Clinometers
Nineteenth-century tools with a variety of uses
Grades 5 to 11 (Ontario)
Elementary cycle 3 to secondary cycle 2 (Quebec)
Clinometers were used by early surveyors, explorers and scientists to quickly estimate the incline and height of any objects they encountered. While not as common these days, they are still a useful tool. Find out how you can use a clinometer to determine how tall something is in your everyday life!
With downloadable 3D files and activity sheets, students will explore the clinometer, a 19th century tool. Emphasis is placed on using the clinometer to determine the height of an object as well as using it to determine your latitude.
The 3D printing files can be downloaded individually. Activities and 3D print files for the module can be reproduced as necessary for your classroom.
Share :
Curriculum links
Through this activity, your students will:
- Learn about clinometers and a simple way that you can use it to determine height
- Use the principles of trigonometry (specifically the tangent function) to estimate the height of an object
- Learn how determine the solar altitude (the angle of the Sun above the horizon) using a clinometer
- Students will then be able to use this value to approximate the latitude where they are found
Grade 5
- Mathematics
- Geometry and spatial sense
Grade 7
- Mathematics
- Geometry and spatial sense
Grade 10
- Mathematics
- Academic and applied (Trigonometry)
Grade 11
- Geography
- Introduction to spatial technologies
Primary cycle 3 to Secondary cycle 5
How high is that? (Simple method)
In this activity, you and your students will build a clinometer and learn how to use it to determine the height of an object. There are two versions of this activity, a simple one and an advanced one that uses trigonometric functions.
Materials
- Glue stick
- Tape measure
- 3D printout of clinometer
- Printout of clinometer label
Instructions
Constructing the clinometer
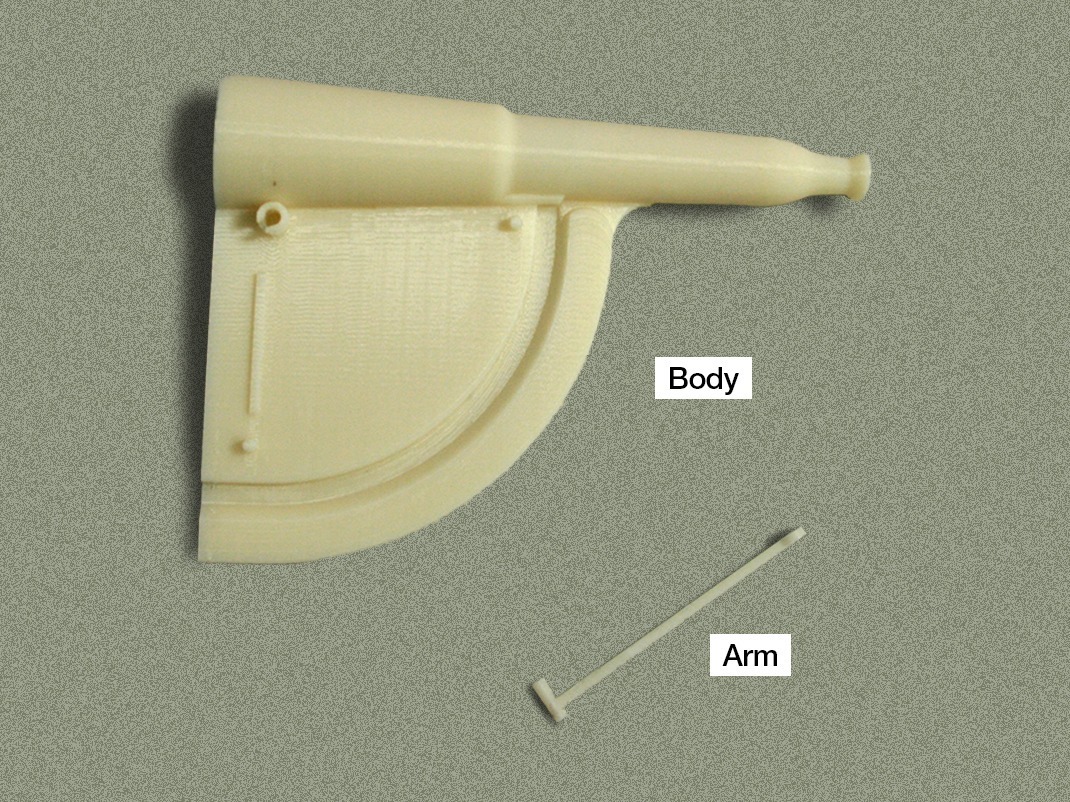
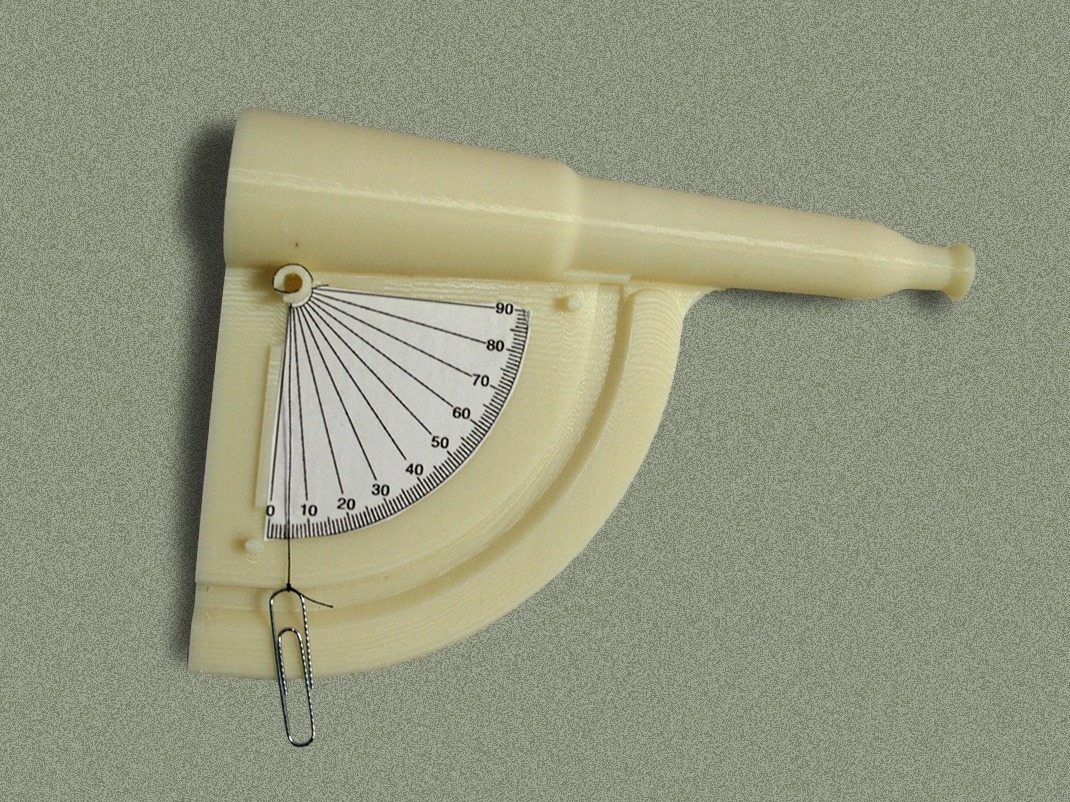
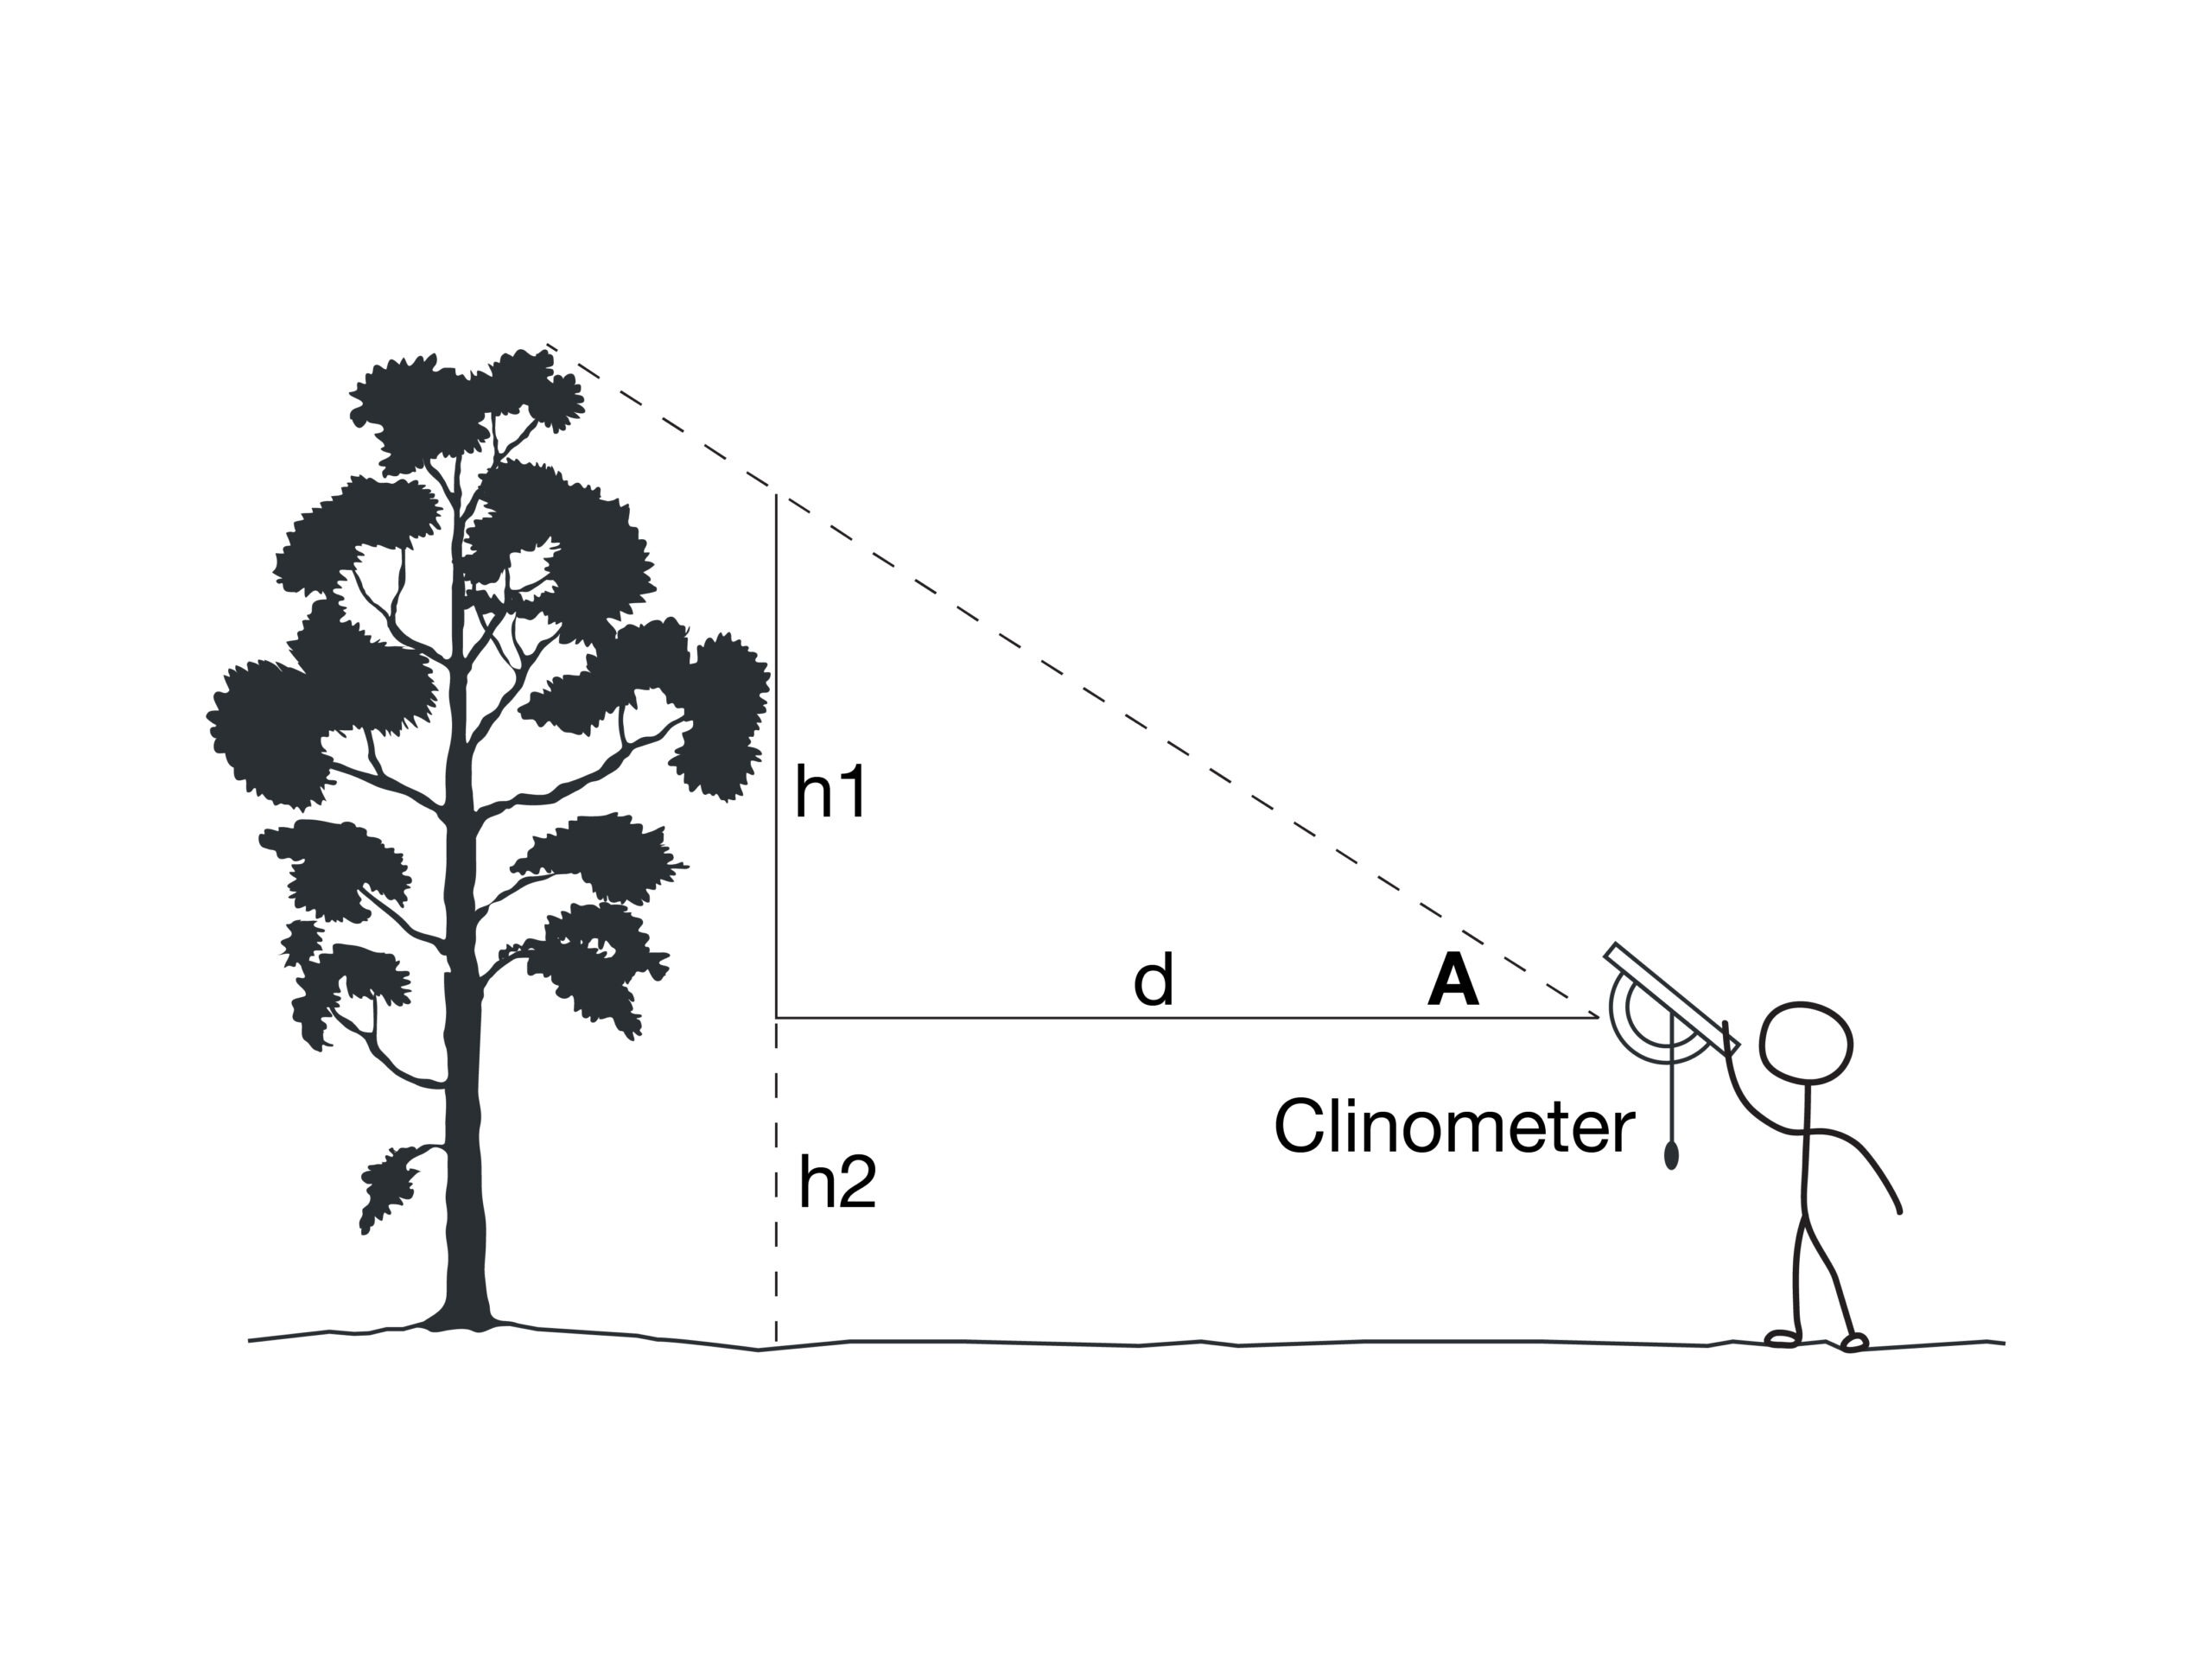
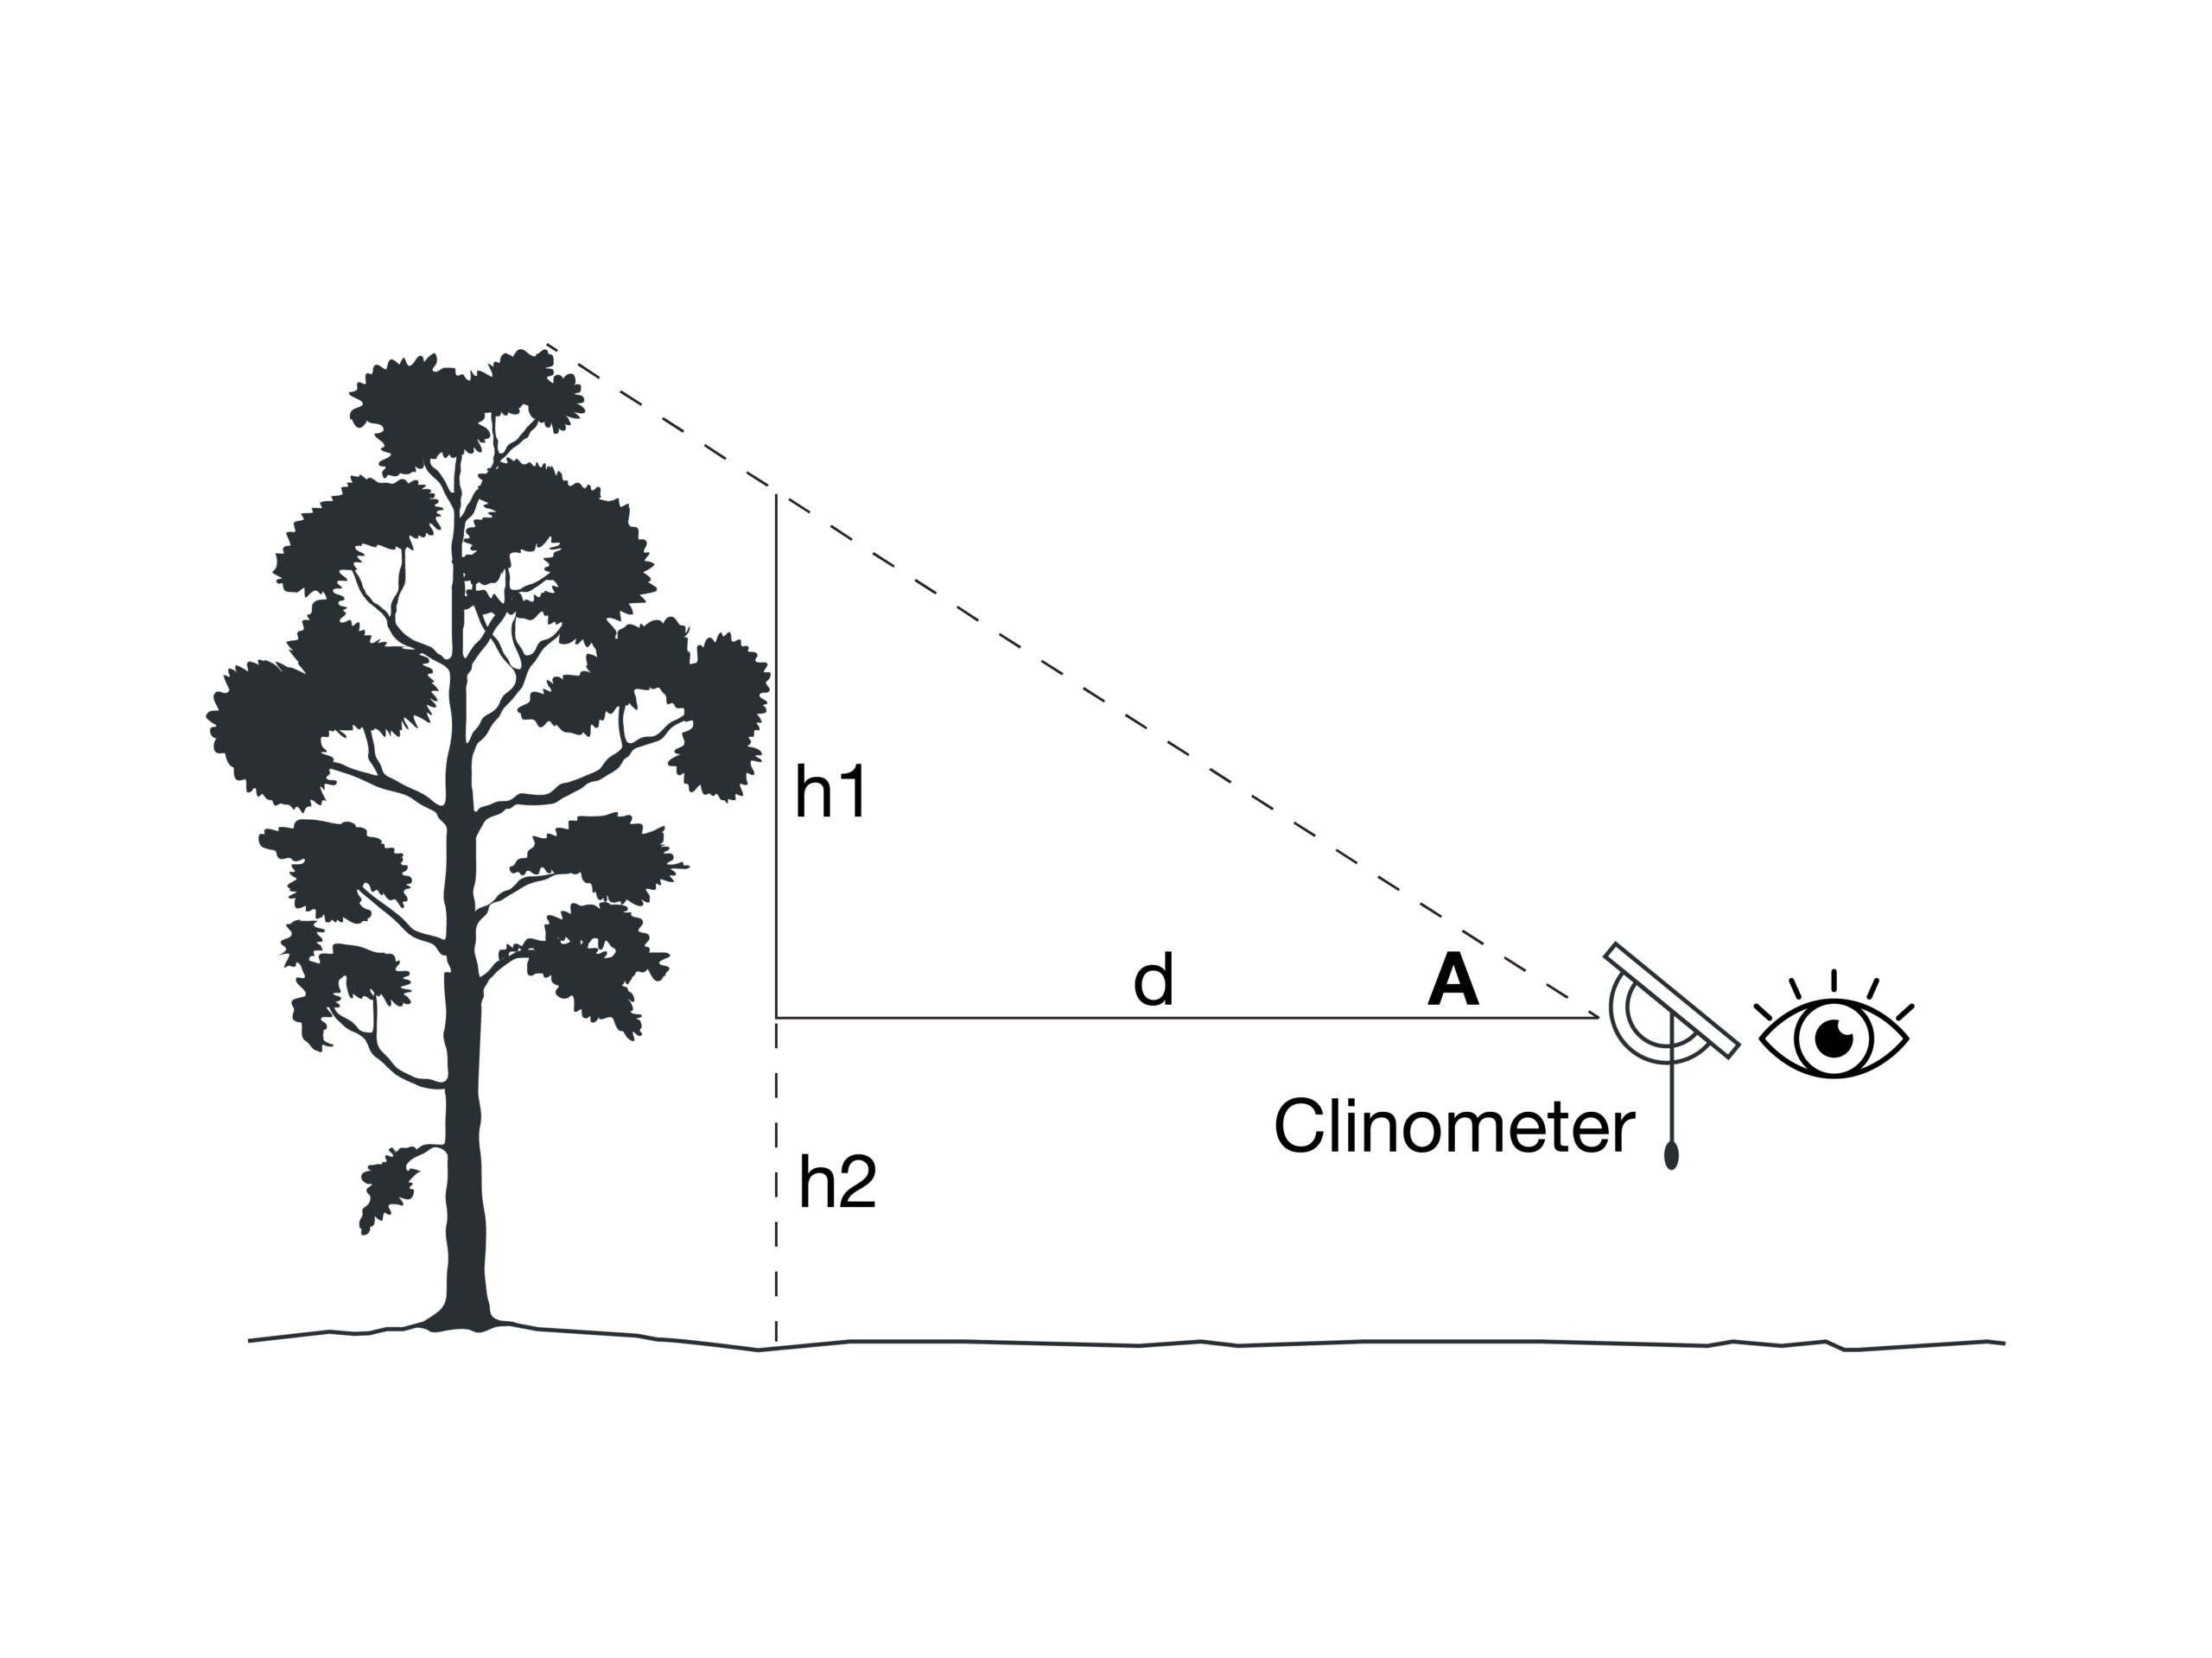
- The naming conventions outlined in the image to the right will be used in these instructions.
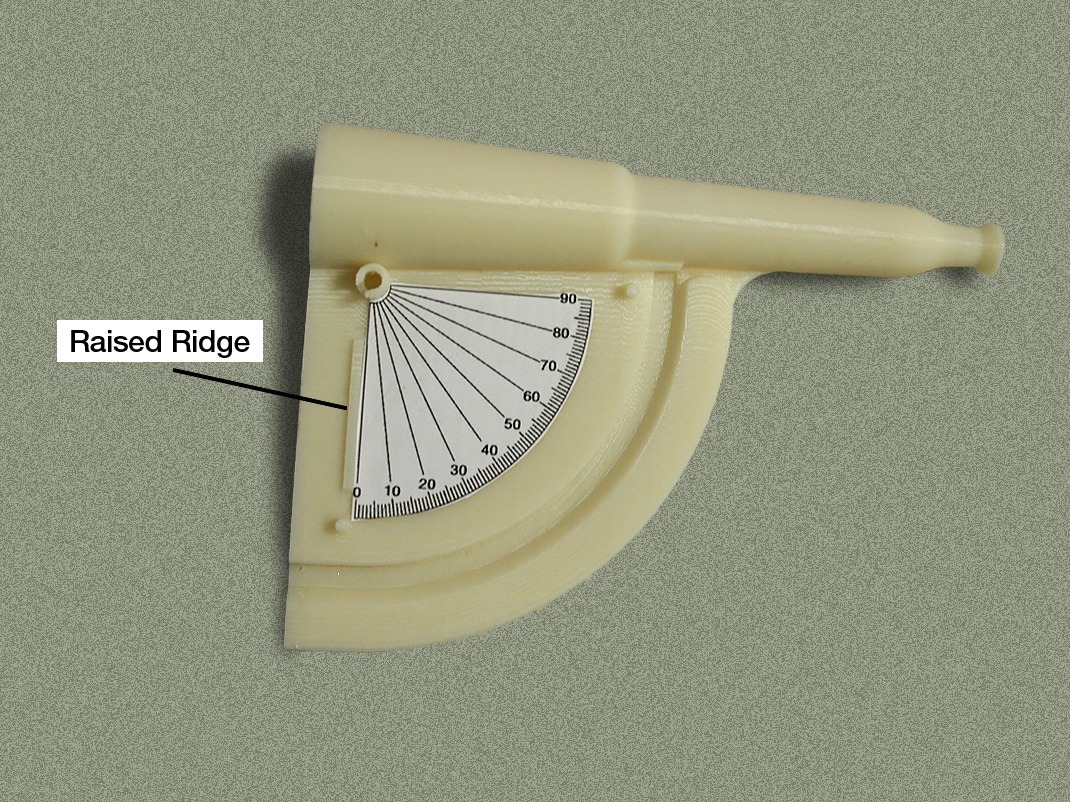
- Paste the clinometer label on to the body of clinometer with the glue stick. Place the label so that the edge of the “0” line is flat against the raised ridge and the round cut-out portion at the top of the label is flush against the hole (see image below). This ensures that the measurements are accurate.
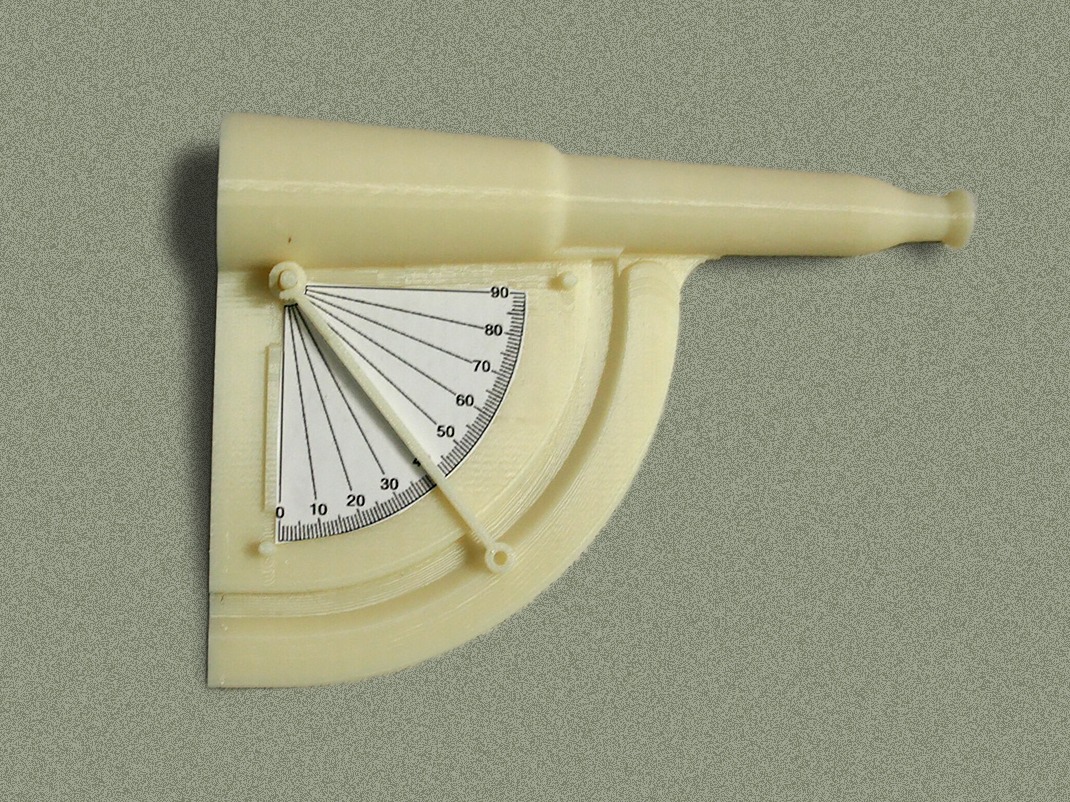
- Insert the arm of the clinometer into the hole found on in the body of the clinometer. Make sure that the shorter end goes in first. If the arm does not move freely you might have put it in backwards.
Note: If you do not wish to use the arm (or if the arm breaks), an alternate way to do step 3 is to tie a piece of thread around the rim of the hole on the body of the clinometer and, on the other end of the thread, attach a weight (such as a paper clip or washer).
- As you tilt the clinometer the arm of the clinometer will point down. The number that it points to represents the angle that the clinometer is tilted above the horizon. Try it out! Make sure to hold the clinometer in a way so that the arm does not drag along the surface of the main body.
Measuring height
Note: This activity is best done with 2 people working together.
- Pick a nearby object that you wish to measure the height of and face it.
- Look through the clinometer and slowly tilt it up until it reaches 45 degrees.
- Walk toward the object while maintaining the clinometer at a 45-degree angle. This is where the second person can help out by making sure that the person with the clinometer does not trip over anything.
- Stop walking once the top of the object is seen through the centre of the view piece of the clinometer.
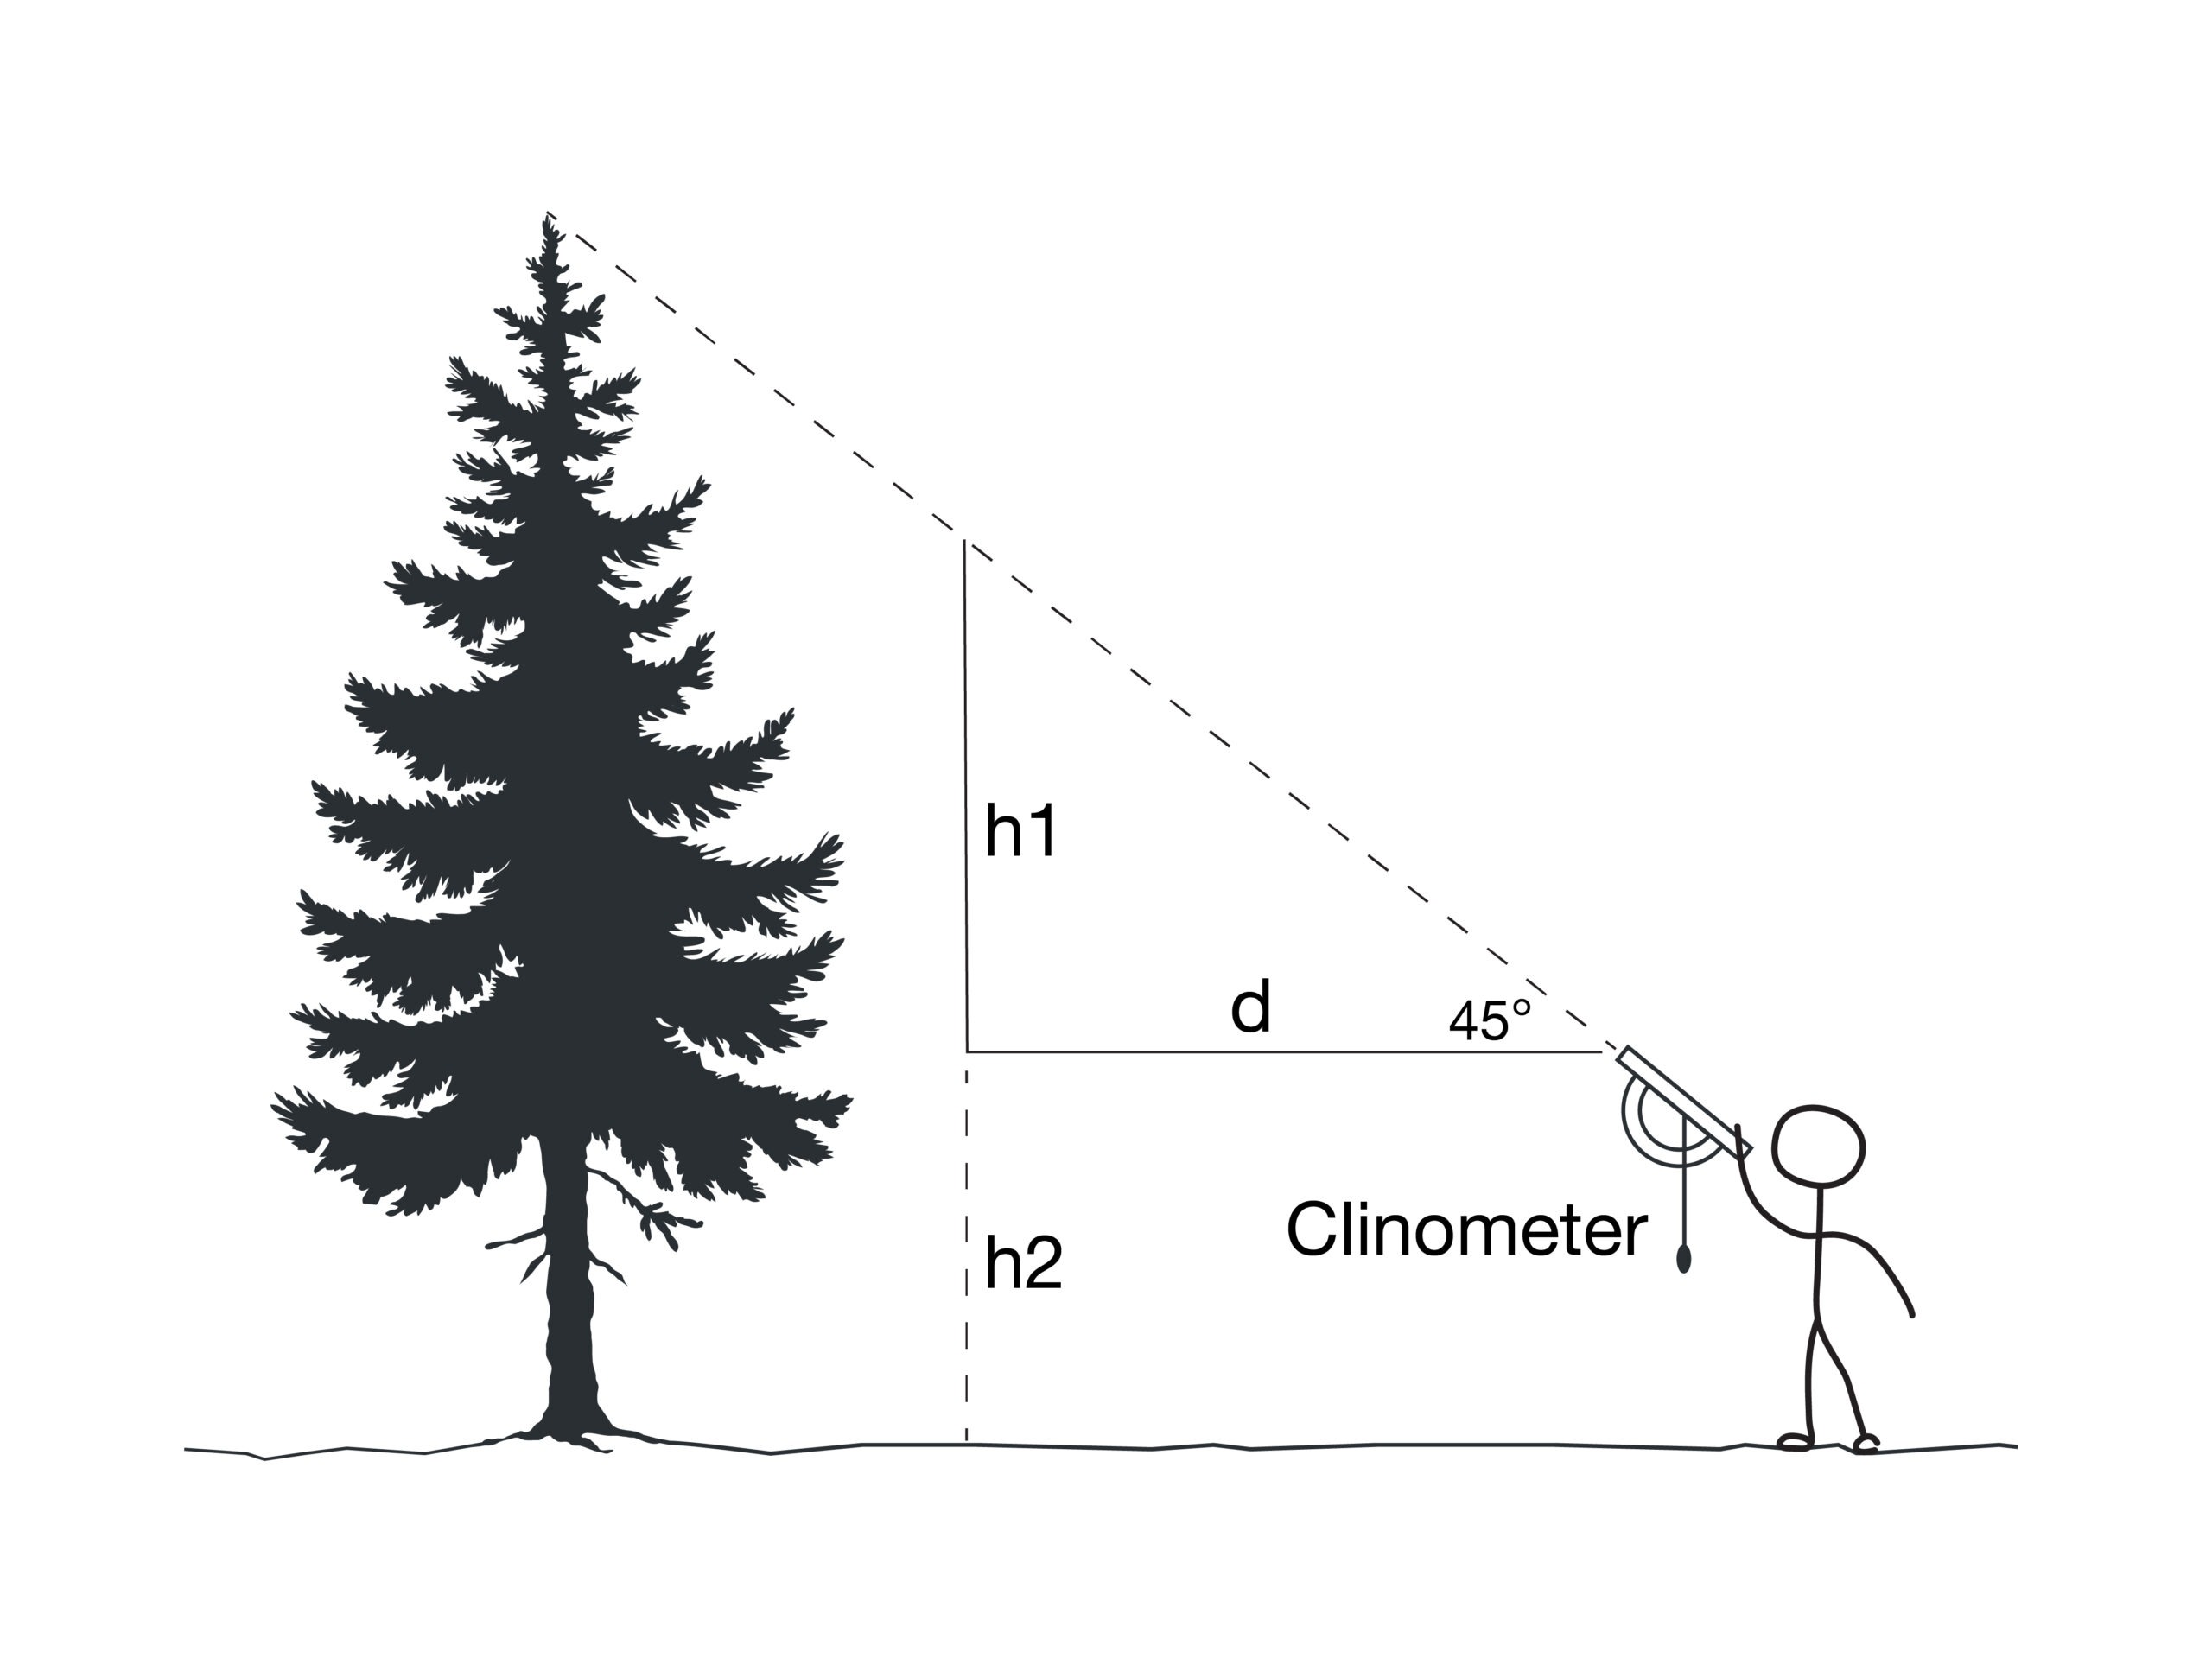
- Measure the distance between the person with the clinometer and the object (d in the image above). This is equal to the height of the object from the level of the clinometer (h1). Why is this?
- This height that you determined is not the actual height of the object. To get the actual height you need to add the distance from the ground to whatever level the clinometer was at when the measurement was made (h2 in the image above).
Scientific explanation
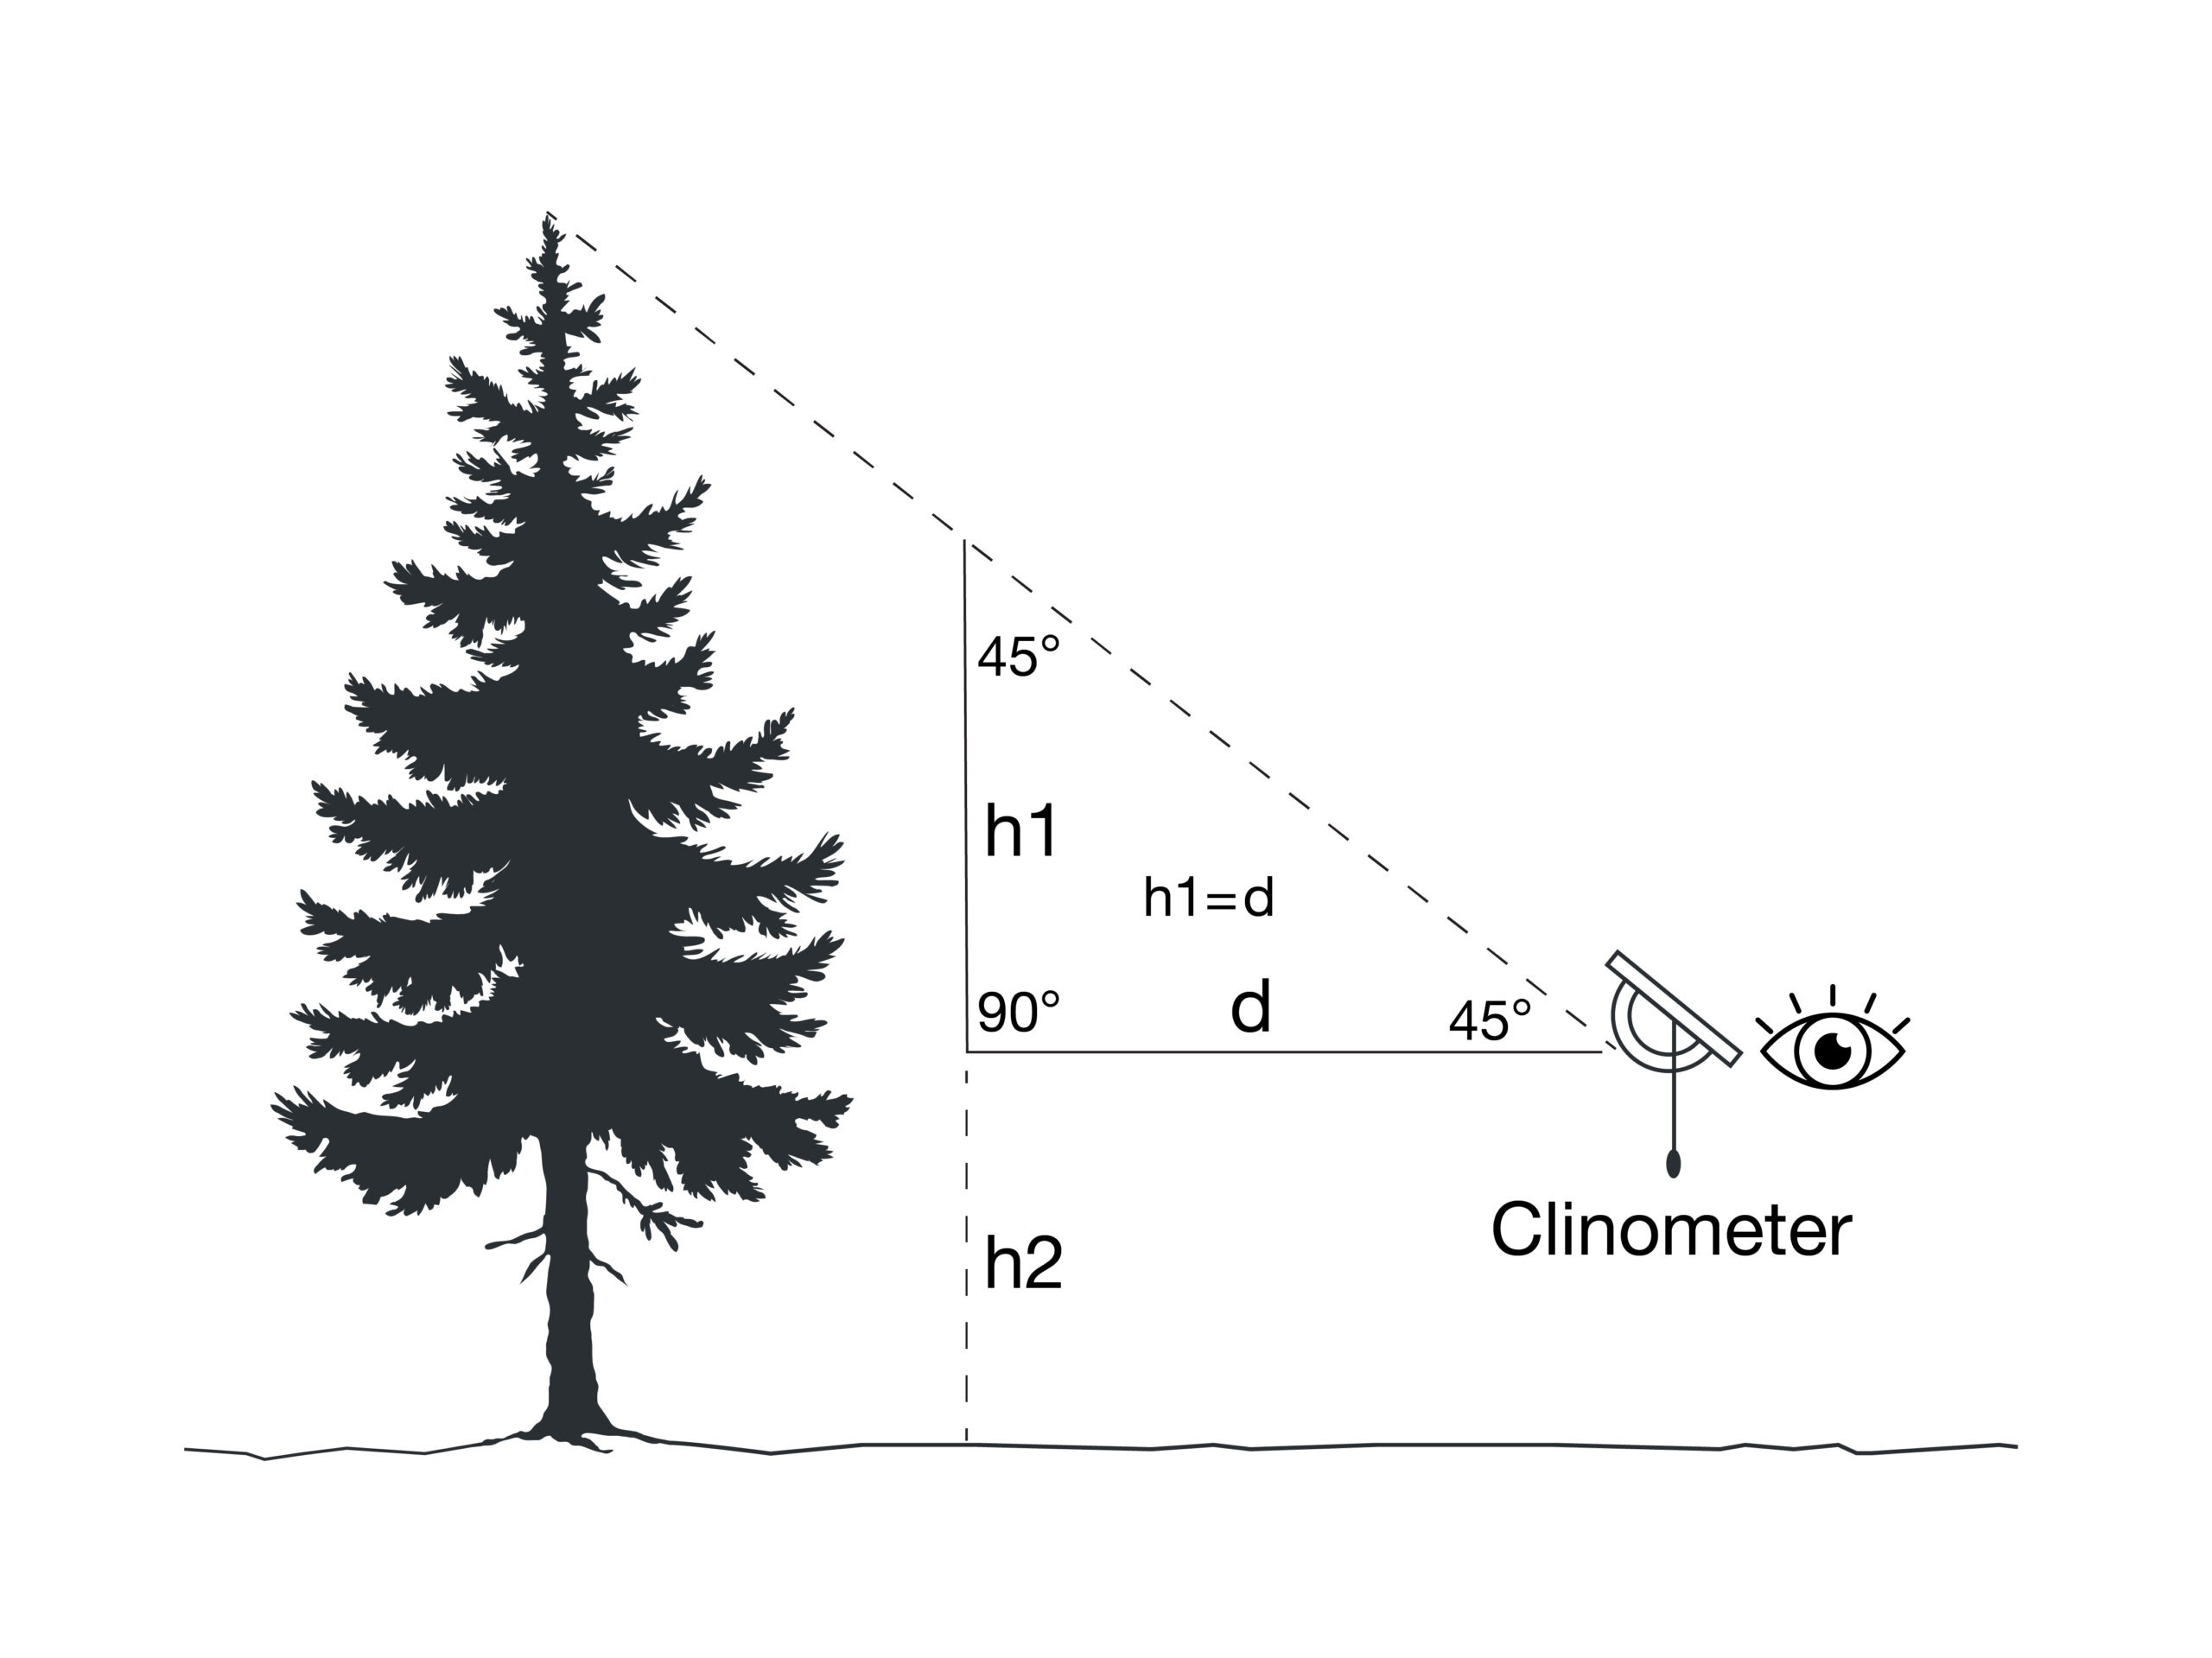
Trigonometry is the basis of how the clinometer works. In this activity, the individual walks with the clinometer at a 45-degree angle until the top of the object is seen, for this explanation we’ll assume that it is a tree. At this point, it forms a triangle which has one angle at 90 degrees and the other two at 45 degrees. This is an isosceles triangle and the two sides of the triangle that touch the 90-degree angle are of equal length (see diagram). These two distances represent the distance between the clinometer and tree (d), and the height between the clinometer and top of the tree (h1), which is how you determine the h1 in this activity.
As indicated in the instructions, h1 is the not the actual height of the object, it is the distance between the level of the clinometer when it made its measurement and the top of the tree. To get the actual height of the tree, you’ll need to add h2, the distance between the ground and the level of the clinometer (see diagram).
Ingenium has more than 150,000 objects in its collection, including many related to clinometers.
How high is that? (Advanced method)
Clinometers were used by early surveyors, explorers and scientists to quickly estimate the incline and height of any objects they encountered. While not as common these days, they are still a useful tool. Find out how you can use a clinometer to determine how tall something is in your everyday life!
Materials
- Glue stick
- Tape measure
- Calculator
- 3D printout of clinometer
- Printout of clinometer label
Instructions
Constructing the clinometer
- Follow the instructions above in the section “How high is that? (Simple method)”.
Measuring height
- Pick a nearby object that you wish to measure the height and stand a certain distance from that object.
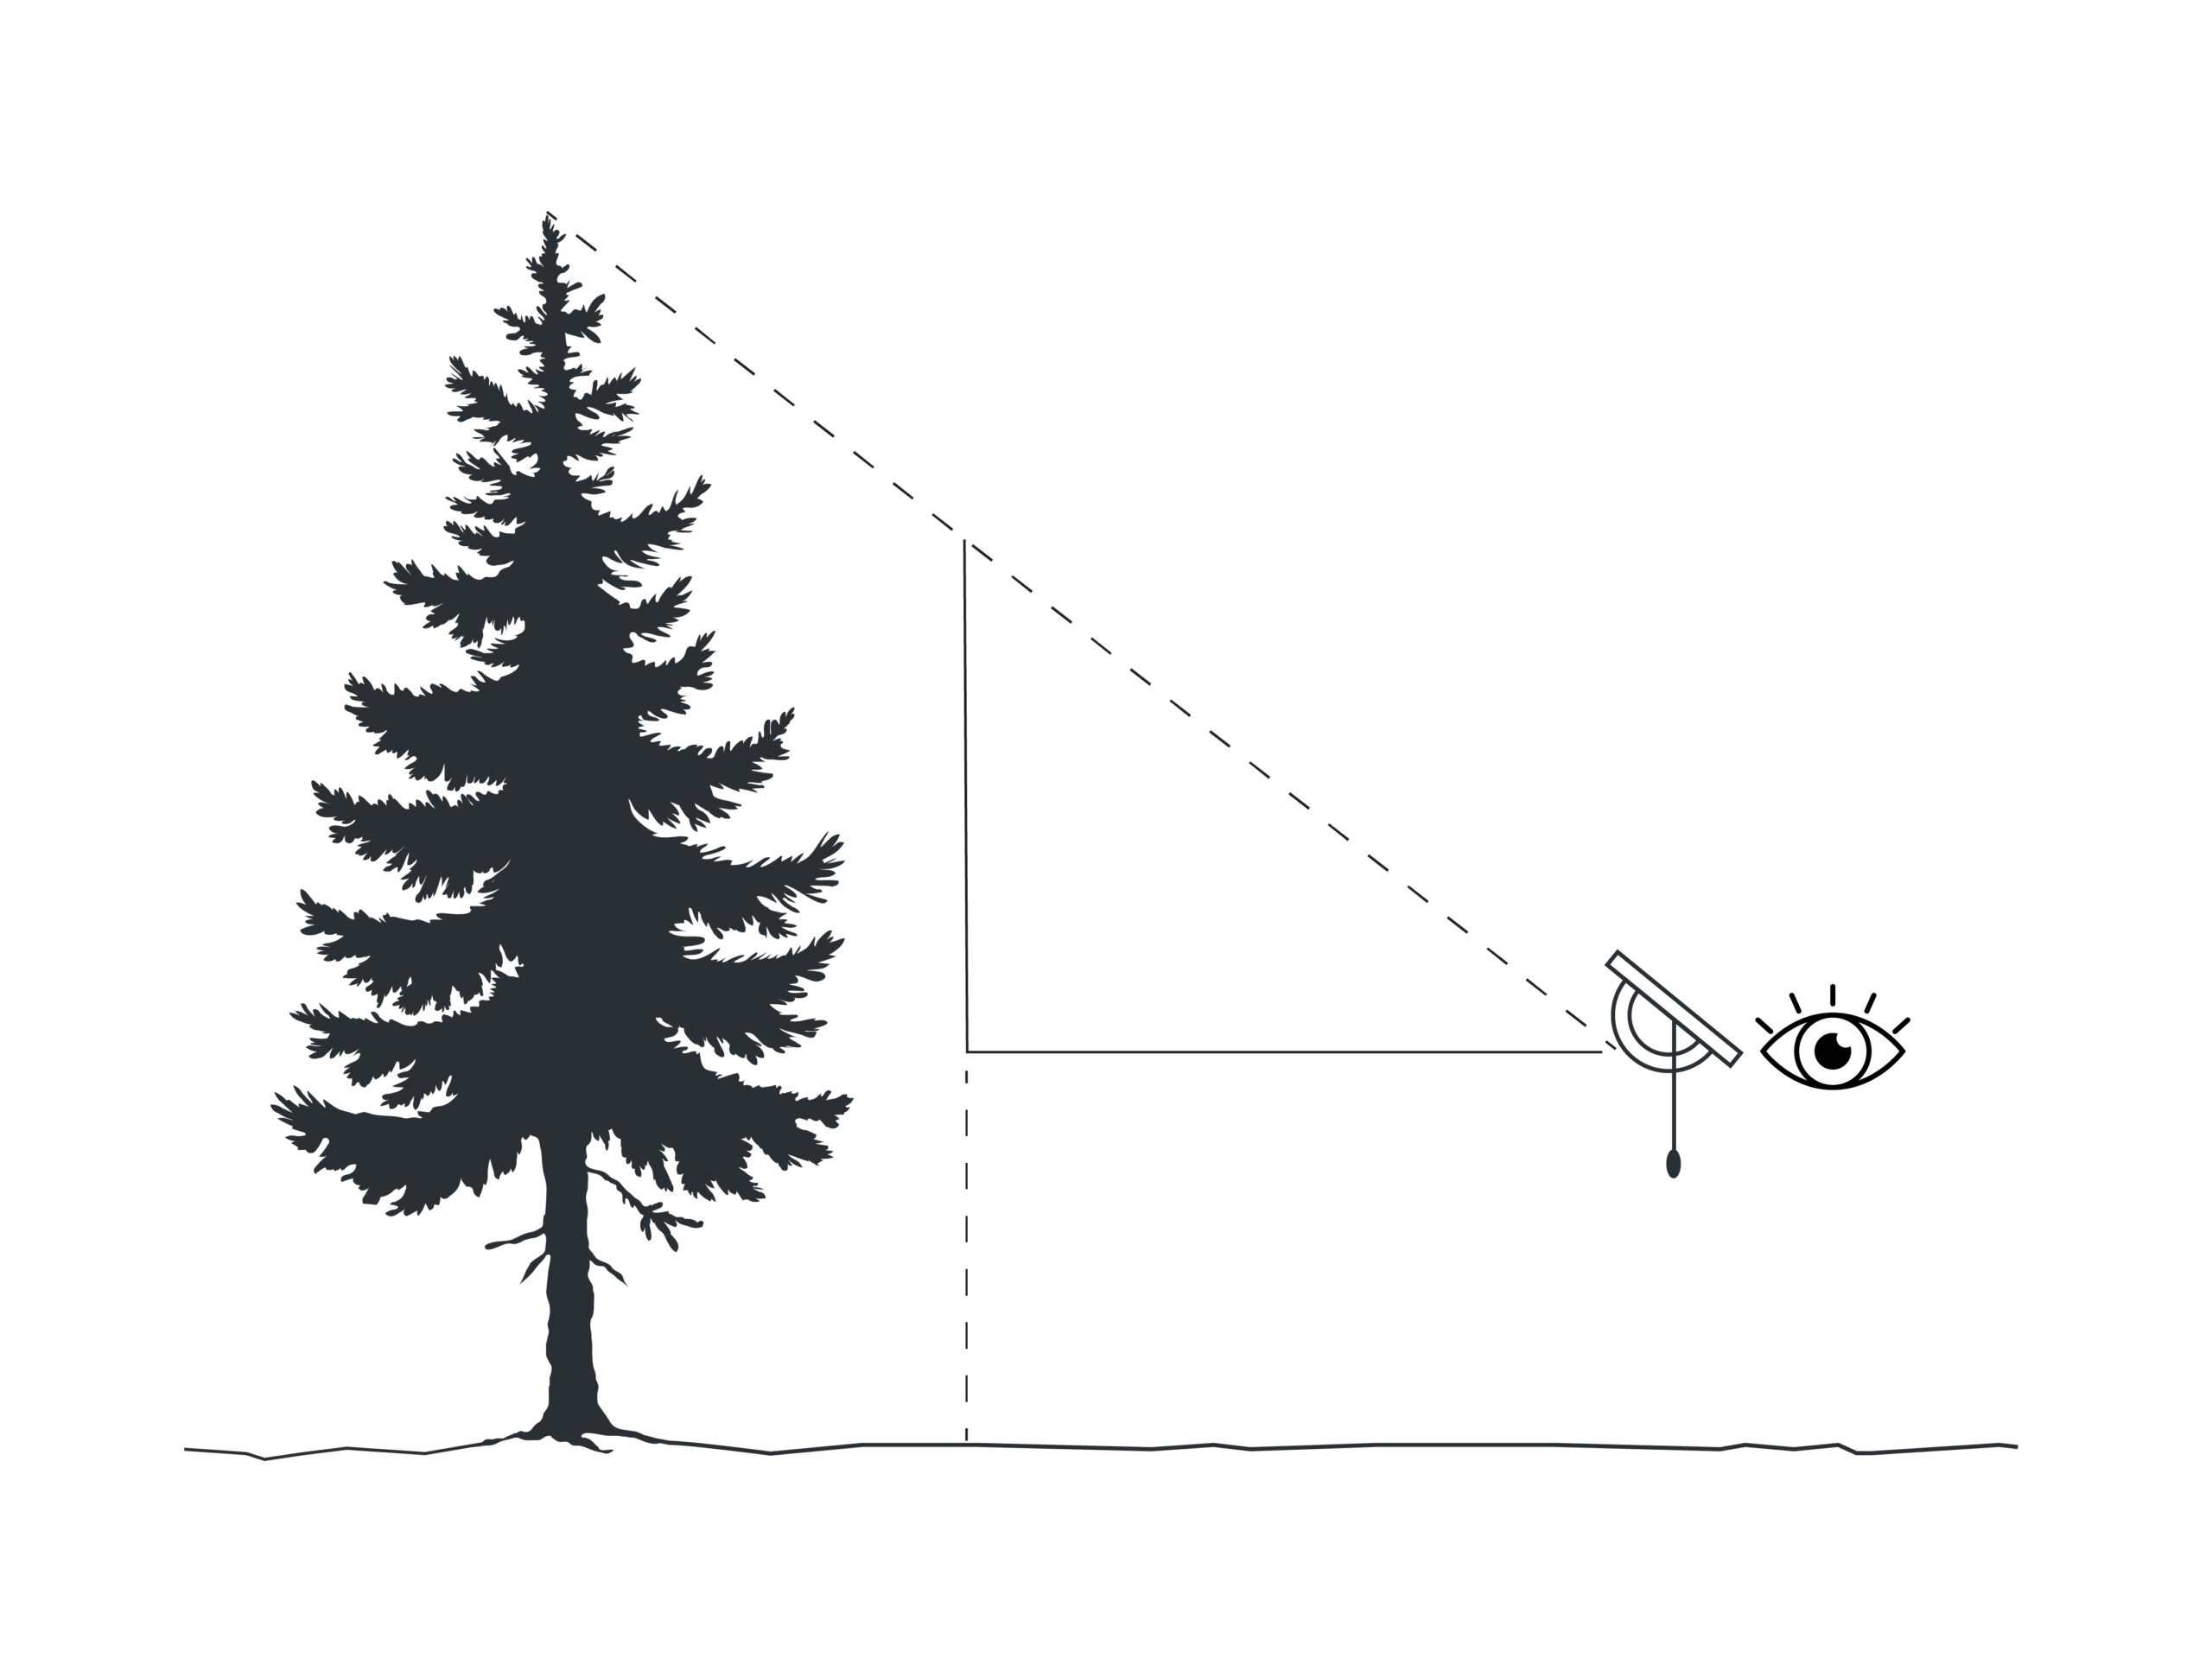
- Look through the clinometer so that the top of the object that you wish to measure the height of is in the centre of the view piece.
- Record the angle that the arm of the clinometer indicates (A in the image). If you’re having problem reading the angle, hold the arm against the label once it stops moving.
- Measure the distance between yourself and the object (d in the image above).
- To determine the height of the object above the level of the clinometer (h1 in the image), use the following equation:Height (h1) = Distance between person and object (d) x tan(angle A)
- Can you explain why this equation works?This height that you determined is not the actual height of the object. To get the actual height you need to add the distance from the ground to whatever level the clinometer was at when the measurement was made (h2 in the image).
Try this!
The original function of the clinometer from which the 3D model was scanned from was to measure the cloud base height (the height of the bottom of a cloud). You can still try this out. The only addition piece of equipment that you need is a very powerful light (like a handheld spotlight) and a second person.
Wait until evening and then have the second person stand beneath some clouds and shine the light straight up in the air. You should see a bright spot where the light is hitting the bottom of the cloud. Now use the previous instructions to determine the height of the bright spot. Because of how high the clouds are you probably need to be standing 100 m or so away from the second person.
Scientific explanation
Trigonometry is the basis of how the clinometer works. When measuring the height of something (such as a tree) a right-angle triangle is formed by the distance between the clinometer and the tree (d), the height of the tree above the clinometer (h1) and the diagonal line between the top of the tree and the clinometer (see diagram).
In a right-angled triangle, the tangent of one of the non-90˚ angles is equal to the ratio of the length of the side of the triangle opposite to the angle to the length of the side of the triangle adjacent to the angle:
tan(angle) = Opposite Length ÷ Adjacent Length
If we substitute the labels that we used in the diagram above, we have:
tan(angle A) = h1 ÷ d
This can be rearranged to:
h1 = d x tan(angle A)
We can measure d. The clinometer measures angle A. With these two variables known, h1 can be calculated.
As indicated in the instructions, h1 is the not the actual height of the object, it is the distance between the level of the clinometer when it made its measurement and the top of the object. To get the actual height of the object, you’ll need to add h2, the distance between the group and the level of the clinometer.
Ingenium has more than 150,000 objects in its collection, including many related to clinometers.
Determining your location
We have many modern technologies to determine our location. But, what would we do if we did not have our gadgets? One way would be with the Sun. Learn how to do this in this activity!
Materials
- Glue stick
- Tape measure (optional)
- Calculator
- 3D printout of clinometer
- Printout of clinometer label
Constructing the clinometer
- Follow the instructions above in the section “How high is that? (Simple method)”.
Determining latitude
You can use solar altitude (the angle of the Sun above the horizon) to determine the latitude where you and your students are located.
Calculating solar altitude
Two potential methods to determine the solar altitude can be found below. The first method is more direct, but more difficult.
Note: For either method, the most important thing to ensure is to not look directly at the Sun. This can cause damage to your eyes.
Solar altitude 1: The direct method
- Hold the clinometer in front of you in a way that you can see the shadow of the clinometer on the ground. At this point the shadow should be completely solid. To help illustrate this, we’ve included a photo of the shadow on a piece of white plastic (see image on the right).
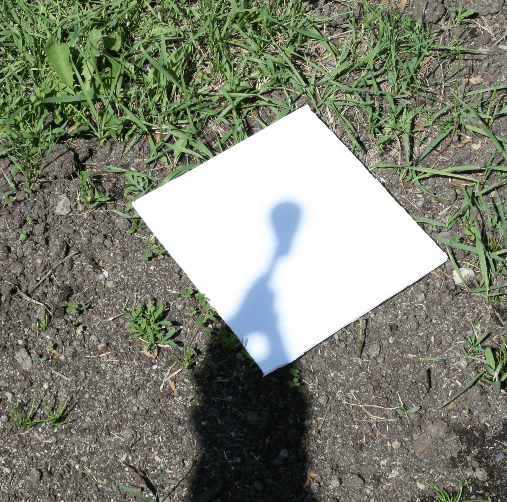
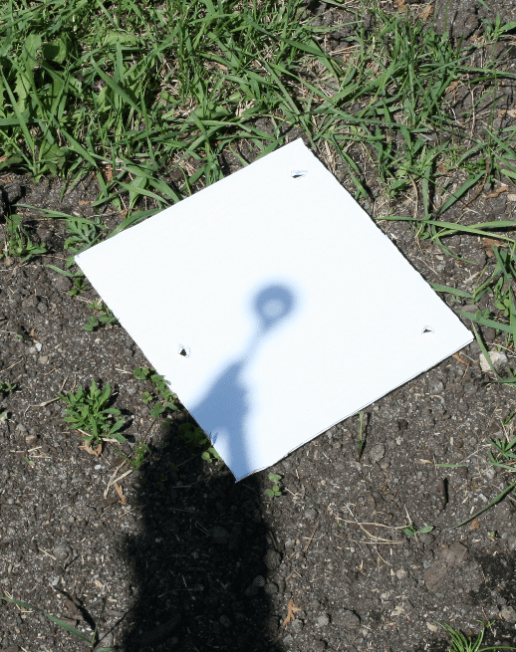
- Angle the clinometer to allow light to shine through the tub. This is a bit tricky, but when you have succeeded, you should see a small circle of light on the ground in the middle of the clinometer’s shadow (see image above, on the right).
- Read the angle that the arms points to, this is the solar altitude.
Solar altitude 2: The indirect method
- Find something that is standing up relatively straight and casting a shadow (such as a tree or sign post).
- Measure the length of the shadow.
- Determine the height of the object using the methodology found in the “Clinometers – How high is that?” activity (either the “simple” or “advanced” one is fine), which is found above.
Note: Do not do this measurement while standing at the tip of the object’s shadow. If you do this, you will likely be looking directly at the Sun. - Use the equation below to determine the solar altitude:Solar altitude = tan-1 (Height of object ÷ Length of shadow)
Try this!
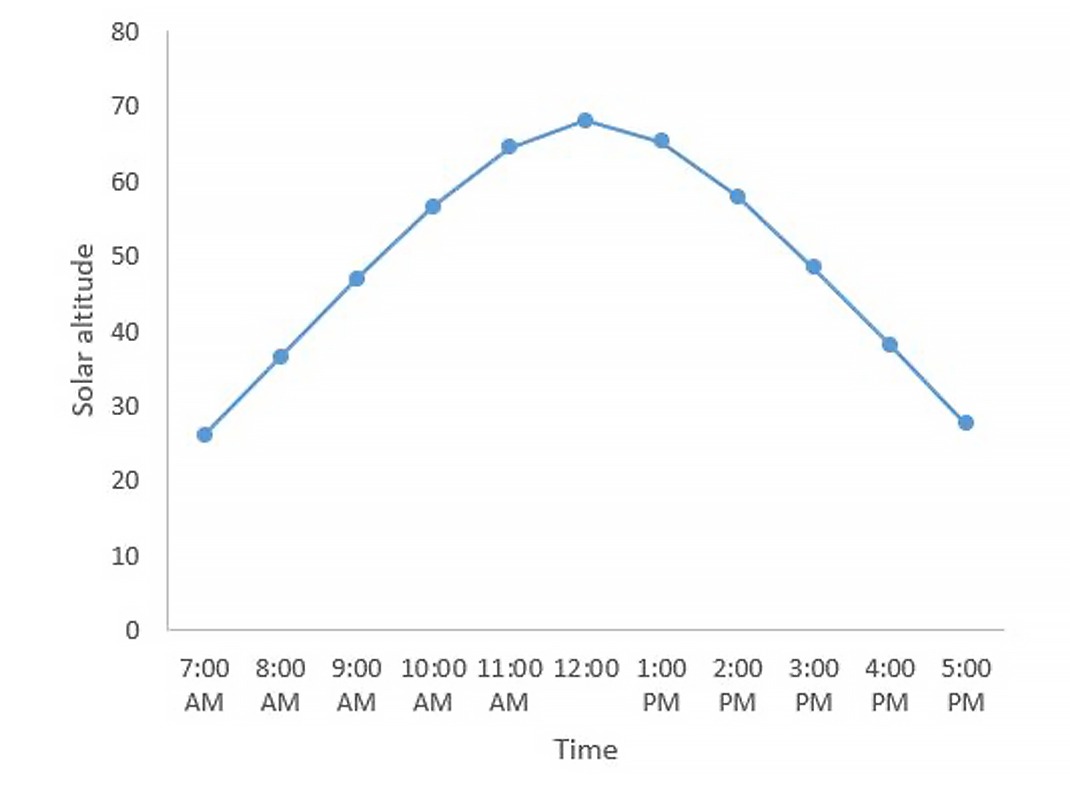
Have your students determine the solar altitude throughout the day. If you plot these points (time being one variable and solar altitude being the other), you can see how the Sun’s position changes. A typical graph can be found below.
Try this!
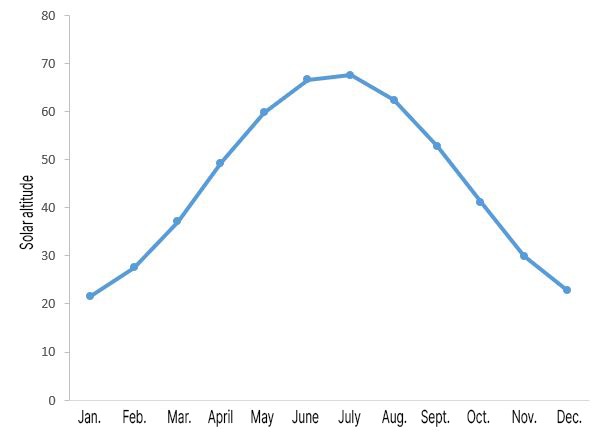
Have your students determine the solar altitude at noon each day (or each week or each month) for a period of time. These values will show the impact of the Earth’s orbit on the solar altitude. For instance, you can find a graph of the solar altitude of the first day of each month for Ottawa, Canada below.
Latitude calculation
Calculate your latitude using the following equation:
Latitude = 90 – Solar altitude +/- Declination
Note: A positive value indicates a latitude in the Northern Hemisphere, while a negative value indicates a latitude in the Southern Hemisphere.
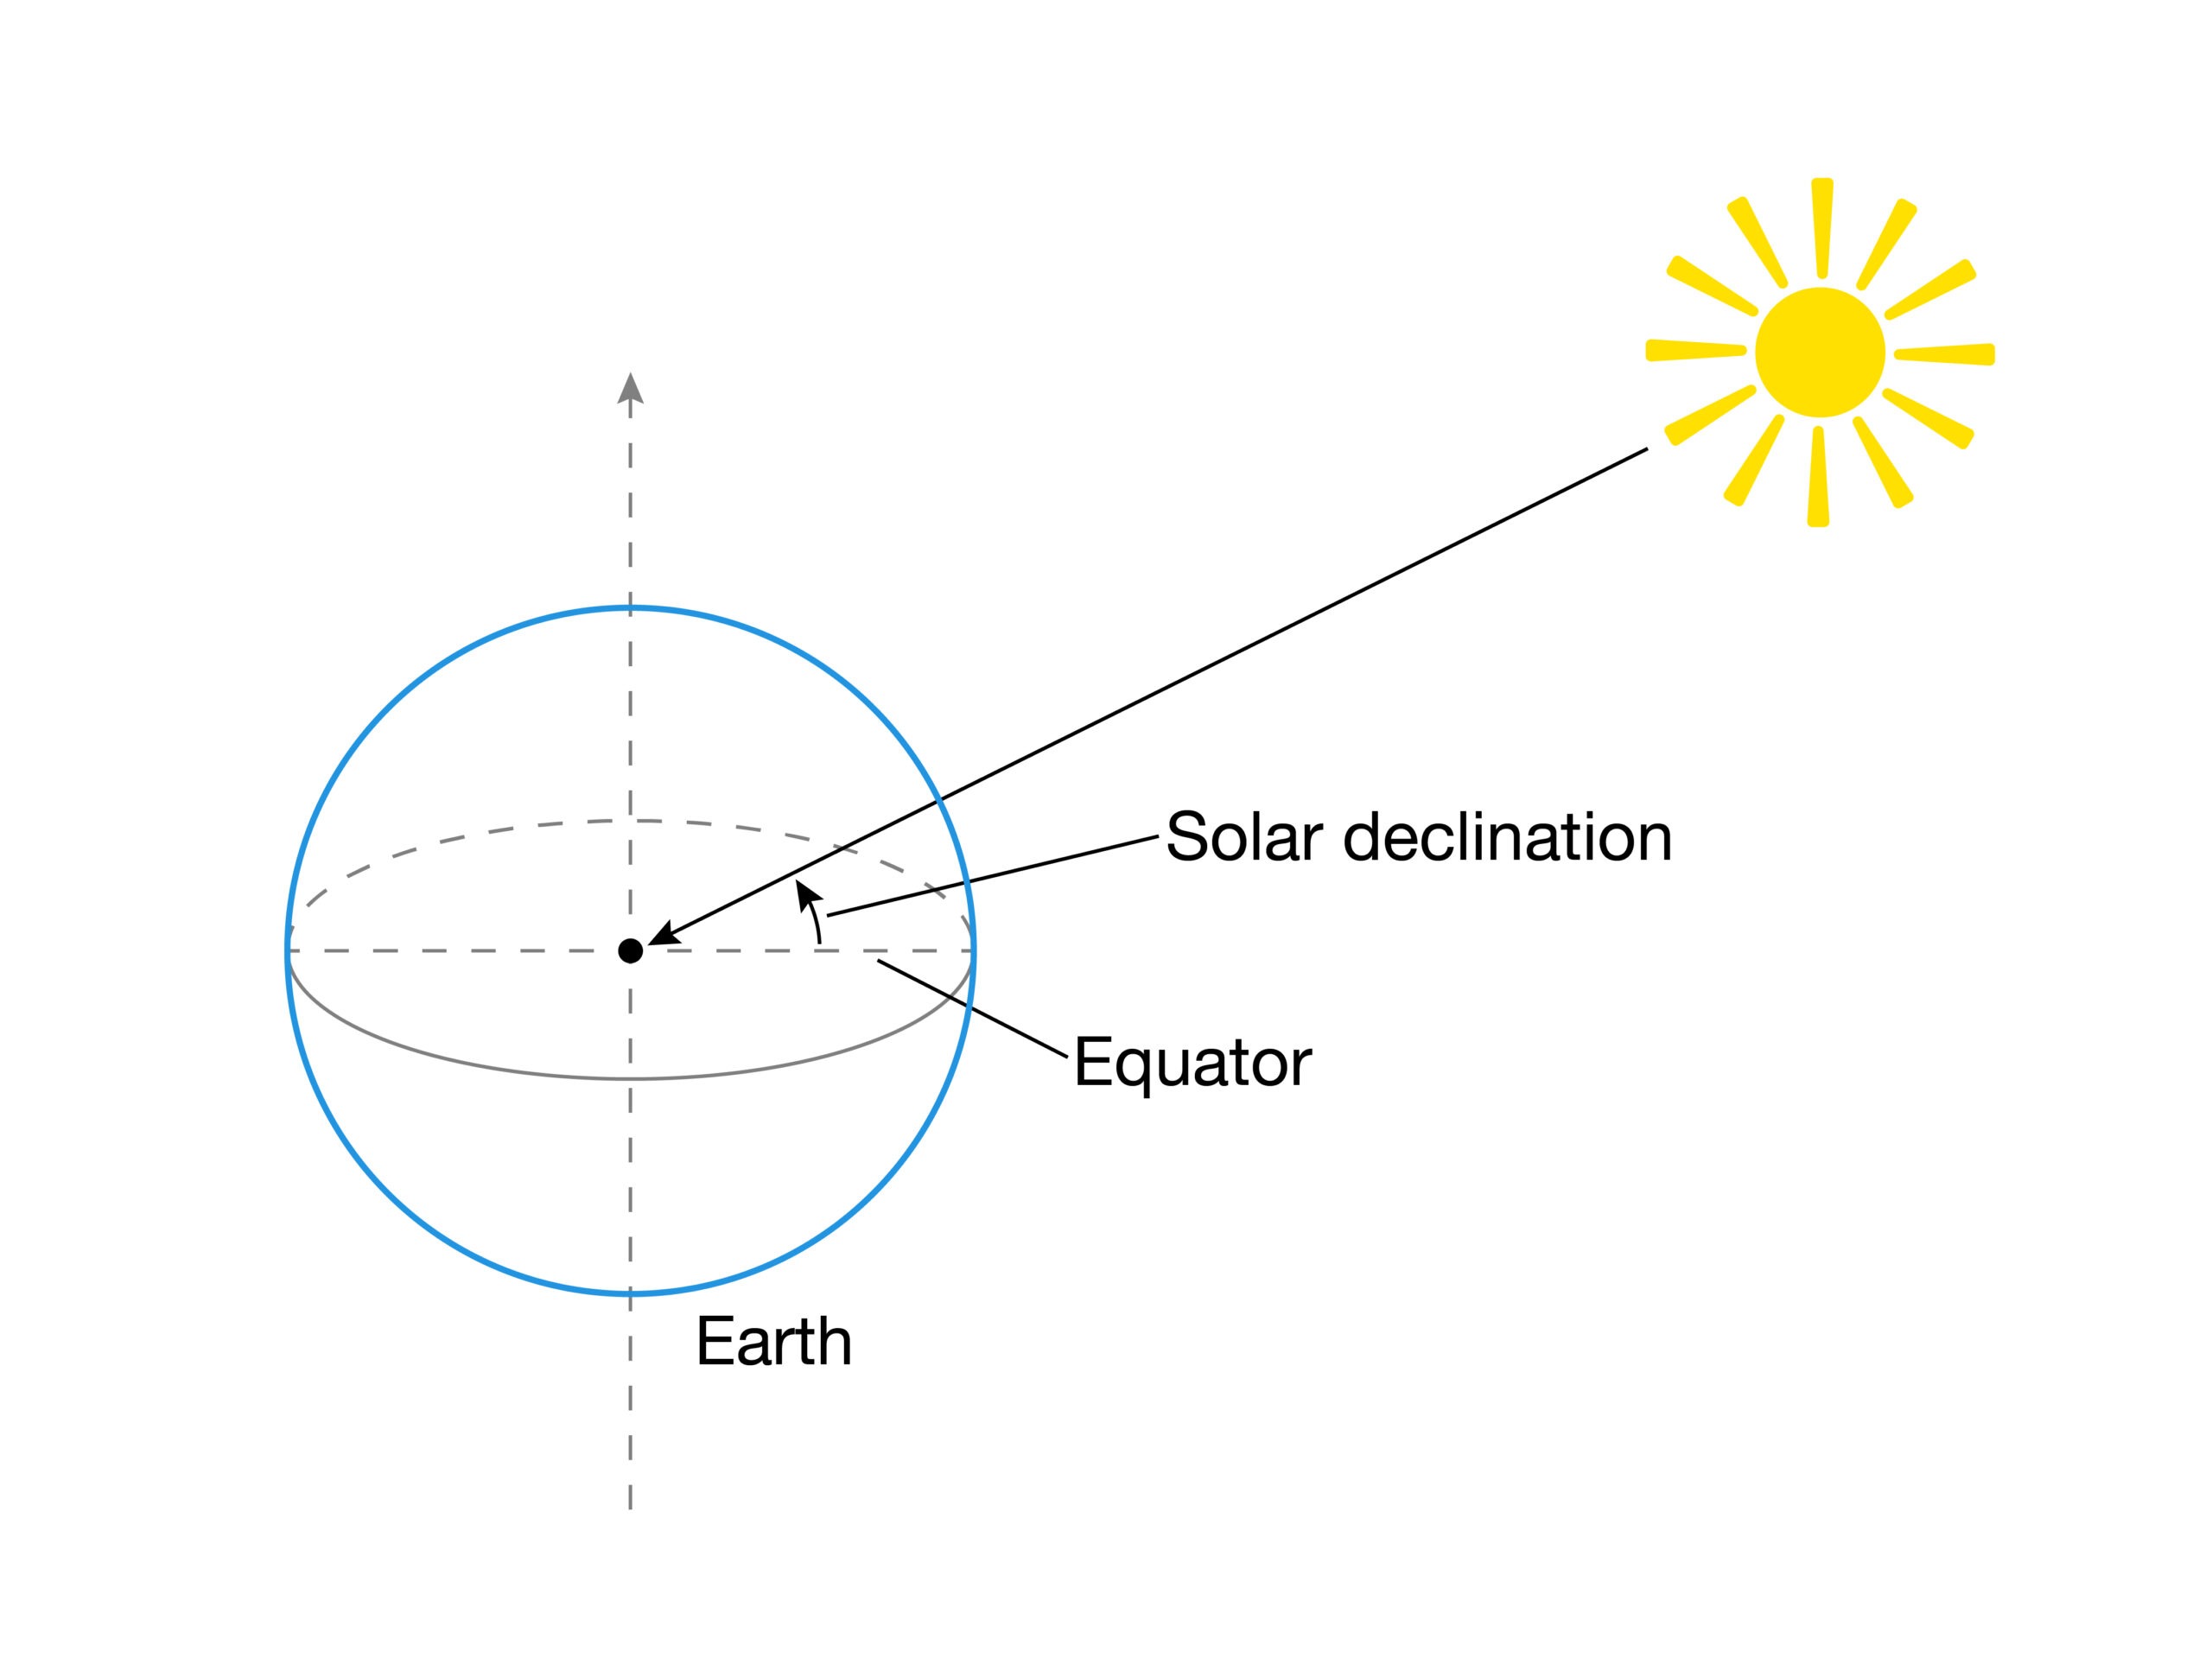
Declination (specifically solar declination) is the angle that the Sun makes with the plane formed by the equator (see image to the right).
Declination is impacted by the tilt of the Earth and its rotation around the Sun. It is positive when the Sun is north of the equator and negative when it is south. To estimate the declination for your day, you can use the equation below:
Declination (in degrees) = -23.45 x cos(360 ÷ 365 x (DOY + 10))
DOY is the day of year number.
For example, for January 1, DOY = 1, January 15 DOY = 15. For February 1, DOY = 32, since there are the 31 day of January plus the first day of February. A DOY calendar can be found here.
Whether or not you add or subtract the declination depends on the time of the year and your position on the Earth. If you are in the Northern Hemisphere and the Sun is to the south of you at midday, then you will be adding the declination (this will always be the case if you are in Canada).
Note: When declination is negative you will be in fact subtracting it (since you will be adding a negative number). Conversely, if you are in the Southern Hemisphere and the Sun is to the north of you, you will be subtracting the declination.
If you are in the Northern Hemisphere and the Sun is to the north of you (this will only happen if you are at a low latitude during the summer), you will subtract the declination. But the latitude that you obtain will be negative, so you will need to take its absolute value (make the value positive).
Similarly, if you are in the Southern Hemisphere and the Sun is to the south of you, will you add the declination and then take the absolute value of the latitude.
Latitude example calculation:
Location: Ottawa, Canada
Date and time: June 1, 2018 at noon
Latitude = 90 – Solar altitude +/- Declination
a) Measured solar altitude = 67 degrees
b) Declination = -23.45 x cos (360 ÷ 365 x (DOY + 10))
For June 1, 2018, the DOY is 152
Declination = -23.45 x cos (360 ÷ 365 x (152 + 10))
= -23.45 x cos (159.78)
= 22
c) Latitude = 90 – Solar altitude +/- Declination
Since we are in Canada, we will be adding the declination:
Latitude = 90 – Solar altitude + Declination
= 90 – 67 + 22
= 45
Since the value is positive, we calculated a latitude of 45˚ N for Ottawa, Canada, which is the correct value.
Scientific explanation
Solar altitude changes during the day
The Earth’s rotation is what causes us to have day and night. As one side of the planet rotates toward the Sun, more of it is exposed to the Sun, causing the Sun to seem like it is rising and thus increasing the solar altitude. At midday, this side of the planet begins to rotate away from the Sun, decreasing its exposure to the Sun, causing the Sun to seem like it is setting and thus decreasing the solar altitude.
Solar altitude changes throughout the year
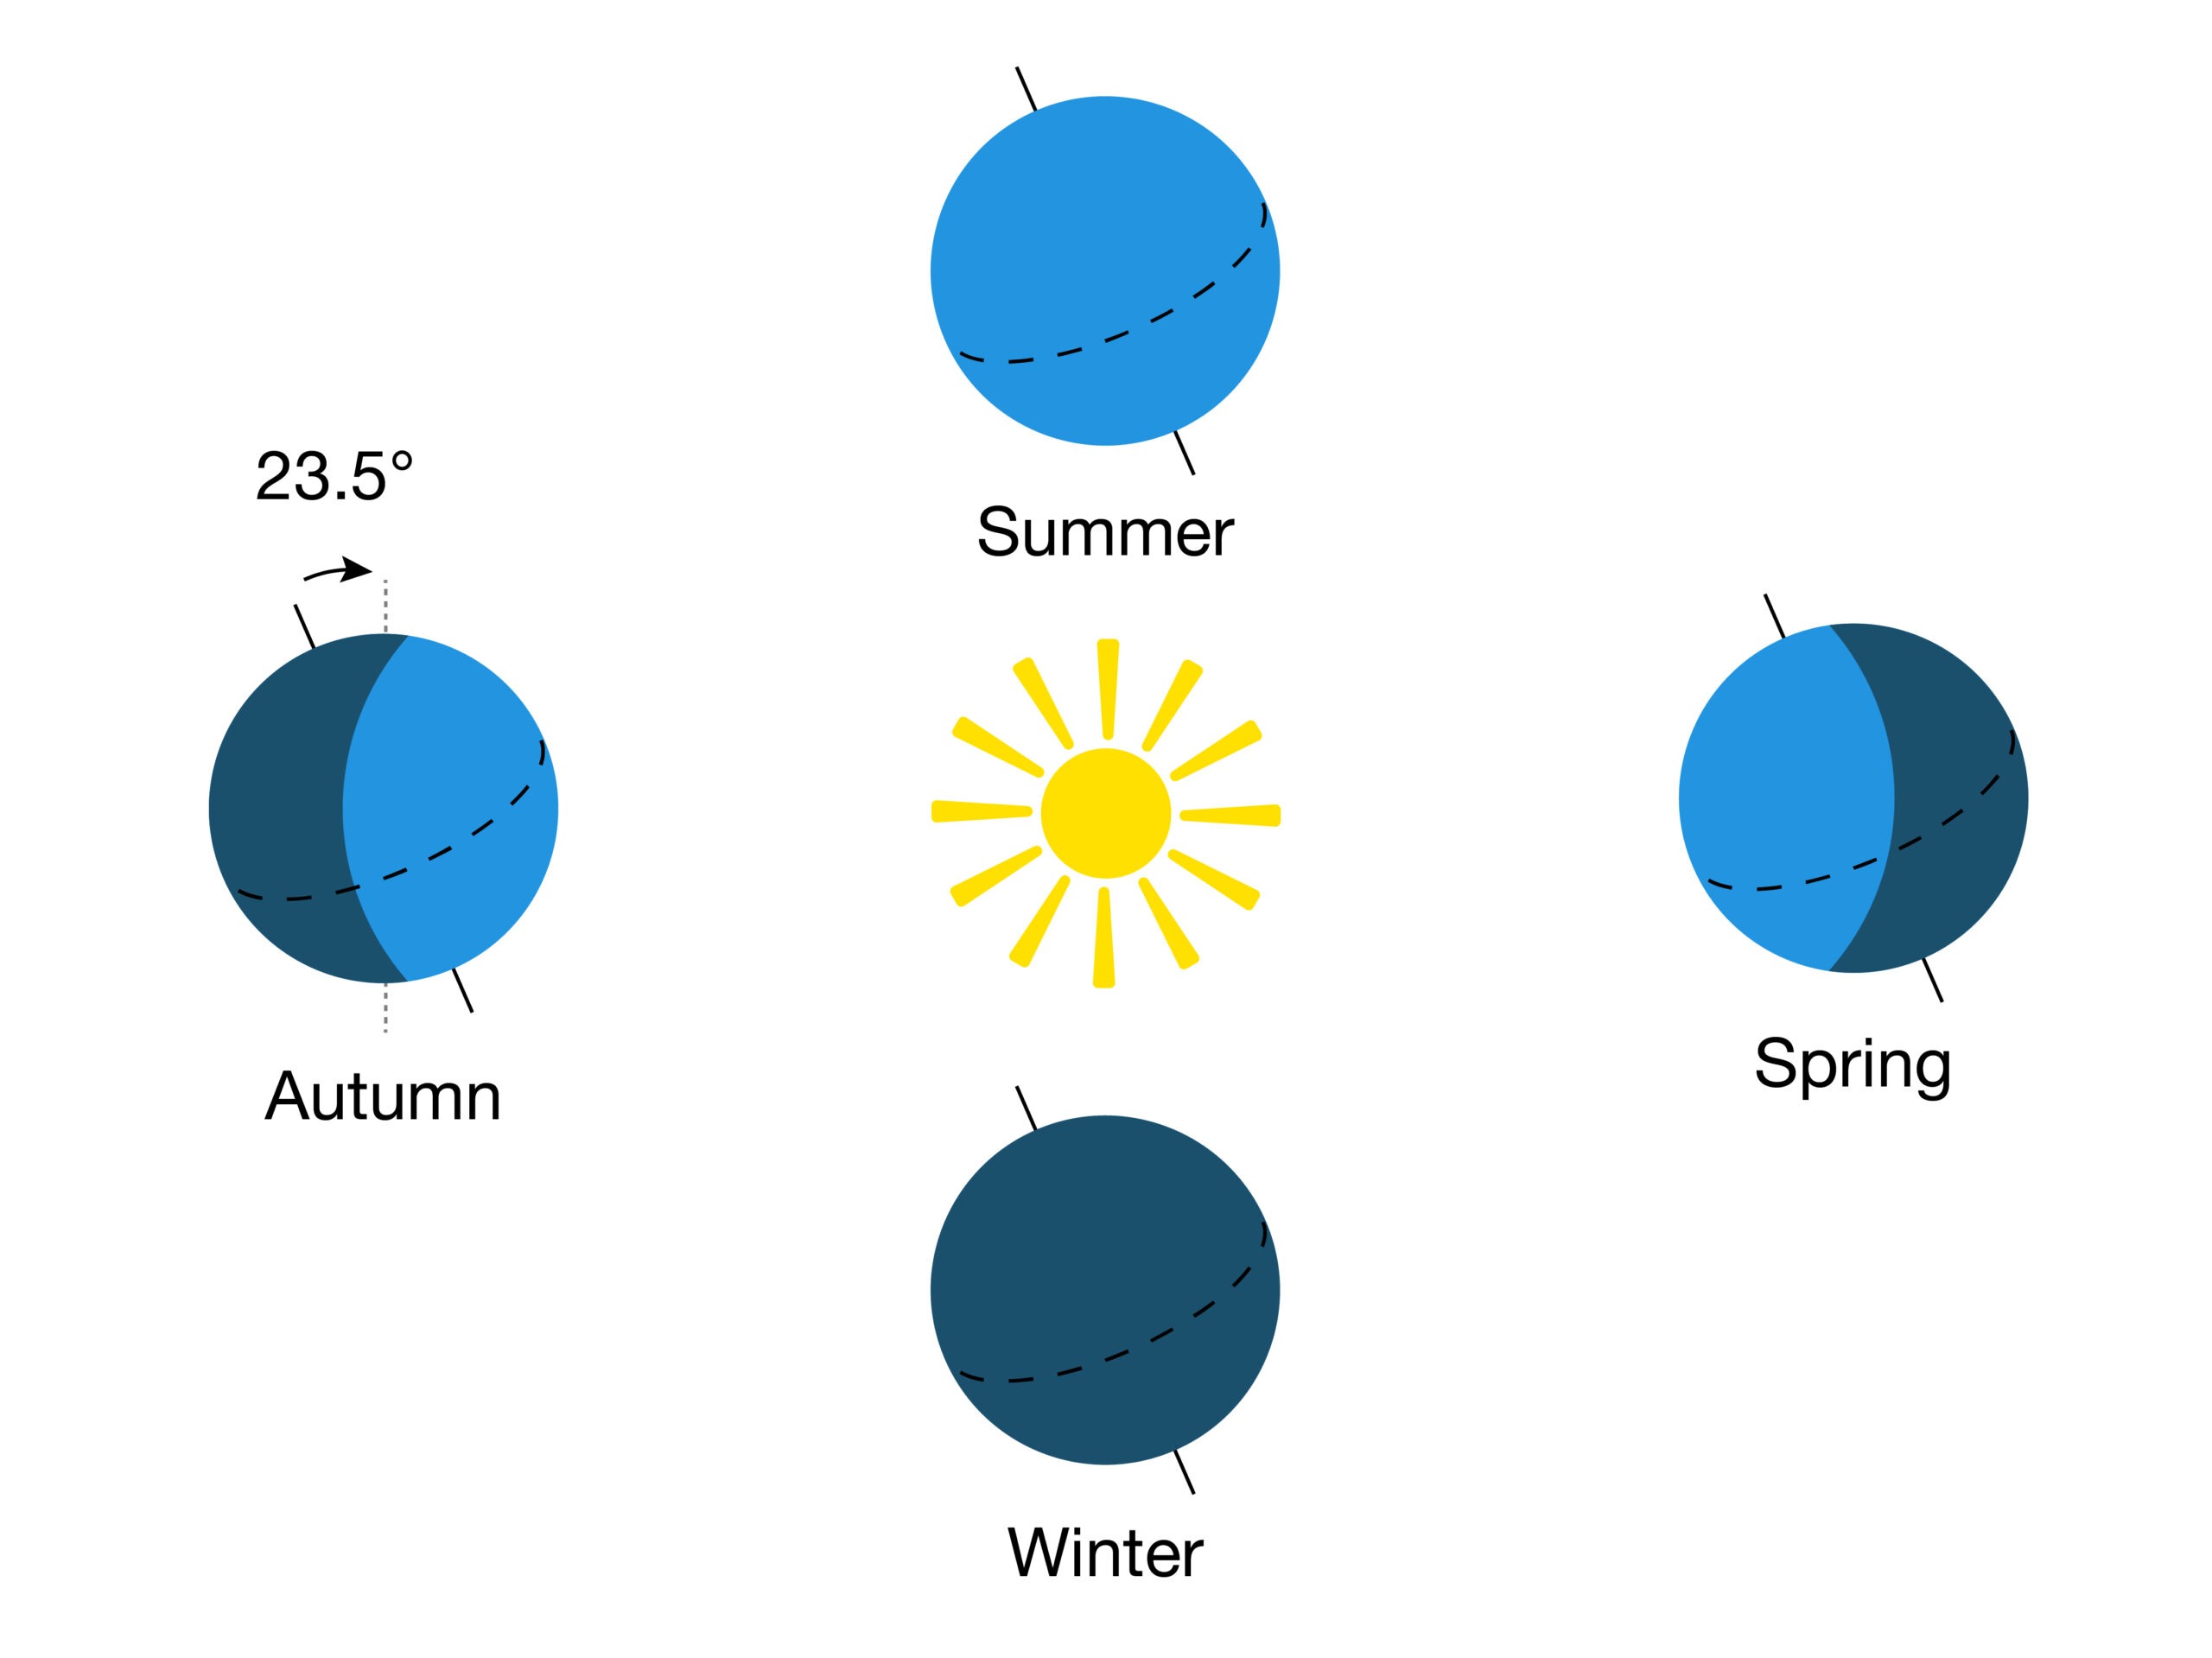
The Earth has a yearly orbit around the Sun. If you create a plane of this orbit, you will notice that the Earth’s axis is not perpendicular to it, it is actually titled at an angle of 23.5 degrees away from vertical.
This tilt and the Earth’s orbit around the Sun are the reasons why we have seasons. It is also why the solar altitude at noon (or at any other time) will change throughout the year. During the summer, the northern hemisphere will be tilted toward the Sun, whereas it is tiled away during the winter. This is what causes the solar altitude to be higher during the summer in these parts of the planet.
Ingenium has more than 150,000 objects in its collection, including many related to clinometers.
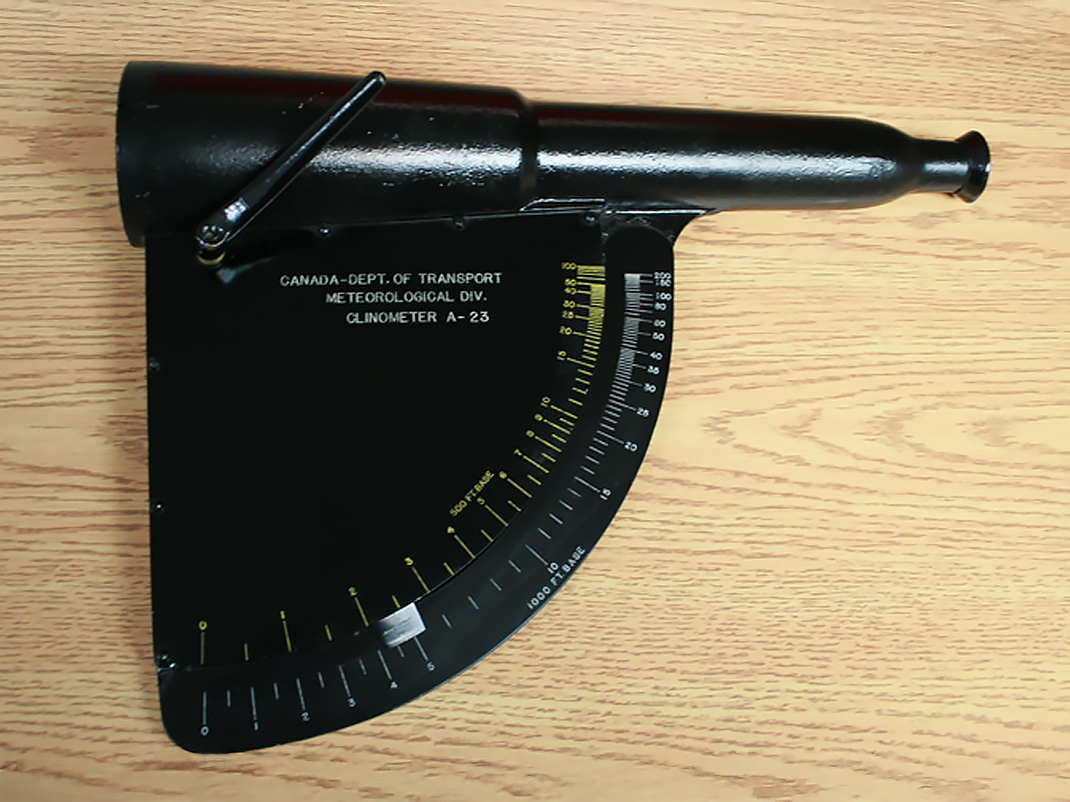
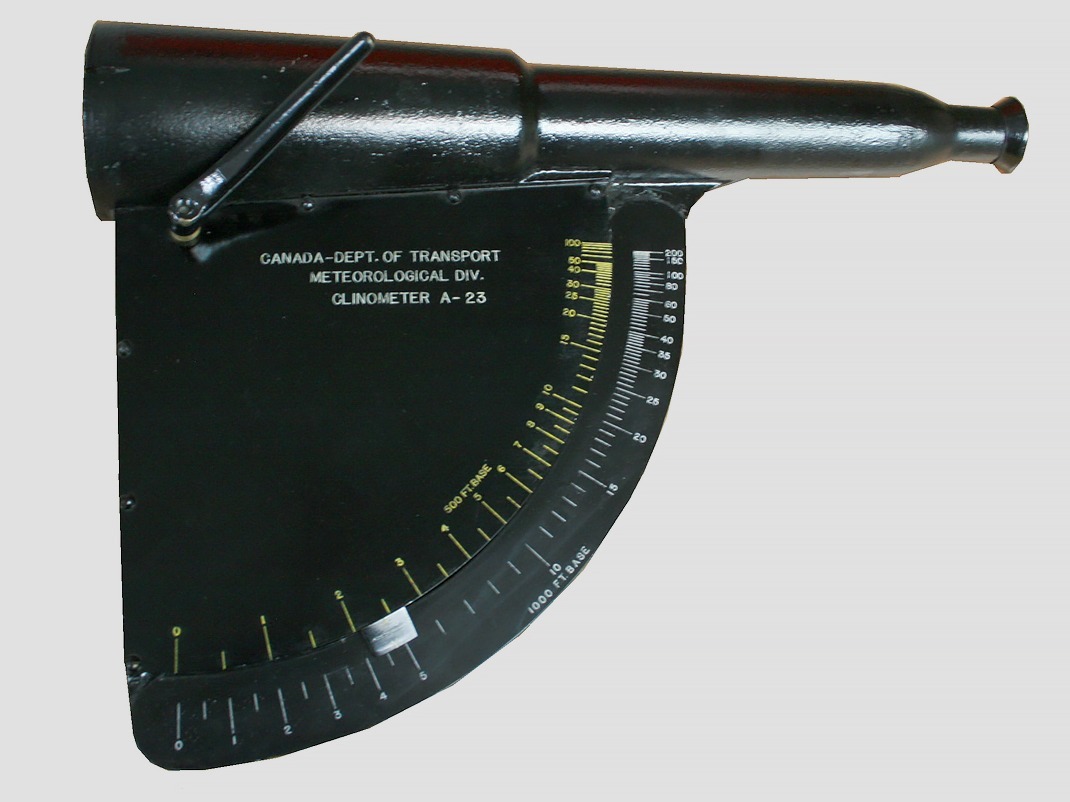
Artifact: Clinometer
The clinometer, also called an inclinometer (or in surveying, an Abney level) is part of a group of instruments that can be used to measure angles. Some other devices that fulfill a similar role include the sextant and the astrolabe. Both the astrolabe and sextant were mainly used by navigators on ships to measure the angles between stars (in particular the North Star) and the horizon.
In contrast, the clinometer is used mainly to measure angles on land. This information can then be used to determine such things as the incline of slopes and the height of mountains, trees and even clouds.
Clinometers have been around for a long time. They initially began as a simple plummet tool (a string with a weight at the end of it), but by the end of the 18th century it was a sophisticated tool that included such things as bubble levels, sights and telescopes. A well-known clinometer is the Abney level. Invented by William Abney before 1880, it consisted of a small telescope, a semicircle divided into degree and a bubble tube.
Artifact details
- Clinometer, circa 1951
- Manufacturer: DOT Meteorological Div. (Canada)
- Artifact no. 1987.0738.001
The clinometer pictured to the right was designed and used by Meteorology Services of Canada to determine cloud base height from the early 1950s to 1958. It was made out of cast iron and brass parts and was painted black.
Fun fact
In an 1831 letter to John Henslow, Charles Darwin stated his excitement about his new clinometer and how he was going to use it on his geology trips.
Files for downloading
3D printing files
Download and print your very own clinometer! Use these .stl files in the activities above.
- 3D printing files (ZIP, 750 KB)
Printable templates
- Clinometer label (PDF, 44 KB)
You may also be interested in
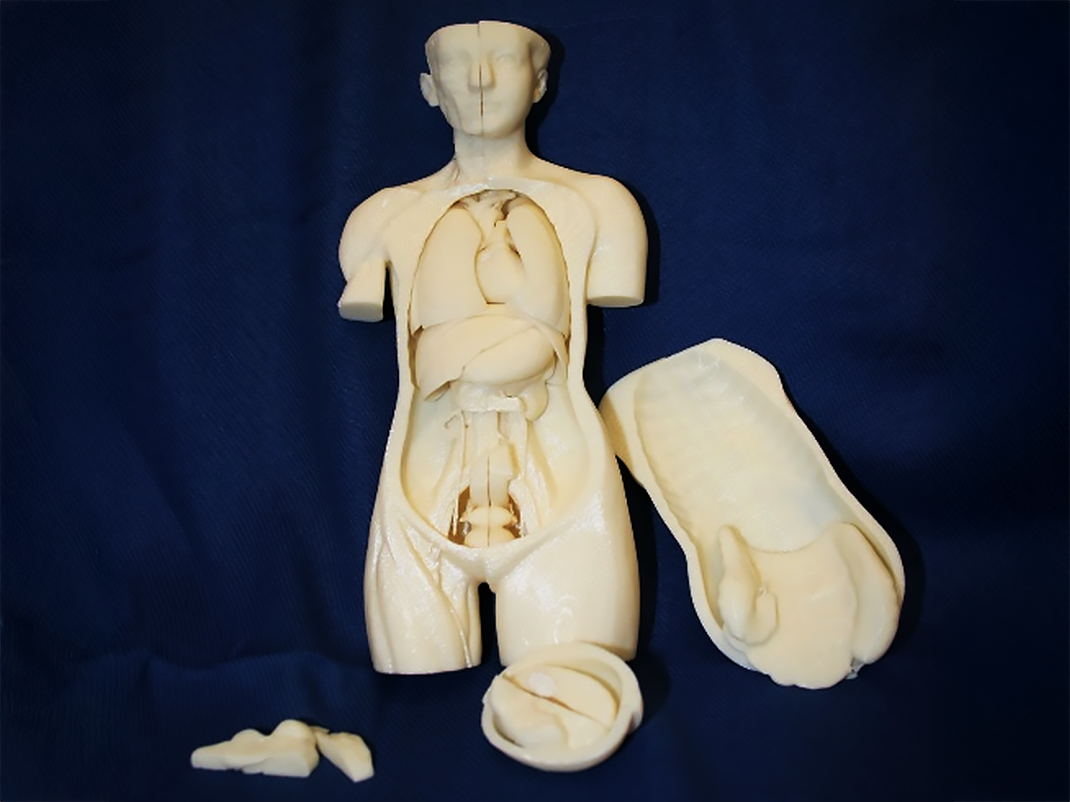
Anatomical model
Learn about the amazing human body and how complex organs perform all sorts of functions that work together to keep us alive in a series of fun, educational mini-activities and demonstrations from Ingenium.

Butter-making artifacts
Make your own butter in your classroom with these 3D printable files and activities. Then, create a stamp to decorate and name your butter with a butter stamp like the kind used in the 18th and 20th centuries.
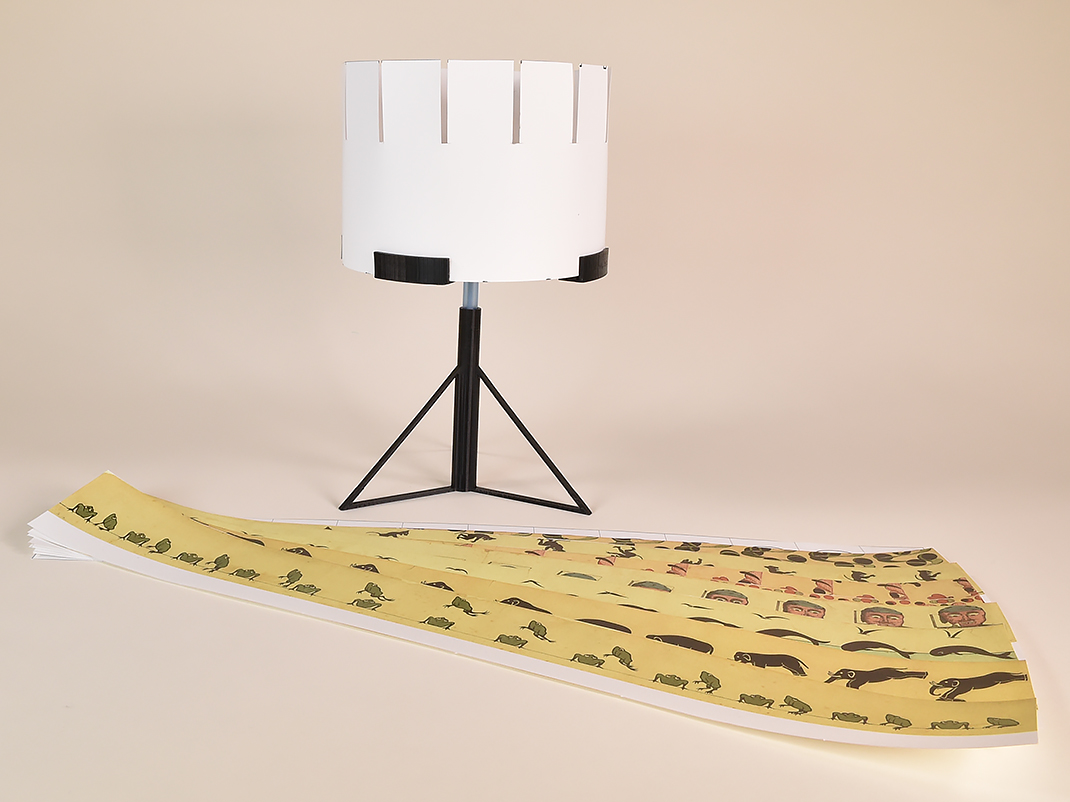
Zoetrope
Explore the zoetrope, an early animation device that uses an optical trick to make moving images. This lesson plan contains instructions on how to build your own 3D-printed zoetrope, assemble it and make it work. Students will be enthralled by the science behind this artifact from the Ingenium Collection.