Butter-making artifacts
An exploration of nineteenth and early twentieth-century agricultural tools
Grades 1 to 8 (Ontario)
Elementary cycle 1 to Secondary cycle 2 (Quebec)
With downloadable 3D files and activity sheets, students explore how butter was made, shaped and marked in the 19th and early 20th century. Emphasis is placed on making your own butter and creating your own butter stamp.
Butter has long been a popular spread and cooking fat around the world, particularly in northern European and North American culture. Making butter is not that difficult and can be done in just a few simple steps. Through this activity, your students will learn about emulsions and how a physical change in matter can create butter.
The 3D printing files can be downloaded individually. Activities and 3D print files for the module can be reproduced as necessary for your classroom.

Share :
Curriculum links
Through this activity, your students will learn about emulsions and how a physical change in matter can create butter. This activity can be connected to multiple aspects of the school curriculum.
Grade 3
Social studies (Heritage and identity: Communities in Canada, 1780 – 1850)
Grade 5
Science (Properties of and change in matter)
Grade 7
History (Canada, 1800-1850: Conflict and challenges)
Primary cycle 1 to Secondary cycle 2
[A screen capture of the SketchUp program, accompanied by the text “Creating a Butter Stamp In SketchUp Make”]
“Welcome to this guide on how to use Sketchup make to add a name to the bottom of a butter stamp. The first thing that you’ll see when you launch Sketchup Make is this welcome page. To start the program itself, click on the “Start Using Sketchup” button.”[A screen capture of the SketchUp Free download]
“The welcome page will close and Sketchup Make will launch after a few moments.” [A screen capture of the Welcome page from SketchUp]
[A screen capture of a desktop with Windows]
[The SketchUp software opens]
“Once the program has launched, click on the “File” menu in the top left corner of the screen. Then select “Open” and find editable Butter Stamp (dot) smk file. For ease of access, we’ve left ours on the desktop.” [The cursor clicks on “File”, then on “Open”. A new window opens, and the cursor selects “Desktop”, then clicks on an icon named “Editable butter stamp”.]
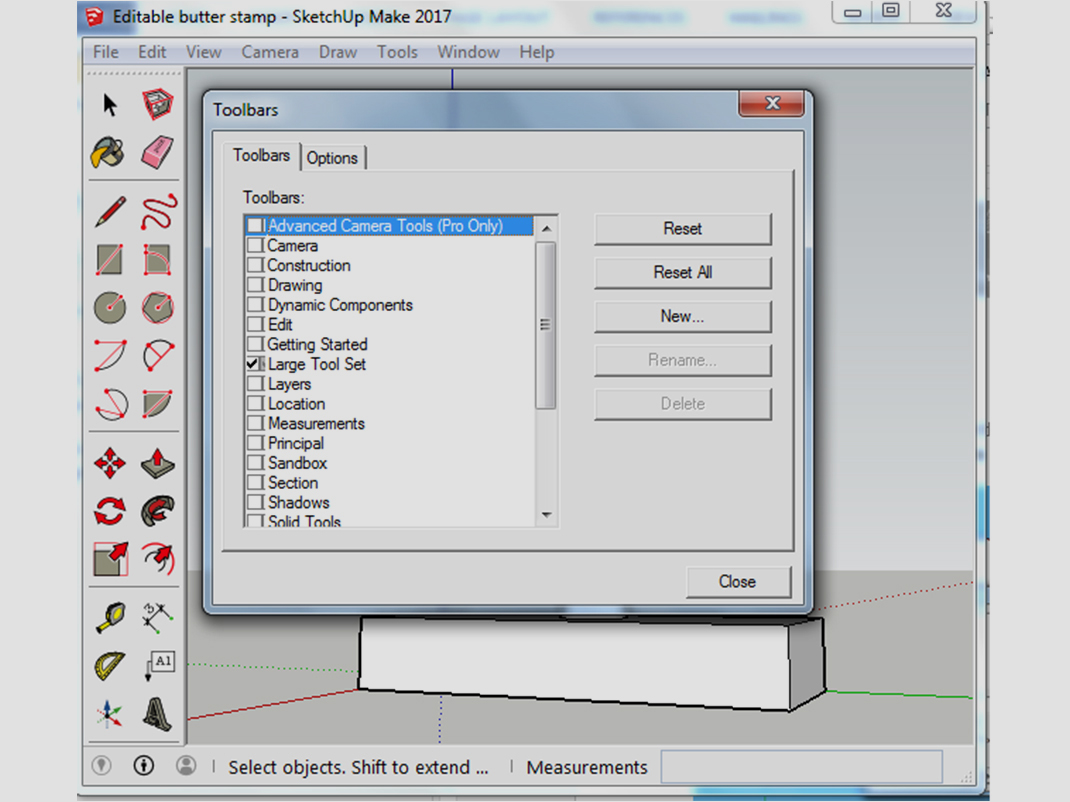
“Now that you’ve opened the Butter Stamp file, click on the View menu and select “Toolbars” Make sue that the large tool set option is checked, and deactivate any other options. For example, if you’ve just installed the program, the “Getting Started” toolbar is likely checked.” [ The file opens, and an upside-down T-shaped object, the butter stamp, appears in the window, with a red, green and blue line representing the 3 axes of rotation. The cursor hovers over “View” in the toolbar at the top of the screen, and clicks on “Toolbar”. A new window opens up.]
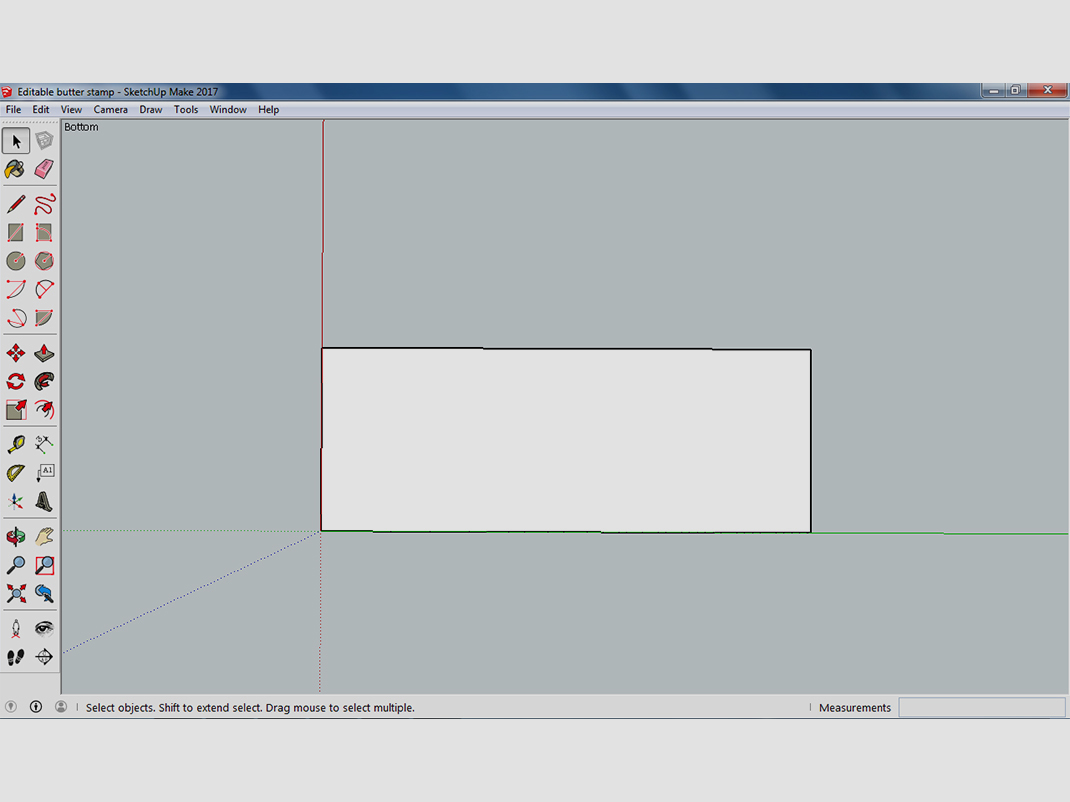
“Next, rotate the camera so you are looking at the bottom of the butter stamp. To rotate the butter stamp, locate the “Orbit” button, then click and hold on the model that you want to rotate, and move your mouse back and forth. ” [The cursor moves to the toolbar on the left side of the screen and clicks on an icon of two arrows circling around a vertical line. The cursor clicks and drags on the butter stamp, rotating it so that the rectangular base is flush with the screen.]
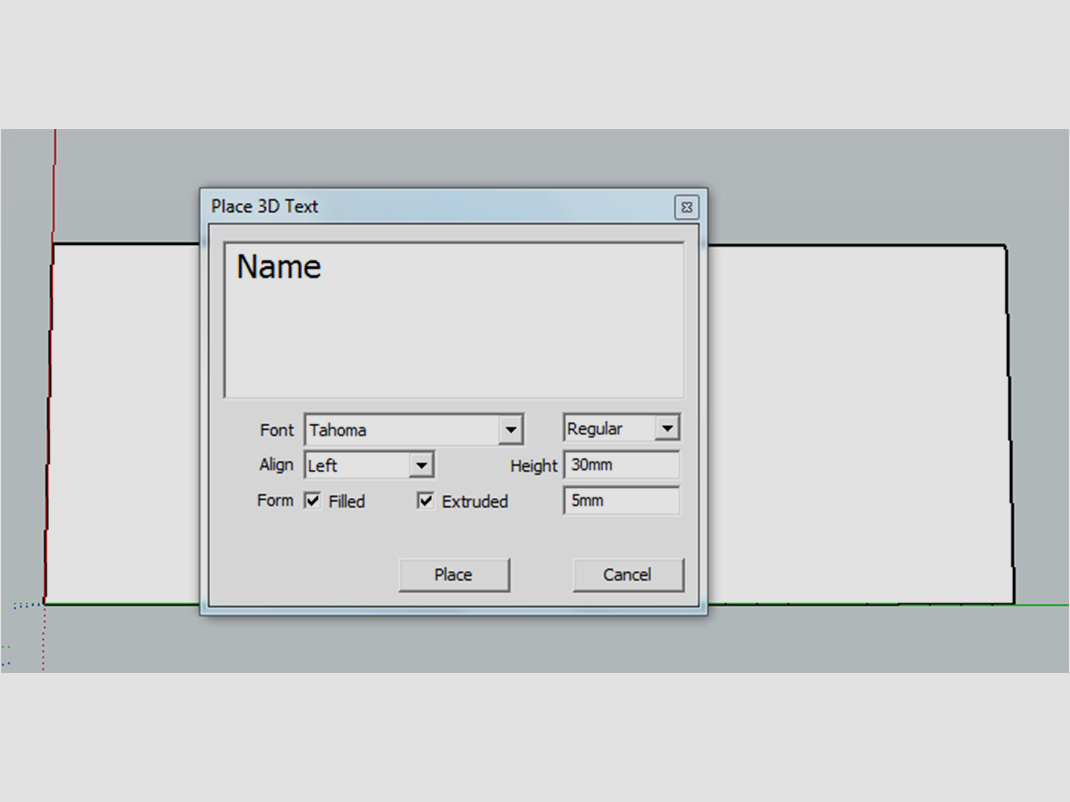
“Click on the “3D Text” button and move your cursor to the bottom of the butter stamp – a new window should appear. Type your name into the box, set the height to 30 millimetres, and make sure that the “Filled” and “Extruded” are checked in the “form” row, and set the extruded value to 5 millimetres. ” [The cursor returns to the toolbar on the left of the screen and clicks on the icon of a 3D letter “A”. The cursor slides over to the butter stamp and a new window opens in the centre of the screen. The word “Name” is typed into the large empty field.]
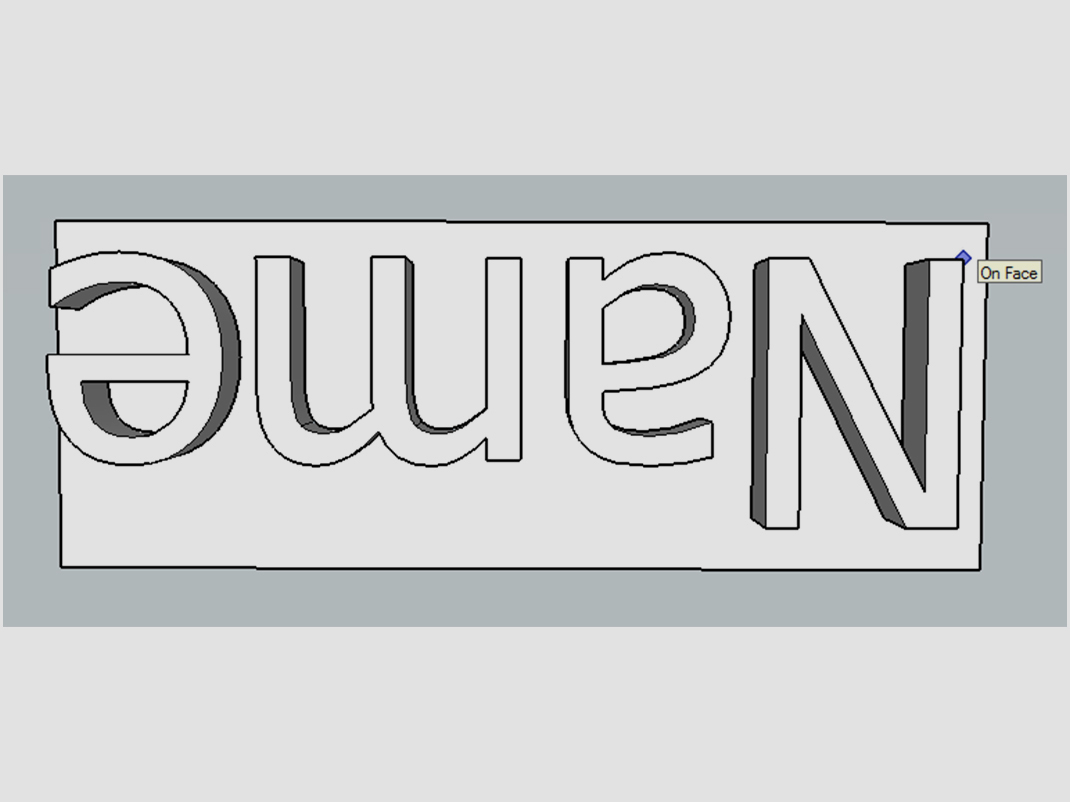
“Press “Place” – you can now move the text to where you want it. A good place would be the bottom left-hand corner of the stamp. To place it, just click the left mouse button, but before you do, make sure that it says “On Face” near your cursor. This text will appear once you stop moving the mouse. Don’t worry if the text is not oriented the way you want it, or if it’s too big; we’ll address that in a moment. ” [The word “Name” appears in thick white text with a thick grey border, but it is aligned vertically, so only the letters “Na” are visible on screen.]
“If the text is not facing the right direction for you, click on the “Rotate” button. A protractor-like image will appear once your cursor is in the drawing area. Move the protractor over the text to the point you want to rotate the text around. You might see the protractor tool flip between being parallel to the top and side surfaces of the text as you move. This is defining the plane of rotation. Make sure the protractor is parallel to the top surface of the text and choose your rotation point. Once you have chosen the rotation point, click the left mouse button. Your name should now be outlined in blue. “[The word “Na” is now surrounded by a blue box, and the outline of the letters becomes blue. The cursor slides over to the toolbar on the left and clicks on an icon of two arrows “chasing” each other in a circle. A thin blue 360-degree protractor accompanies the cursor, and the centre of the protractor is placed on the upper-left corner of the text box containing the word “Na”.]
“Now you will need to determine the length of the rotation arm. Move the mouse back and forth to vary the length. A longer rotation arm means that you can rotate over smaller angles, though this is not important for this activity. ” [The cursor moves from the centre of the protractor to the right, creating a straight dotted line behind it. A small pale-yellow text box labelled “On Face” appears next to the cursor.]
“Once you’ve selected your arm length, click the left mouse button again. You can now rotate your text. Move the mouse back and forth until you have found a satisfactory rotation, then click the left mouse button. Don’t worry if your text isn’t over the stamp yet.” [ The cursor moves in an arc up and to the left, while the large text box swings in the same direction. The text box rotates until the text is horizontal.]
“If you need to move your text, click on the “Move” tool, then click on your name. The text should now be outlined in blue, and you should be able to move the text anywhere you wish. Once you have the text where you want it, click the left mouse button to place the text.” [The cursor moves to the toolbar on the left of the screen and clicks on an icon of four arrows pointing in different directions: up, down, left and right. The cursor returns to the text box with “Name” written in it, and moves the text to be centred on the rectangle that is the bottom of the stamp.]
“If you need to resize your text, click on the “Scale” tool, then click on your name. The text should now be outlined in yellow, with green boxes surrounding it. Click and hold on one of the boxes, then move your mouse back and forth to resize your name. We recommend that you use the square found in one of the corners. When you’re done, release the button. ” [The cursor returns to the toolbar on the left of the screen and clicks on an icon of a grey square with a red arrow extending out from the upper-right corner. The outline of the text box changes to yellow. The cursor moves back and forth, shrinking and enlarging the text.]
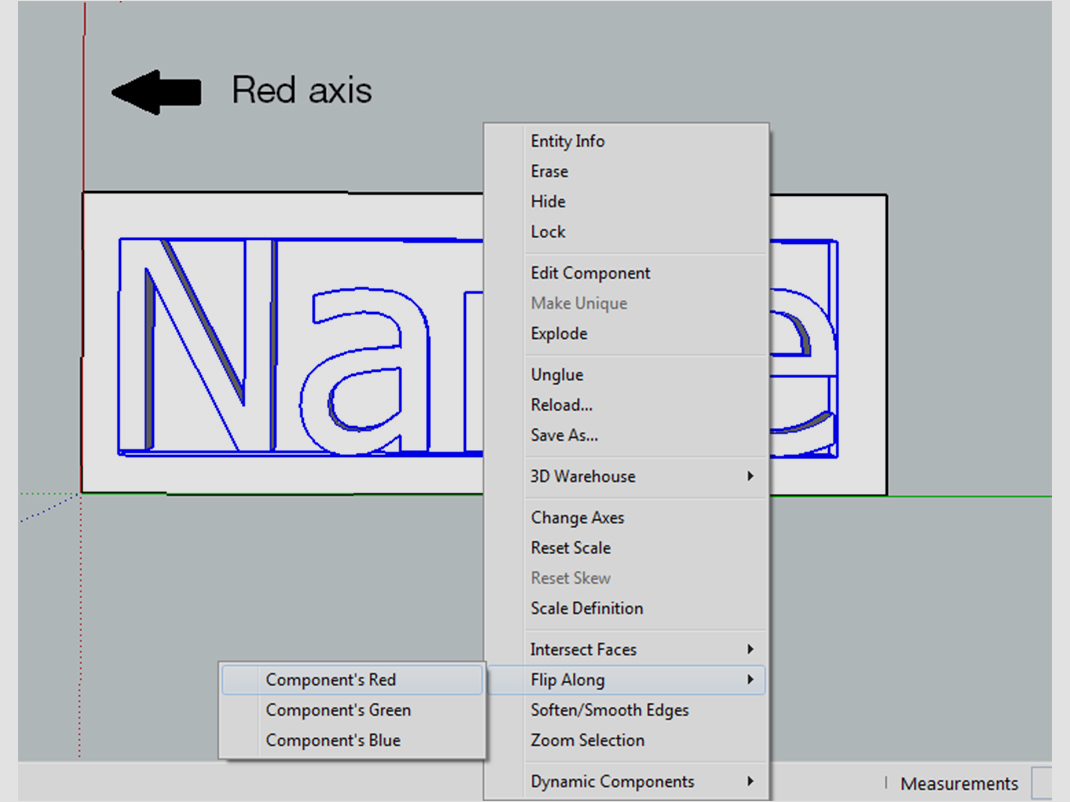
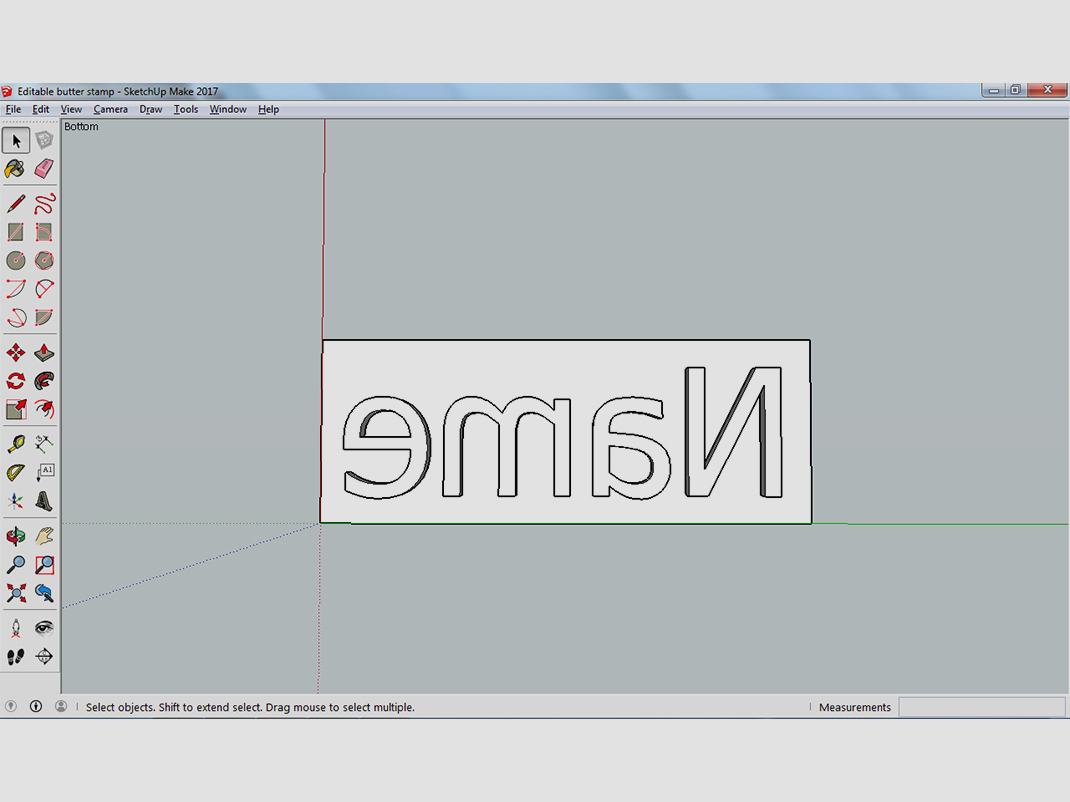
“Finally, right-click on your text, then select “Flip Along…” This will bring up another menu. This will bring up another menu. What you choose next depends on the orientation of your name. You want to flip your name along the axis running vertical to the text. In this case, that is the red axis. So, we want to select components red.Your personalized butter stamp is done! Print it off, then use it in the butter mould.” [The cursor moves to the toolbar on the left and clicks on the icon of a small black arrow. The cursor returns to the text box and opens a menu and selects “Flip Along”, which opens another menu. The cursor clicks on “Component’s Red” and the name flips to a mirror reflection.]
[Screen fades to Ingenium logo on a white background.]
Make your own butter
Have you and your students ever wanted to make butter like they did in the past? In this activity you all will have the opportunity to use a 3D printed butter churn to do just that!
Note: The butter churn should only be used for demonstrational purposes and any butter made from it should not be ingested. Currently there is no way to 3D print an object that is entirely food safe. If you wish to make butter without a churn, see the first “Try this” activity.
Materials
- 3D printout of butter churn
- Spatula
- 500 mL of 35% cream (whipping cream)
- Dish brush
- Bowl
- Container
- Water
- Dish soap
Instructions
- Take the 35% cream out of the fridge and let it reach room temperature.
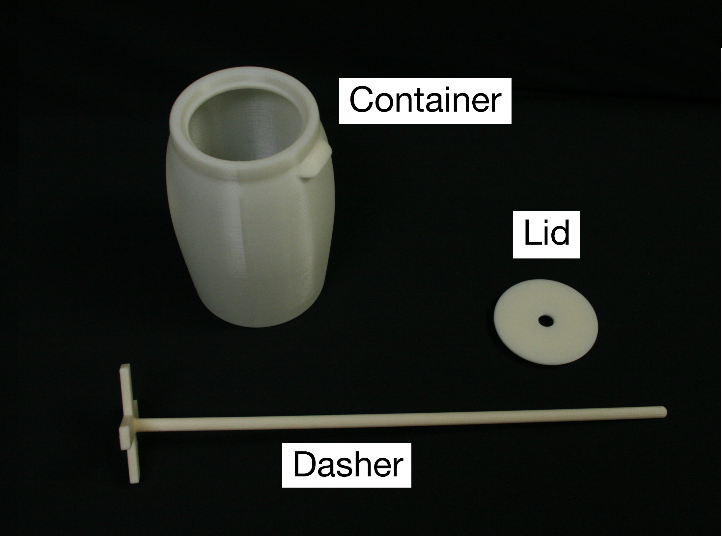
- Fill about one third of the container of the butter churn with cream.
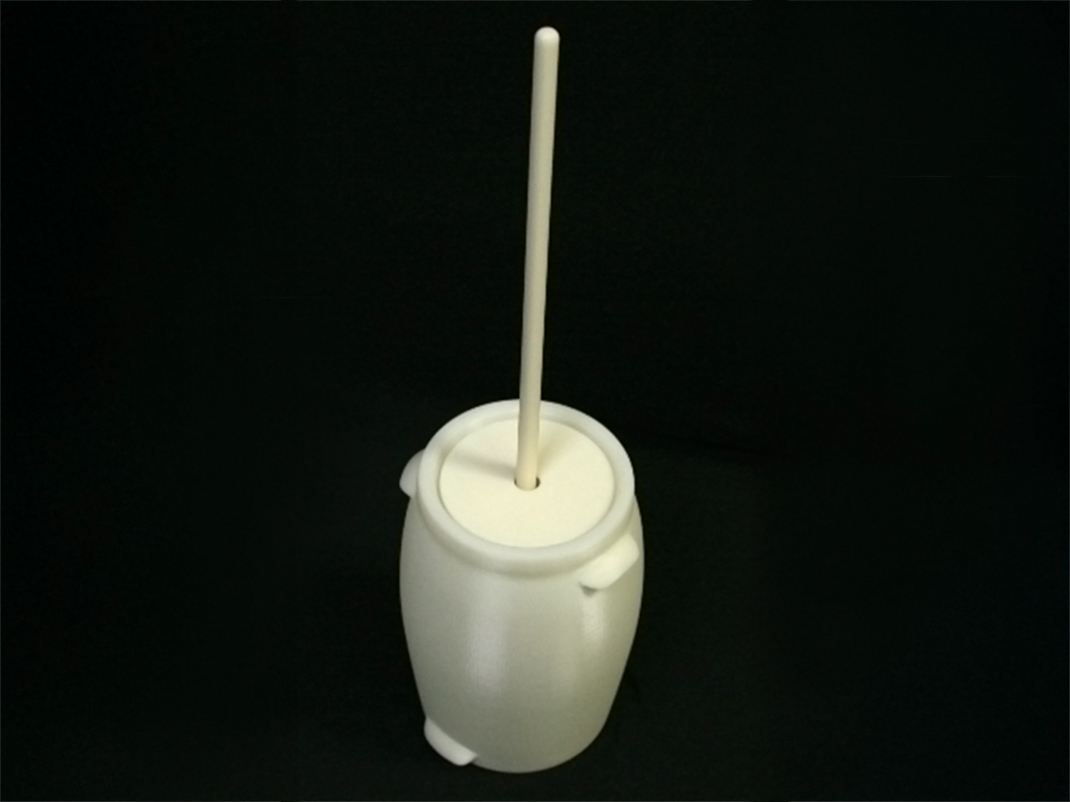
- Put the lid on the container with the dasher (the pole) in the barrel and sticking out of the lid. To do you this you’ll need to put the dasher in the container first before putting on the lid.
- Use the dasher to agitate the cream by moving it up and down quickly. This can be a messy process, so it’s best to do it in a sink.
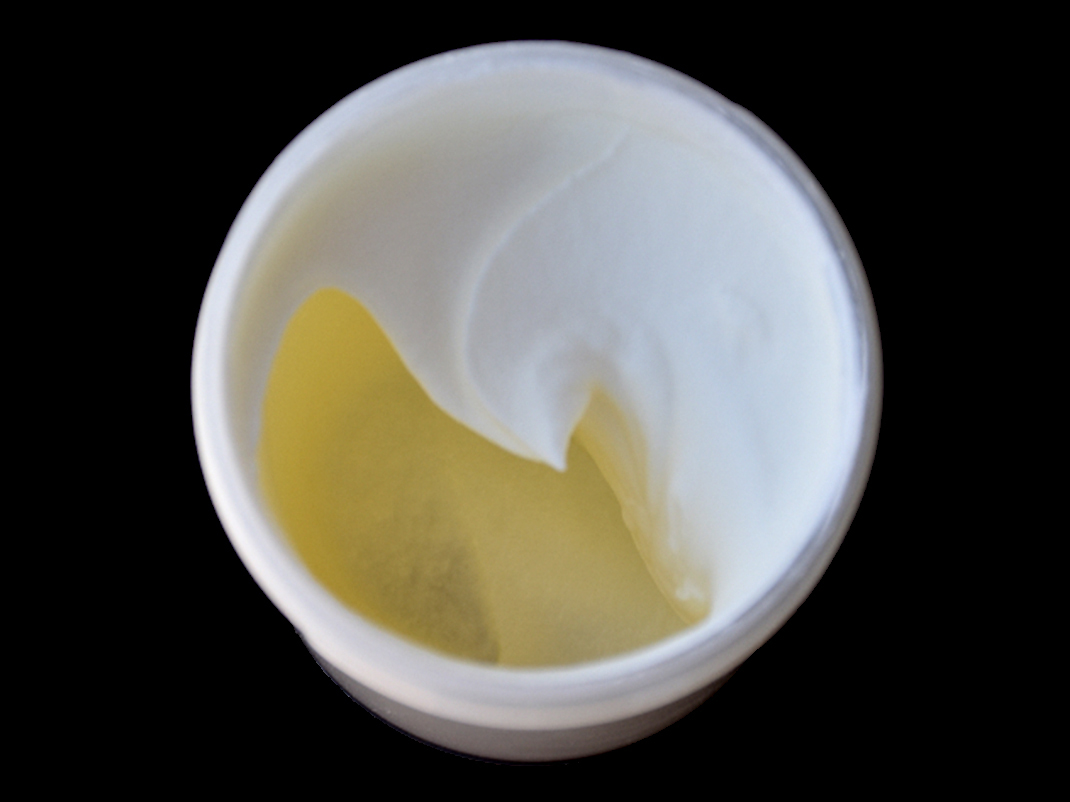
- At some point the cream will no longer easily move in the barrel and will have a foam-like appearance (this will likely take around 10 minutes). The cream has now formed whipped cream. Feel free to open the lid to see what this looks like.
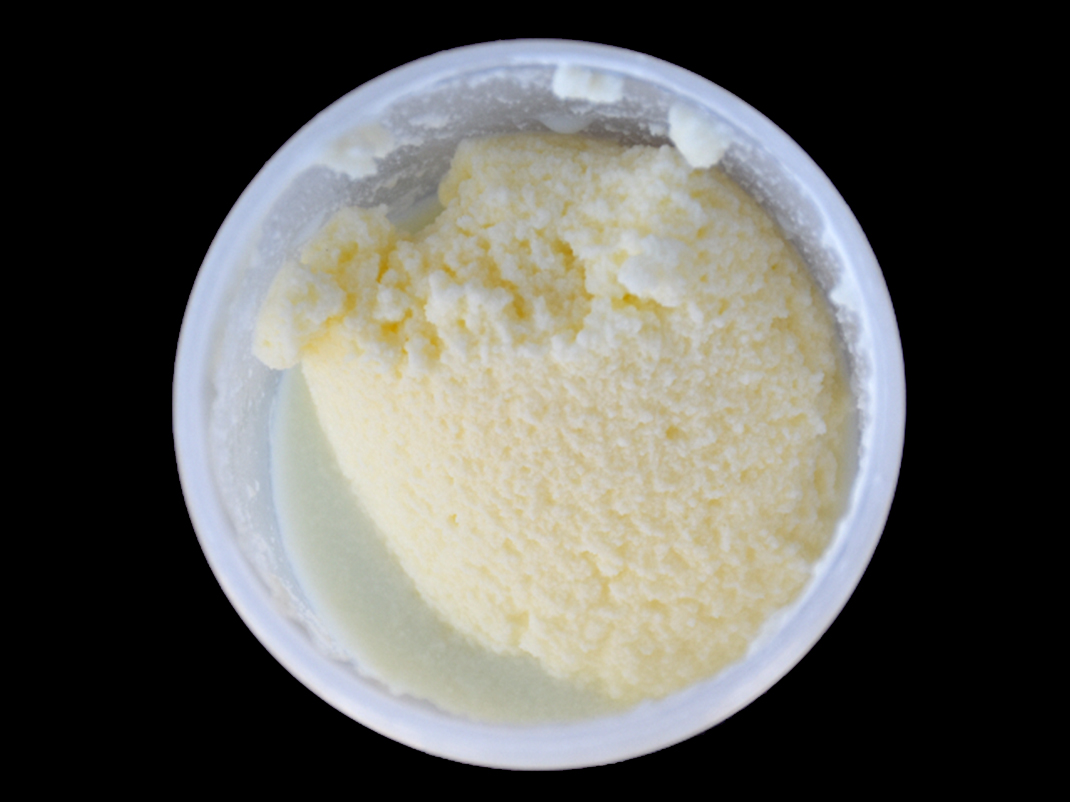
- Keep agitating the whipped cream until a substantial solid begins to separate from the liquid (this will likely take 10 minutes). You have now formed butter! The liquid part is buttermilk.
- Pour out the buttermilk in a separate container.
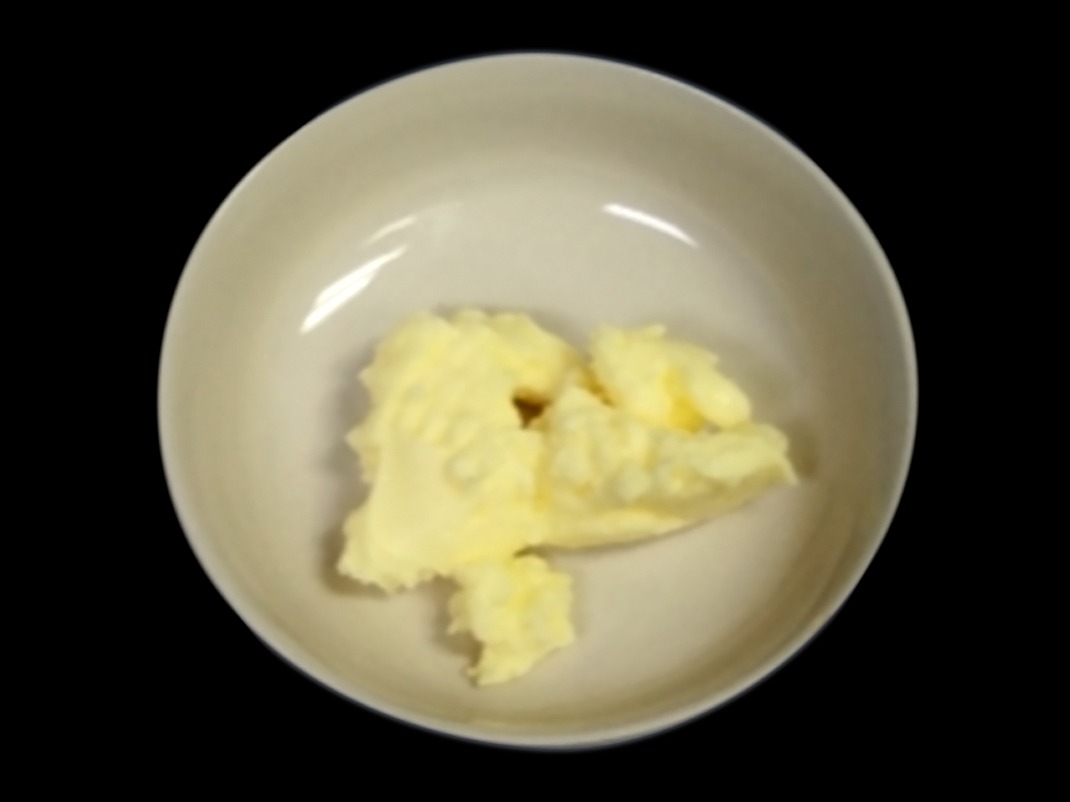
- Use the spatula to scoop out the butter into a bowl. Fill the bowl with cold water. The cold water will harden the butter. Gently knead the butter while it is still in the water to remove any remaining buttermilk
- Drain the water from the bowl. Now your butter is ready!
Note: We recommend that you do not ingest any butter. Currently there is no way to 3D print an object that is entirely food safe. If you wish to make butter without a churn, see the “Try this” activity below. - Wash the churn with hot soapy water and a brush to remove the butter that may have gotten into the cracks. This is important as butter could get stuck in the cracks of the butter churn and cause bacteria to grow.

Try this! You can also make butter using just a plastic bag or glass bottle. Have a discussion with your class on what advantages and disadvantages each method has. One point that you can bring up is how using the butter churn makes mixing a large quantity of cream easier.
Scientific explanation
As you saw in this activity, cream is used to make butter. Cream is obtained from the milk that comes directly from cows. It is mainly a mixture of fat particles and water (the cream used in this activity was 35% fat) along with some other substances like pigments (carotene) and milk solids (protein, lactose). More specifically it is an emulsion of water and fat; an emulsion is a mixture of two things that normally do not mix. One of the main reasons why the fat stays mixed in the water and does not clump together, or float to the surface, is because it is found in tiny membrane sacs. The fat clumps inside these membrane sacs are called “globules”.
During this activity, the agitation in the milk created by the dasher caused many of the membrane sacs to burst. The fat, now free, begins to clump together. As more of the membrane sacs burst, more of the fat clumps together, forming butter. The remaining liquid forms buttermilk. It is largely water, though some of the fat globules remain.
Try this! Have your class determine the impact of the 35% cream’s temperature on the butter making process by using the cream right after you have taken it out of the fridge. It should be easier to make butter when the cream is at room temperature. A higher temperature means that the fat globules have more energy, making it easier for them to clump and create butter.
Try this! Have your class determine the impact of using different liquids on the butter making process. Instead of 35% cream, try making butter using skim milk (0% milk fat), half and half cream (10% milk fat) and table cream (18% milk fat). Are your students able to make butter with anything but the 35% cream? 35% cream is the easiest because it has the highest content of milk fat, which is what the butter is made out of.
Making a mark on butter
Your students will learn about how a butter mould was used to shape and mark butter in the 19th and 20th centuries. They’ll then have a chance to create their own butter stamp!
Historically butter moulds were used to shape the butter. Many moulds also contained a stamp that would mark the butter for either decorative purposes or so that consumers would know where the butter was made.
Materials
- Computer
- 3D editing program (Sketchup Make)*
- 3D butter mould
- Plasticine (size: 11 cm x 4 cm x 3 cm, length x width x height)
- Butter stamp file
* There are many different 3D editing programs that you can use. For this activity we suggest Sketchup Make (which is free to download). Some other possibilities include Blender and Tinkercad.
Instructions
There are two parts to this activity. In Part 1, you and your students can explore how a butter mould was used. In Part 2, you and your students can design your own butter stamp.
For Part 1 we suggest that you use plasticine instead of real butter because currently there is no way to 3D print an object that is entirely food safe.
Part 1: How to use a butter mould
- Put the plasticine on a flat surface (such as on a cutting board or a table). Try to make it so that the plasticine covers the same area as the butter mould.
- Lower the butter mould over the plasticine, and press down on the stamp (the plunger part).
- Lift up the butter mould and press down on the stamp to push the plasticine out. You should have a piece of plasticine in the shape of a bar of butter with a stamp of the logo of the butter company, just like a real piece of butter!
Part 2: Design a butter stamp
Install Sketchup Make
- Download Sketchup Make here.
- Install Sketchup Make. If you have any problems, please visit this link for troubleshooting tips.
Make your own butter stamp
There are many ways for you and your students to design and customize a butter stamp. For this activity, we’ll just have you put your name on one that has already been created.
- Start Sketchup Make. This will take you to the Welcome page, click on “Start using Sketchup” to start the program.
- Load the Sketchup Make file of the editable butter stamp into the program (Editable butter stamp.smk). Note, if you are using a different program, we’ve provided you with a .stl file that you can use.
- Familiarize yourself with the program. You can find video tutorials of the program here.
Some general hints:-
- Activate the “Large Tool Set” toolbar; this is the toolbar that will have the most useful options for this activity. To do this, go to the “View” menu and click on “Toolbars”. Then make sure “Large Tool Set” is checked. Also, if there are other options selected, click on them to deactivate them. For instance, if you just installed the program, the “Getting Started” toolbar is likely checked.
- In most cases, to draw something you need to click and then move your mouse. You do not need to hold the mouse button while you move it.
- To zoom in and out, you can use the scroll wheel on your mouse button. If you cannot do this, you can use the “zoom” button. Click on the “zoom” button, click and hold the left mouse button where you want to zoom and move the mouse up and down.
- To rotate the camera, click and hold the middle mouse button (usually the scroll wheel) and then move the mouse. If you cannot do this, you can use the “orbit” button. Click on the “orbit” button, click and hold the left mouse button where you want to rotate and move the mouse back and forth.
- To pan/move your viewpoint, click and hold the middle mouse button (usually the scroll wheel), hold “Shift” and then move your mouse. If you cannot do this, you can use the pan button. Click on the “pan” button, click and hold the left mouse button where you want to start to pan the view and move your mouse back and forth.
- To select things, click on the “arrow” icon on the toolbar and then click on what you want to select.
-
- Rotate the camera so that you are looking at the bottom of the butter stamp.
- Click on the 3D text button that is found on the toolbar. Click on the bottom of the butter stamp and a new window should appear.
- Type your name in the box. Set the height to 30 mm. Make sure that, in the “Form” row, both “Filled” and “Extruded” are checked. Set the extruded value to 5 mm.
- Press “Place”. Now you can move the text to where you want to place it. To place it just click the left mouse button. Before clicking, make sure that it says “On Face” near your cursor; this text will appear once you stop moving the cursor. Also don’t worry if the text isn’t oriented the way that you want it or is too big, we will be addressing this in the following steps.
- To rotate the text (if needed):
-
- Click on the rotate button. A protractor-like image will now appear when you are in the drawing area. Move the protractor over the text to the point that you want to rotate the text around. As you move over the text, you might see the protractor tool flip between being parallel to the top surface of the text and parallel to the side surface of the text. This is defining your plane of the rotation. Make sure that the protractor is parallel to the top surface of the text. Once you have chosen your rotation point, click on the mouse button (your name should now be outlined in blue).
- Now you will need to determine the length of the rotation arm. To do this, move the mouse back and forth to vary its length. A longer rotation arm means that you can rotate over smaller angles, though this is not that important for this activity. Once you have selected your arm length, click the left mouse button.
- Now you can rotate your text. Move the mouse back and forth to do this. Click the mouse button once when you are done. Don’t worry if, after rotating the proper angle, the text is not on the butter stamp, we will be moving the text in the next step.
-
- Move the text (if needed):
-
- Click on the move tool. Click on your name (it should now be outlined in blue). Now you can move the text anywhere you wish.
- Once you have placed the text where you want it, click the mouse button to place the text.
-
- Resize the text (if needed):
-
- Click on the scale tool. Click on your name (it should now be outlined in yellow with green boxes surrounding your name).
- Click and hold one of the boxes and then move the mouse back and forth to resize your name. We recommend that you use one of the squares found in a corner. When you are done release the mouse button.
-
- Flip the text. This is needed so that when the stamp is used, it will make an imprint of your name in the correct orientation. To do this:
-
- If your name is not currently selected, select it using the “arrow” icon.
- Right click your name. This should bring up a menu.
- Click on “Flip along”, which should bring up another menu. What you choose next will depend on the orientation of your name. You want to flip along the axis that is running vertically to your name. In the case below, you will be flipping along the red axis, so you would select “Component’s Red”.
-
- Your personalised butter stamp is done! Print it off and then use it in the butter mould with butter or plasticine.

Try this! Have your student add other elements to their butter stamp. For example, they can add squares and circles to create their own patterns and designs.
Ingenium has more than 150,000 objects in its collection, including many ones related to butter stamps and moulds. You can explore other objects in the collection below.
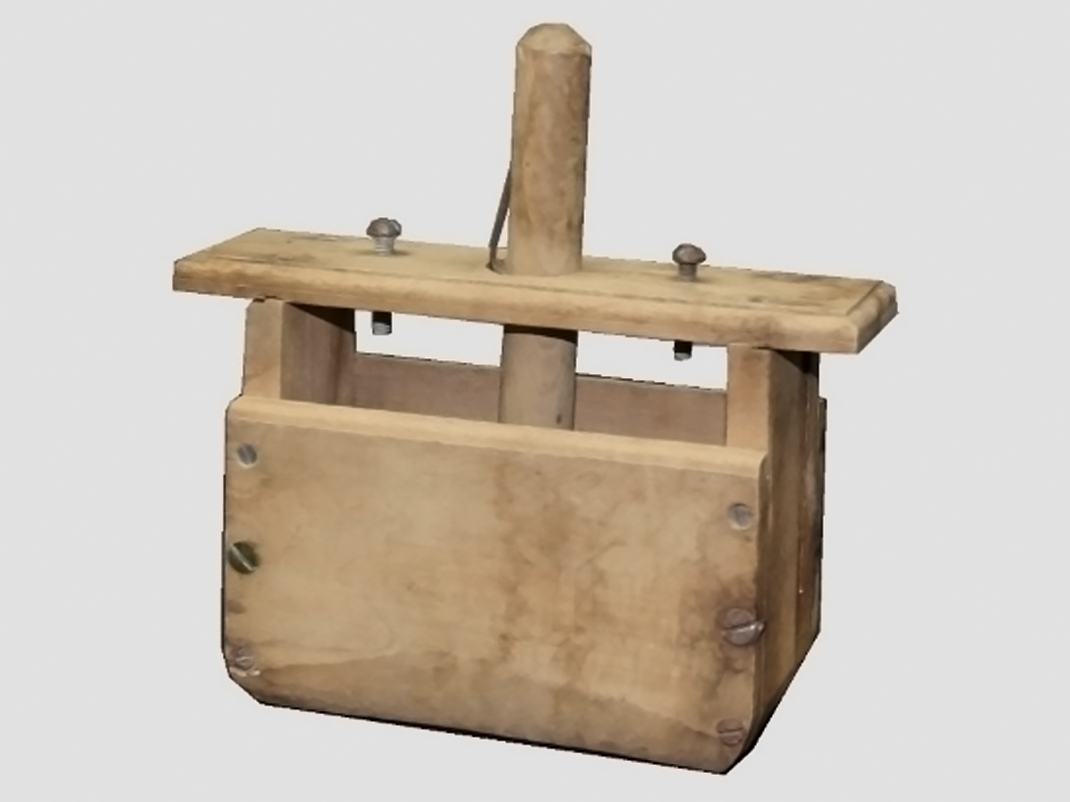
Artifact: Butter churn
Butter is made by agitating cream obtained from cow’s milk. One of the first devices used to make butter was the butter churn. Early churns were essentially containers. They were made from such materials as animal skins, and were filled with cream and then shaken until butter formed.
Butter churns became more complex over time. The “dasher model”, seen in the photo above, was a popular design favoured by North American settlers. It consists of a container, which holds the cream, and a rod with a wooden x-shaped dasher at the end. This rod is plunged up and down to churn the cream into butter. Later, barrel churns came into use. This churn is composed of a barrel, which held the cream, and a crank, which can be used to turn the barrel and produce butter.
Churns, and home-made butter, became less common when dairy factories, or creameries, began producing butter and other dairy products to meet the demand of growing urban markets in the late 19th century.
Many artifacts related to butter churns and butter making can be found in the Ingenium collection.
Explore the collection online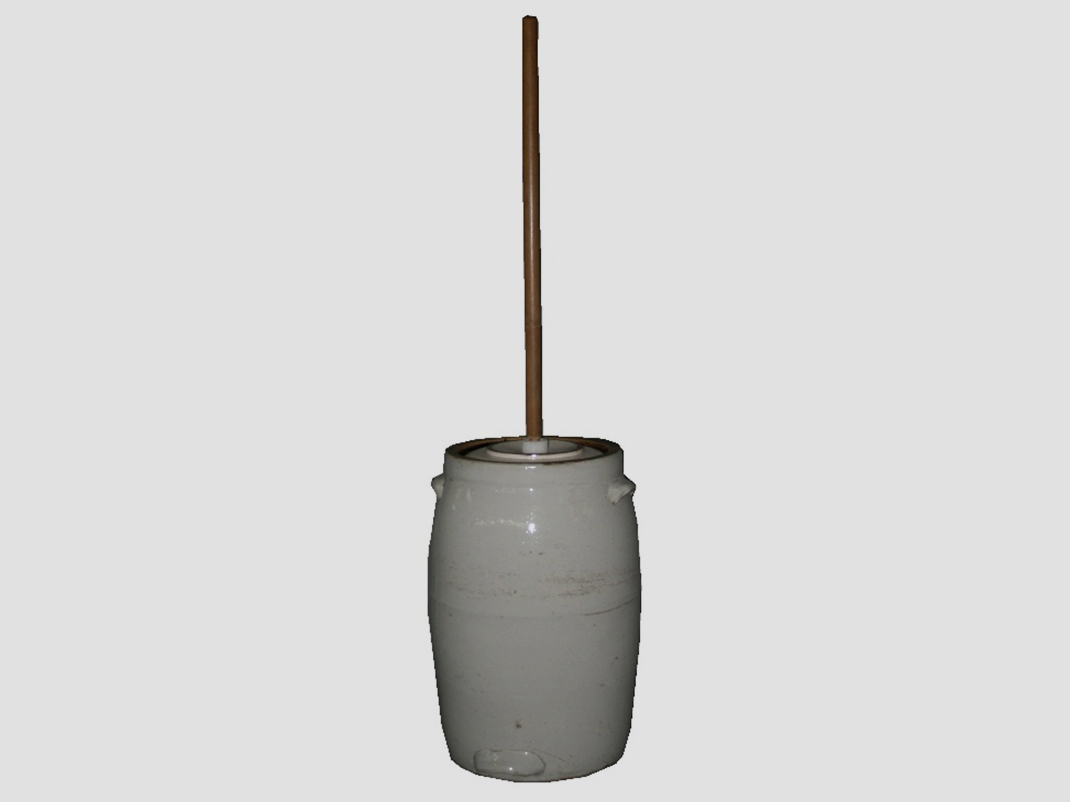
Artifact details
Butter churn, circa 1900
Manufacturer: Unknown
Artifact no. 1987.0363.001
The butter churn pictured above is the familiar “dasher churn” in which the dasher (a plunger with an x-shaped attachment) was moved up and down to churn cream into butter. In this particular churn, the dasher was made out of wood. The barrel is ceramic with a pinkish-gray glaze.
Fun fact
It takes around 21 kilograms of fresh cow’s milk to make the cream needed to make one kilogram of butter
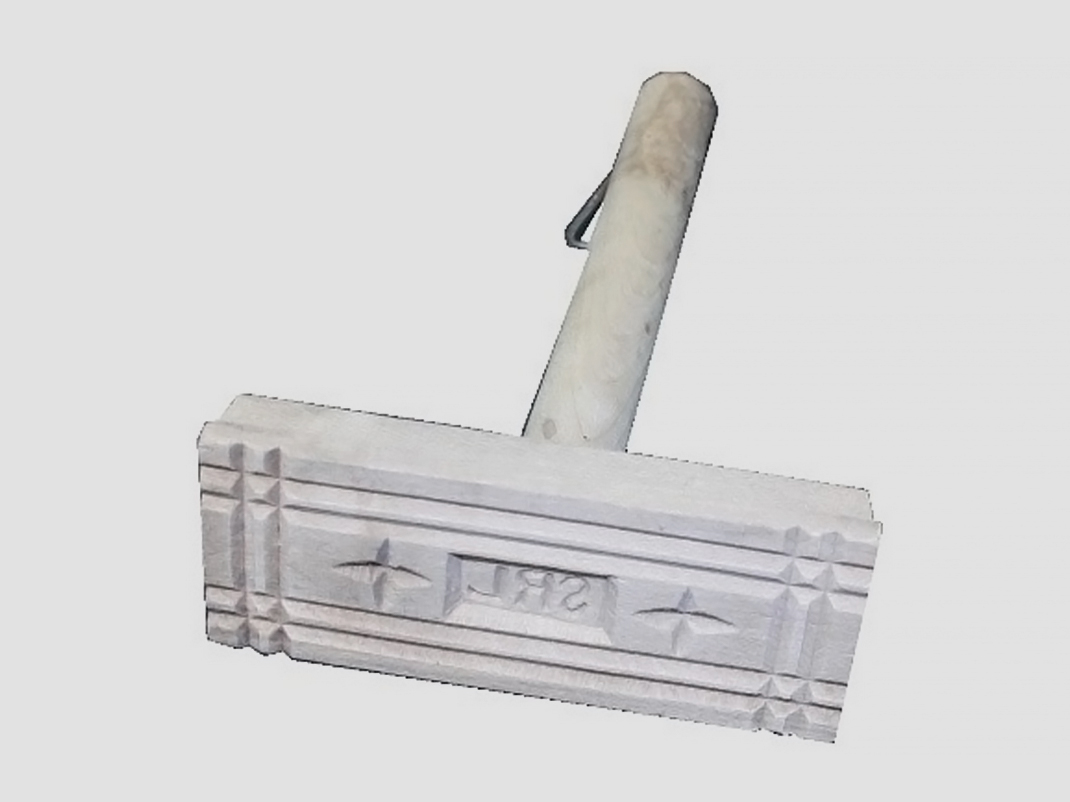
Artifact: Butter mould and stamp
A butter mould is a tool used to form butter into shapes, while a butter stamp is used to mark the butter with a design. In many instances they were combined in the same device. Butter moulds and stamps were introduced to North America by European settlers who brought the tools and techniques from their homelands. Butter moulds were particularly useful for marketing butter as it allowed producers to form a quantity of butter with a desired weight, while the stamp could be used to identify the butter maker. The stamps were also decorative, with symbols and designs reflecting particular regions.
Moulds and stamps were initially carved by hand from wood, often by the farmer who made the butter. Production eventually moved to factories that could quickly produce moulds and stamps in larger quantities. Butter moulds and stamps were popular from the mid-1700s until the early 1900s, but gradually fell out of use as butter became mass-produced in facilities called creameries.
Many artifacts related to butter moulds and stamps can be found in the Ingenium collection, below.

Artifact details
Butter mould, circa 1890
Manufacturer: Unknown
Artifact no. 1987.0387.001
People used butter moulds, like the one pictured above, to shape butter into rectangular blocks, and imprint them with designs. This particular mould is Canadian-made from maple wood and metal fittings. The design on the stamp consists of the letters SRL (possibly the initials of the butter maker) with stars on both sides surrounded by vertical and horizontal lines.
Fun fact
Butter stamps typically have agricultural themed designs, such as cows and different types of grains and flowers.
Files for downloading
3D printing files
Download and print your very own butter mould and butter churn! These .stl files can be reproduced as needed for your classroom, and can be used in the activities above.
- Butter churn (ZIP, 1.5 MB)
- Butter stamp (ZIP, 1.4 MB)
- Editable butter stamp stl and skp files (ZIP, 110 KB)
You may also be interested in
Butter making field trip
Students meet the calves and cows in the dairy barn and discover where milk comes from. In the museum’s lab, they’ll transform cream into butter, ready for tasting!
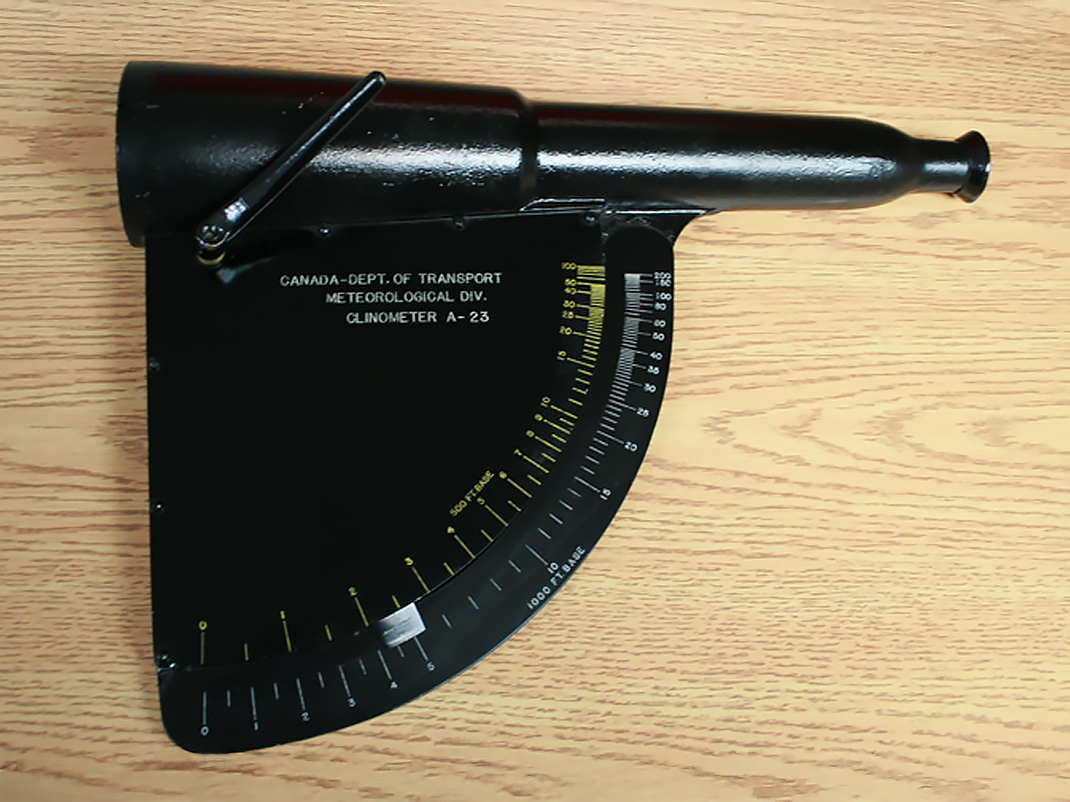
Clinometers
Find out how you can use a clinometer to determine how tall something is in your everyday life! Students can explore this 19th century tool through this educational resource from Ingenium, including downloadable 3D files and activity sheets.
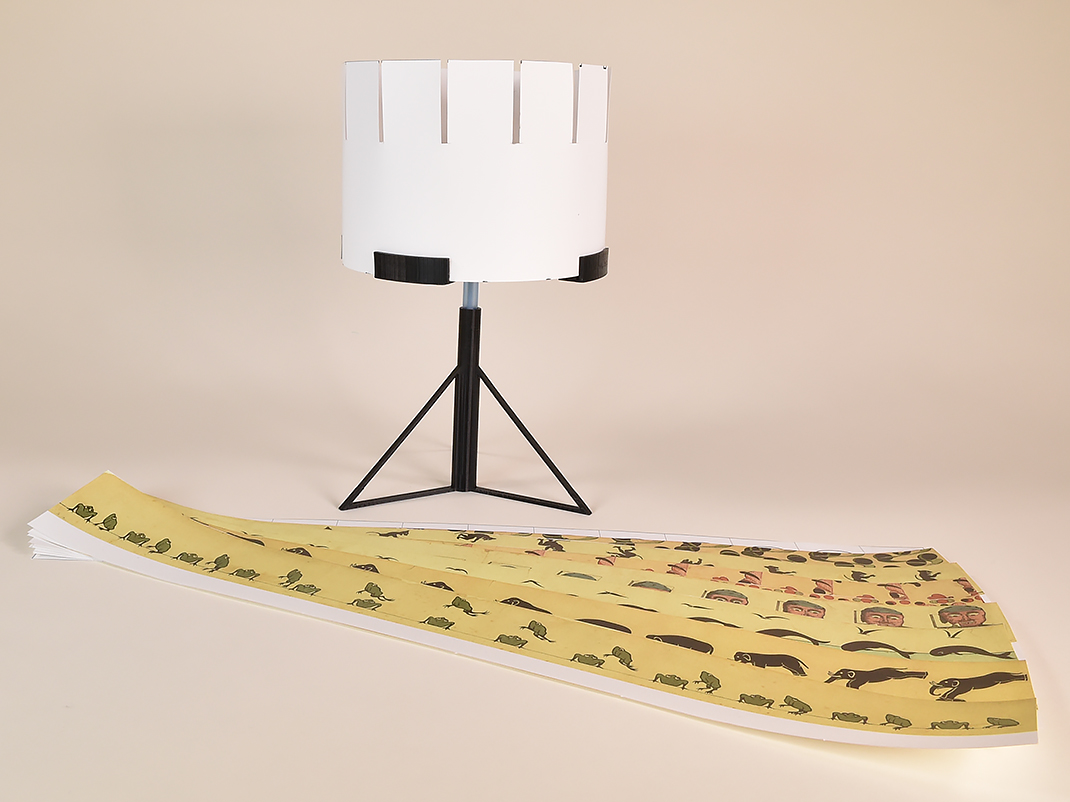
Zoetrope
Explore the zoetrope, an early animation device that uses an optical trick to make moving images. This lesson plan contains instructions on how to build your own 3D-printed zoetrope, assemble it and make it work. Students will be enthralled by the science behind this artifact from the Ingenium Collection.