Anatomical model
Learning about the capabilities of our organs
Grades 5 to 9 (Ontario)
Elementary cycle 3 to Secondary cycle 2 (Quebec)
The human body is an amazing living machine. It contains complex organs that perform all sorts of functions that work together to keep us alive. Find out more about how they do this in a series of fun mini-activities and demonstrations.
With the downloadable 3D files and activities below, students explore the amazing work our organs perform to keep our bodies functioning. Emphasis is placed on visual demonstrations that show the scope of work our organs do.
The 3D files (.stl) for each of the anatomical model parts can be downloaded as one ZIP file. Educators are welcome to reproduce these files or the activity sheets as necessary for the classroom.
Share :
Curriculum links
Through this activity, you and your students will use an anatomical model to go through a series of mini-activities and demonstrations about our body’s organs. This activity can be connected to multiple aspects of the school curriculum.
Grade 5
Science (Human organ systems)
Elementary cycle 3
Instructions
These activities can be done either with a 3D printed anatomical model or through viewing the 3D model with a computer program. Feel free to add your own contributions and explore parts of the model not covered in this document.
Materials
- 1 measuring cup
- 1 tablespoon (15 mL)
- 2 bowls (around 1 L each)
- 1 ruler
- 1 measuring tape
- 750 mL vinegar
- 1 3D printout of the anatomical model or 3D files of the anatomical model and software* to view the files
- 1.65 m yarn
- 900 mL water
* Note: There are many free programs available to view the 3D files. Some examples include Sketchup Make and 3D Builder, which is included with Windows 10.
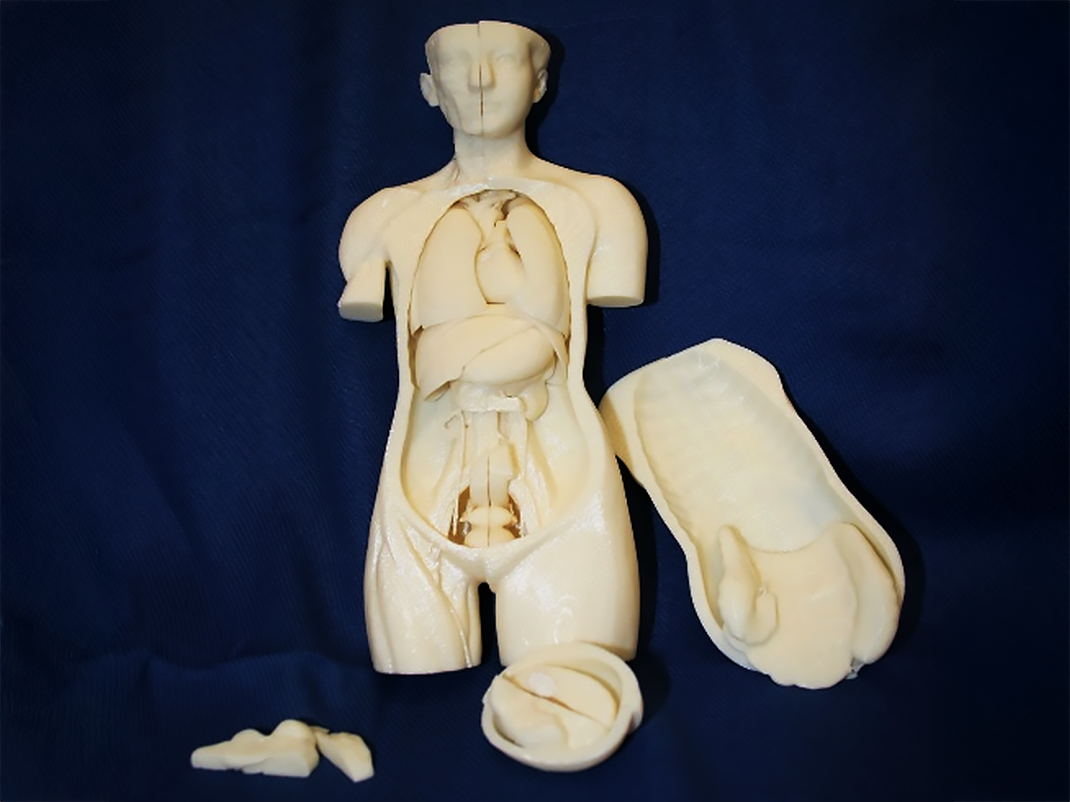
Assembling the anatomical model
If you are having trouble putting together the anatomical model, you can find below a video and a series of diagrams that should help. These images also contain the names of the pieces that will be used in this activity.
Note: To attach the pieces together you can use a substance like adhesive putty or poster tack.
[Light, pleasant music plays]
[Text on screen: How to Assemble Your 3D Printed Anatomical Model]
[Text on screen: The heart]
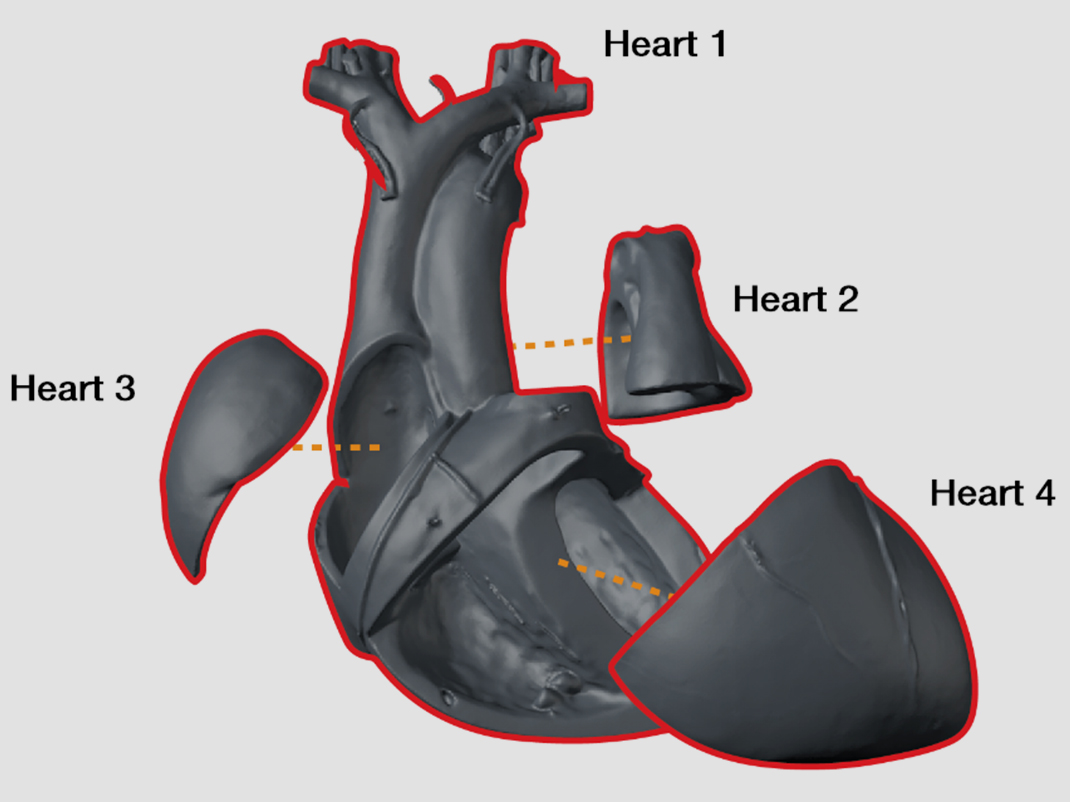
[Text on screen: Heart 1]
[Against a black background, a white plastic piece of the heart model appears.]
[Text on screen: Heart 4]
[A smaller piece appears at the bottom of the screen and fits into the Heart 1. The model rotates 180 degrees.]
[Text on screen: Heart 3]
[A piece appears on the bottom and slides into the middle of the model.]
[Text on screen: Heart 2]
[The model the flips. A piece approaches from the left and settles into the model. The model then exits through the top of the screen.]
[Text on screen: The brain]
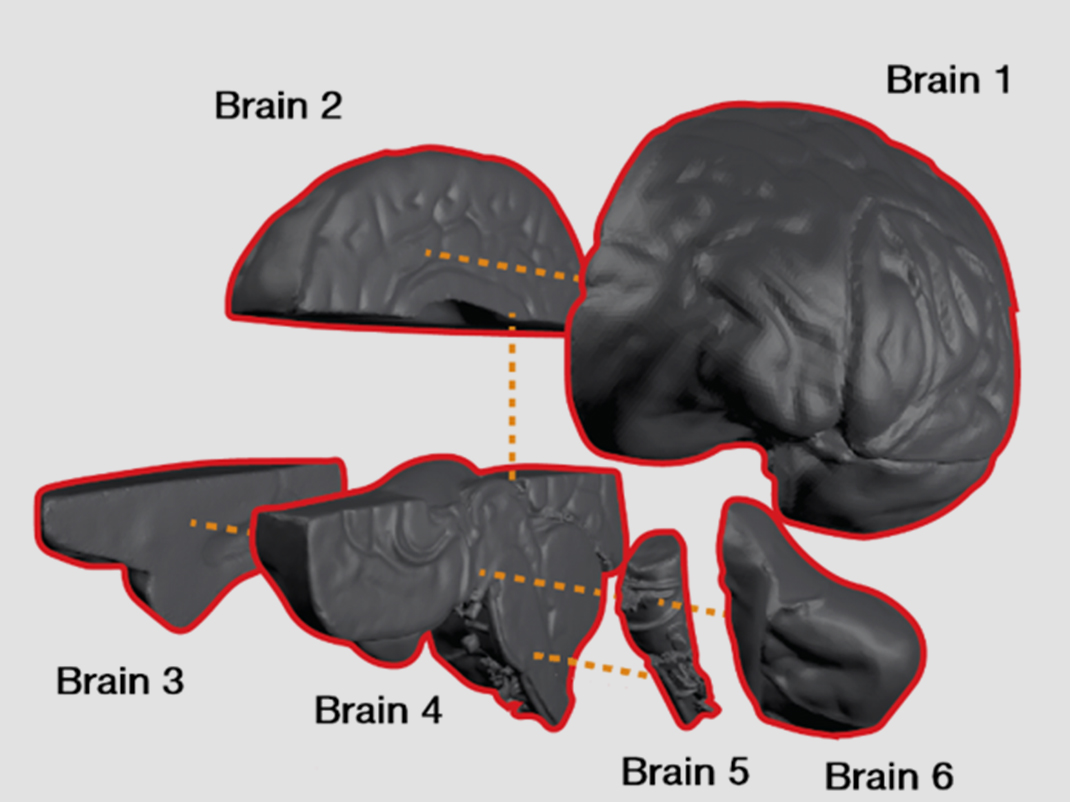
[Text on screen: Brain 1 and Brain 2]
[Against a black backdrop, 2 ovoid white plastic pieces enter the screen from both sides. The two sides meet in the middle and come together.]
[Text on screen: Brain 4]
[Another plastic piece enters the frame on the right and attaches to the model.]
[Text on screen: Brain 3]
[A fourth plastic piece enters the frame on the right and attaches to the model.]
[Text on screen: Brain 6]
[A smaller piece appears on the left of the screen and attaches to the model.]
[Text on screen: Brain 5]
[A small piece enters the frame at the bottom and attaches to the middle of the model, and the completed model then exits the screen through the top of the frame.]
[Text on screen: The body]
[Text on screen: Liver]
[A white plastic piece enters the frame through the bottom. ]
[Text on screen: Diaphragm]
[Another piece enters the frame from the top, and comes together with the Liver in the centre. The model then exits the frame at the bottom.]
[Text on screen: Reproductive Organs 1 and Reproductive Organs 2]
[Two white plastic pieces emerge in the bottom quadrants of the screen and approach each other. The two pieces the connect and exit the screen through the bottom.]
[Text on screen: Liver and diaphragm]
[The largest piece of the model, a hollow torso appear on screen. ]
[Text on screen: Stomach ]
[A small white plastic piece representing the stomach slides into the cavity. ]
[Text on screen: Reproductive organs]
[The stomach piece appears on the left of the torso and slides into the cavity.]
[Text on screen: Right lung 1 and left lung 1]
[Two small plastic pieces are added inside the cavity.]
[Text on screen: Heart]
[A small white piece representing the heart is added to the body cavity.]
[Text on screen: Right lung 2 and left lung 2]
[Two new pieces appear inside the cavity.]
[Text on screen: Intestines]
[A new plastic piece appears in the lower portion of the cavity. ]
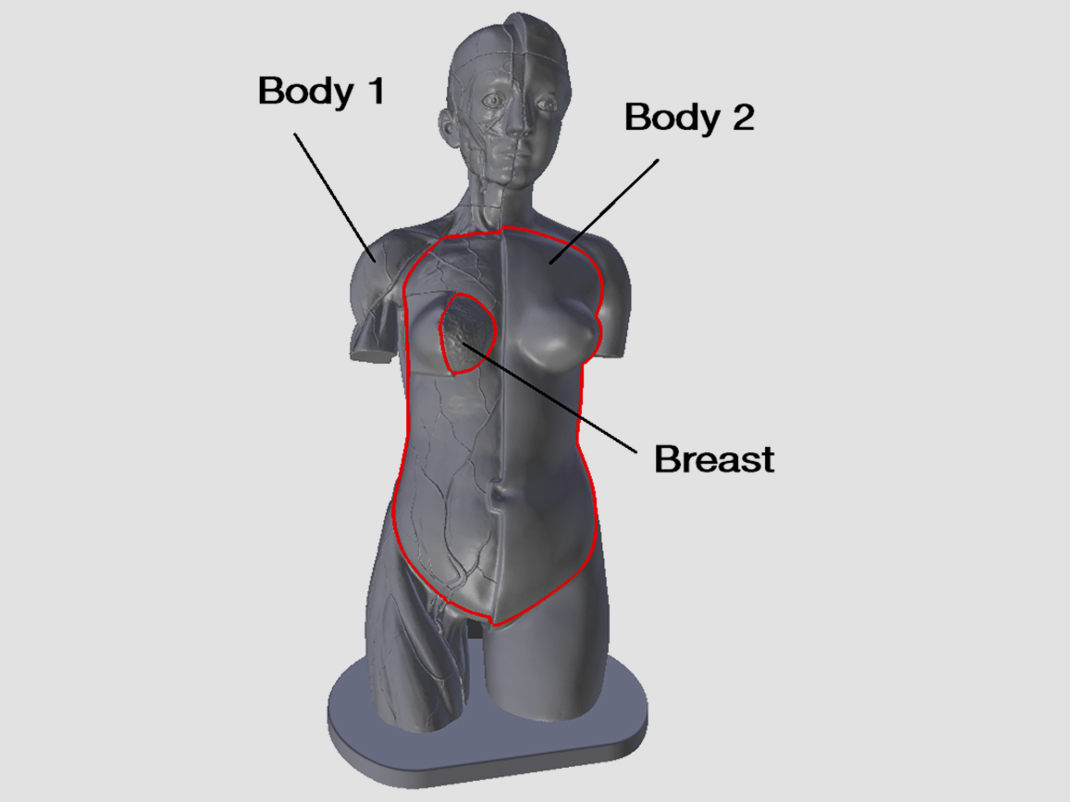
[Text on screen: Body 2]
[A plastic piece appears on top of the cavity, covering the organs. ]
[Text on screen: Breast]
[A small plastic piece appears on the upper-right portion of the body.]
[Text on screen: Head 2]
[A small plastic piece moves into the left side of the screen and slides into the model. ]
[Text on screen: Brain]
[A small plastic piece slides into the top of the model’s head. ]
[Text on screen: Head 1]
[Another small plastic piece appears at the top of the screen slides down to become the top of the model.]
[The image of the competed model fades and is replaced by Ingenium’s logo on a white background.]

Suggested order of construction:
- Diaphragm, liver and stomach
- Completed reproductive organs
- Intestine
- Right lung 1 and left lung 1
- Completed heart
- Right lung 2 and left lung 2
- Head and completed brain
The brain
Pieces of the model
Background information
You can think of the brain as the control centre of the body. It directs voluntary and involuntary movements and it allows humans to form thoughts, emotions and make plans for the future. The human brain is very complex and is one of the main things that distinguishes us from other living organisms.
If you take a look at the surface of the human brain it’ll look folded and wrinkly (see image below). In an actual brain, this folding only occurs in the upper couple of millimetres. This part of the brain is called the cerebral cortex. The folding allows the cortex to perform many of the more complex actions that we see in humans, such as strategic planning and multitasking. We also see similar folding in certain other mammals, such as pigs and dolphins. You and your class can find out just how much folding occurs in the demonstration below!
Activity/demonstration
Materials
- 4 letter-sized (8.5“ x 11“) pieces of paper
- Tape
- 3D printout of brain
Instructions
- Hold up 4 pieces of paper taped together and show it to your class.
- Inform your class that, when unfolded, the cerebral cortex of a human would have the same surface area of the 4 pieces of paper (which is approximately 2322 cm2).
- Have your class take a look at the brain model. Can they guess the size of the unfurled cerebral cortex of the 3D model? It would have an area of approximately 514 cm2, which is slightly smaller than a letter-sized piece of paper.
The heart
Pieces of the model
Background information
The heart is the organ that is responsible for moving blood through the body. This is very important because without this movement, useful materials (such as oxygen and nutrients) could not reach the rest of the body and waste products produced by the body’s cells (such as carbon dioxide) could not be taken away.
To accomplish this, the human heart is divided into a right and a left side. Each side is then divided into two chambers (the atrium and ventricle) and the two chambers work together to act like a pump. So, in total, the heart consists of four chambers which form two pumps, one on the left and one on the right. We’ve labelled the four chambers on the “Heart 1” piece in the image below.
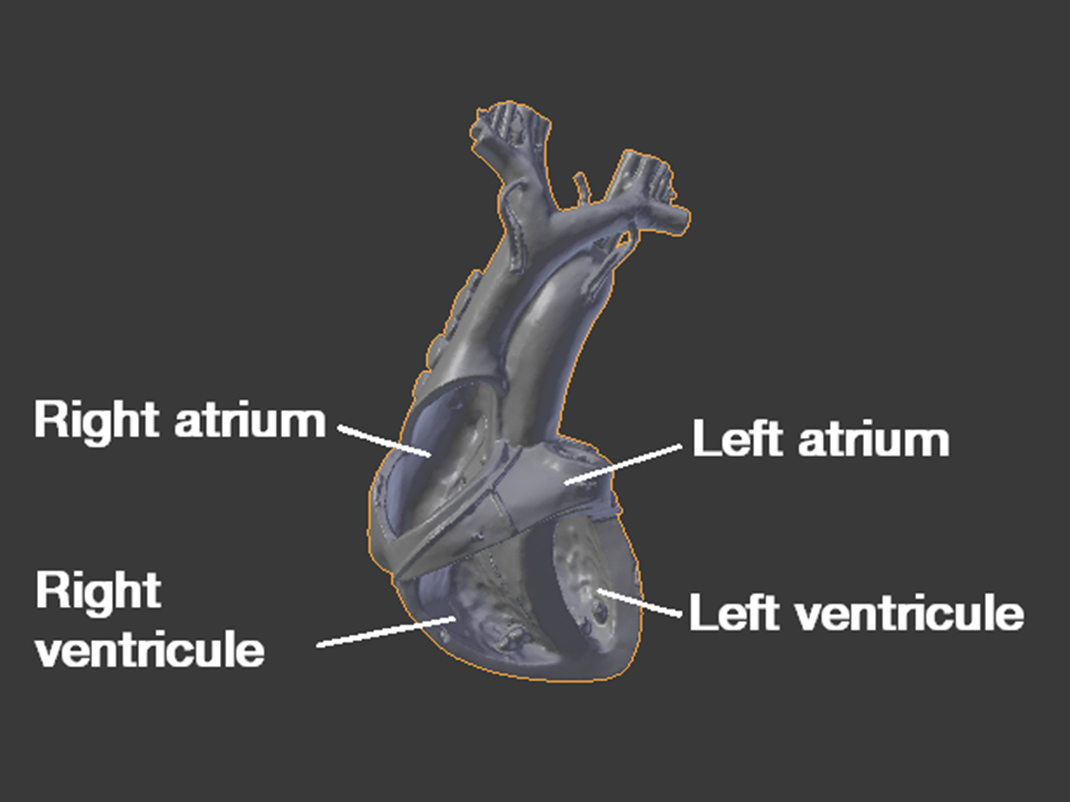
The way that the heart works is that deoxygenated blood (blood with low levels of oxygen) enters into the right atrium. It then moves into the right ventricle before it is pumped to the lungs. At the lungs it becomes oxygenated (filled with oxygen), at which point it returns to the heart through the left atrium. Similar to before, the blood then goes to the left ventricle, before it is pumped to the rest of the body. Because it needs a lot more force to pump the blood through the entire body the left ventricle tends to be stronger than the right one.
To keep humans alive and healthy, the heart needs to pump an enormous amount of blood throughout your body. How much blood? You and your class can find out in the activity below.
Activity/demonstration
Materials needed
- 2 bowls (approximately 1 L)
- 900 mL water
- 1 tablespoon (15 mL)
Instructions
- Check to see if anyone in your class can guess how much blood a heart pumps in a day. A healthy adult human heart at rest will beat at around 70 beats per minute, which translates to pumping 7200 litres of blood in a day!
- Show your class the model of the 3D heart. Can anyone guess how much blood the 3D model heart could pump out? It can pump out around 1300 litres per day or about 900 mL per minute.
- Measure out 900 mL of water into one of bowls to show your class how much this is. If we assume that a heart beats 70 times per minute, this means that each beat of the 3D model heart will transport around 13 mL of blood. Give one of your students a tablespoon (which is 15 mL) and see if they can transfer all 900 mL of the water into the second, empty bowl, in a minute.
The lungs and diaphragm
Pieces of the model needed
Background information
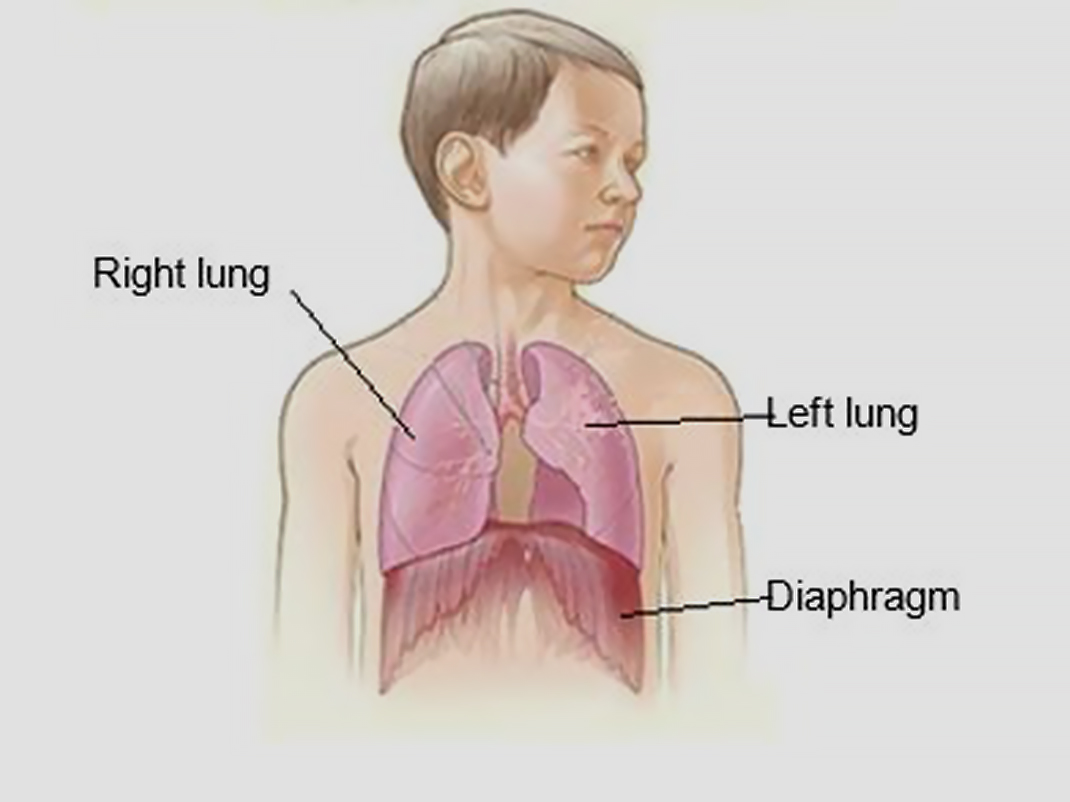
The lungs are responsible for putting oxygen into blood. This is, obviously, very important as we need oxygen to survive. On a very broad basis, the lungs work by filling themselves with air (which contains oxygen) and transferring the oxygen to deoxygenated blood (blood without a lot of oxygen). To explain how this is accomplished, let’s start with the diaphragm. The diaphragm is a flat, dome-shaped muscle that is found just beneath the lungs (see image below). When this muscle is contracted, it flattens, which in turn causes the chest to expand and air to enter the lungs (inhalation). Alternatively, when it relaxes, the opposite occurs and air exits the lungs (exhalation).
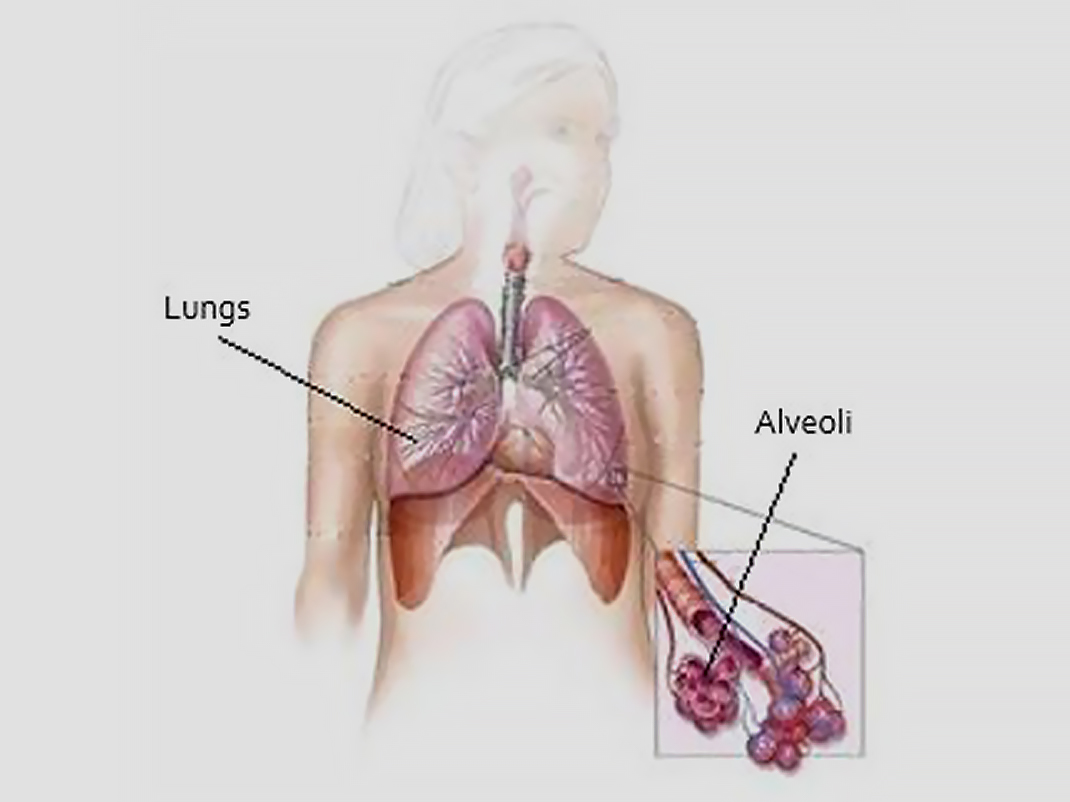
When you inhale, the air enters your lungs, goes through various passageways and eventually ends up in many small thin sacs called alveoli (see image above). On the surface of each alveoli there are a lot of blood vessels. Oxygen can diffuse (or move) from the air in the alveoli into the blood vessels and carbon dioxide will diffuse from the blood into the air. This is how our blood gets oxygenated and how we can get rid of carbon dioxide. In a typical adult, there are a lot of alveoli in your lungs, about 300 million of them. The surface area of all of the alveoli added together would be about the size of a tennis court!
Humans have two lungs to accomplish all of these tasks. Have you or your class ever wondered if they are the same? Find out in the demonstration below.
Activity/demonstration
Materials needed
Instructions
- Have your class take a look at the left and right 3D model lungs. Hopefully they notice that they are pretty big organs!
- Next have your class compare the size of the left and right lungs. What do they notice?
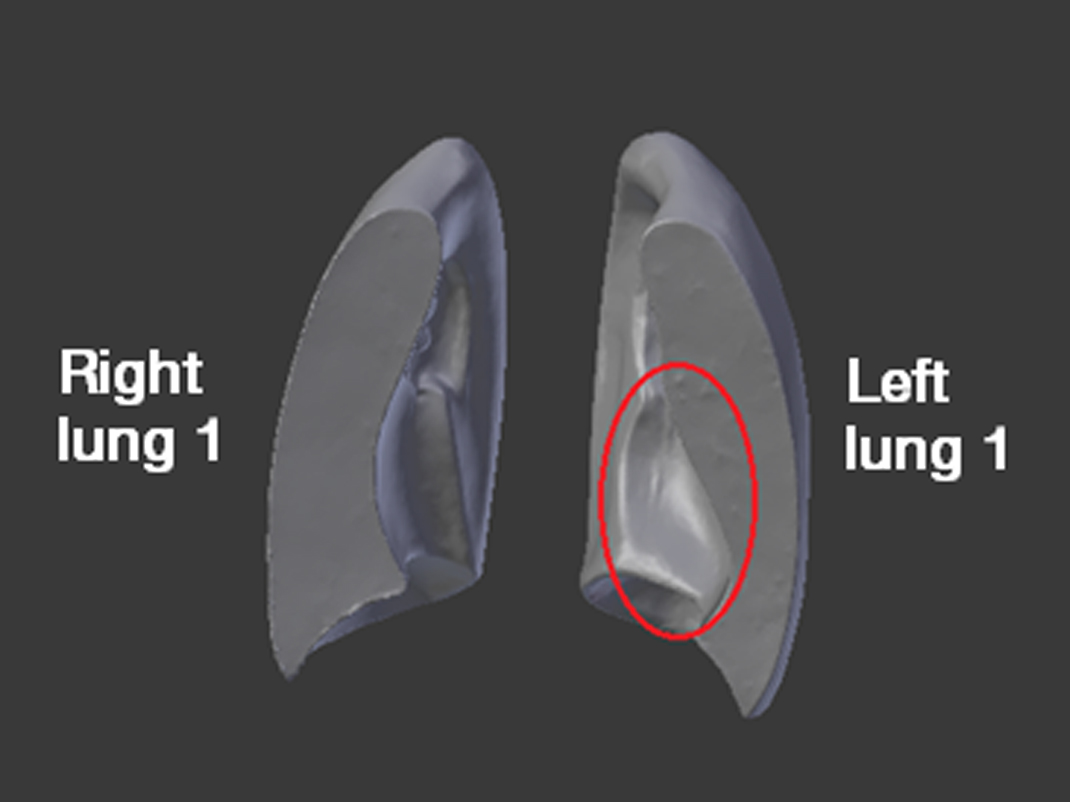
One thing they may notice is that the left lung has a somewhat large empty space in it. Can they guess why this space is there? This space is called the “cardiac notch” and it is where the heart of a person is located. It is also why, even though the right lung is a bit shorter than the left lung, the right lung has a larger volume. An image of “left lung 1” and “right lung 1” can be found above with the cardiac notch circled in red.
Stomach and liver
Pieces of the model
Background information
Both of these two relatively large organs are involved in the digestion of food. The stomach is where the food arrives after it has been chewed and swallowed. Here the food is broken down. This process is both mechanical, through contractions of the stomach which churn and knead the food, and chemical, through secretions of enzymes and stomach acid (also called gastric acid). Most of the food is not absorbed in the stomach, though some iron and highly fat-soluble substances can be. The end product produced by the stomach is called “chyme”, which is then transported to the small intestine.
The liver also plays an important role in digestion. One of its main functions is to produce a liquid called bile. Bile is transported to the small intestine where it helps with the absorption of fats. Another well-known function of the liver is that it helps detoxify some of the things that a person eats (such as alcohol). The liver is the largest gland in the body, it weighs a bit over 1 kilogram in a healthy adult. It also has the amazing ability that, when damaged, it can regrow! There is a limit to this regrowth, though, so too much damage means that an individual will need a transplant.
Do you and your class want to learn more about stomach acid? In the activity below, you and your class can run some interesting experiments to see what types of things stomach acid can break down.
Activity/demonstration
Materials
- 250 mL vinegar
- 1 coated pill (such as coated aspirin)
- 1 bowl
- 1 uncoated pill (such as uncoated aspirin)
- Small pieces of different types of food
Instructions
- Pour 250 mL of vinegar (or any substantial amount) into the bowl.
- pH is a measure of how acidic a liquid is; the lower the number the stronger the acid. Stomach acid has a pH between 1 – 3, while vinegar (acetic acid) has a pH of 2. Thus, while they are not exactly the same, vinegar can be used as an approximation of stomach acid.
- Put in different pieces of food into the vinegar to see what is broken down and what is not. You can also try stirring the vinegar to simulate the churning that goes on in the stomach.
- An interesting thing to try is to put in the coated and uncoated pills. The uncoated pill should dissolve relatively quickly, whereas the coated one will dissolve slowly. Researchers have used this characteristic to design pills so that they dissolve (and thus be absorbed) at certain points of the digestive system.
The intestines
Pieces of the model
Background information
The intestine is found just underneath the stomach and it is where most of the digestion of food takes place. It is also where digested food is either absorbed by the body or is made into feces so that it can be expelled. The intestine is divided into the small intestine and the large intestine. The small intestine is connected to the stomach and it is where most of the digestion and absorption of the food takes place (pictured below).
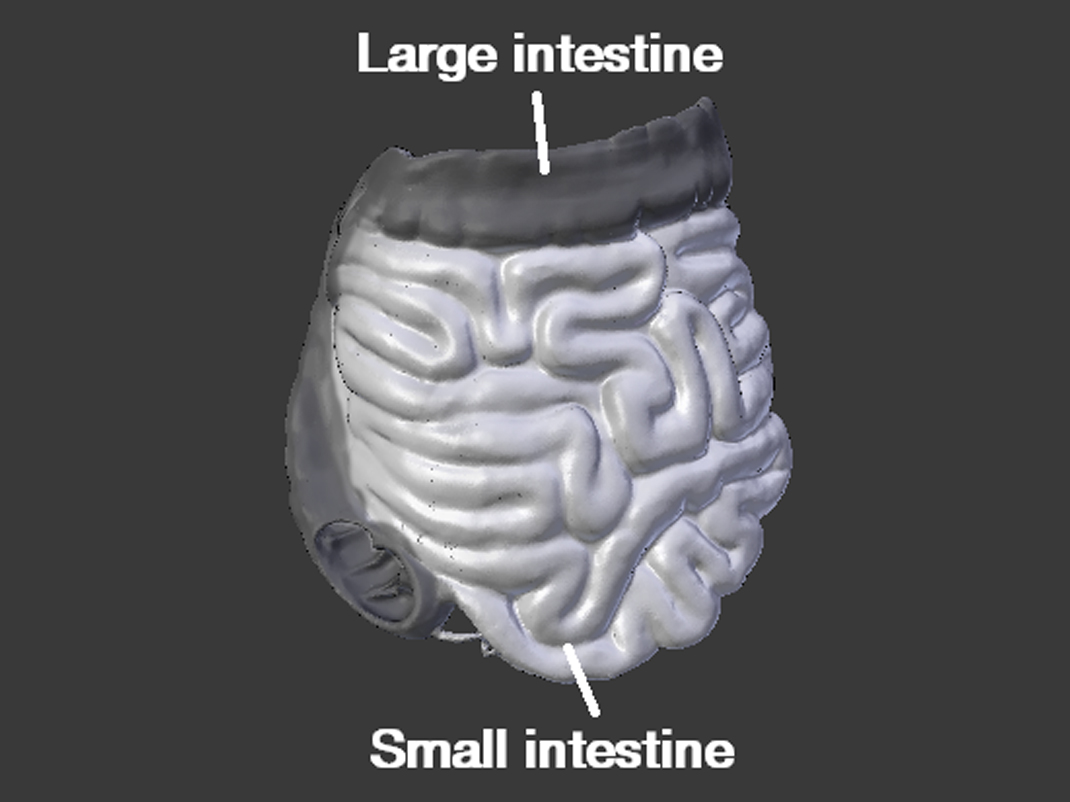
After the small intestine comes the large intestine. The large intestine is larger in diameter but shorter in length. Note that while it cannot be seen in the image, the large intestine is also found along the left side of the small intestine (which is on the right side of the image). The large intestine is the main place where water and salts are absorbed. In addition, bacteria complete the digestion of the food and produce the B vitamins and vitamin K that the human body needs. Anything not absorbed by the large intestine is eventually expelled out of the body as feces.
To accomplish all of these tasks, the intestine needs to be pretty long! How long is it? Find out more in the activity below.
Activity/demonstration
Materials needed
- Yarn (1.65 m)
- 1 scissors
- 1 measuring tape
Instructions
- Explain to your class the role that intestines play. You can inform them that, when unwound, the intestine of an individual would measure around 7.5 metres (6 metres for the small intestine and 1.5 metres for the large).
- Show your class the model of the intestine, what do they notice? One of the main things that they should notice is how folded up it is. This is so that all of the intestines can fit inside a human body.
- See if your class can guess the length of 3D printed intestine if it was unwound. It would have a length of around 1.65 metres! To give your class a sense of this length, measure out 1.65 metres of yarn and compare it to the height of your students. Alternatively have two of your students go up to the front of the class and stand 1.65 m away from each other.
Ingenium has more than 150,000 objects in its collection, including many related to anatomical models.
Artifact: Anatomical model
Anatomical models are representations of the structures and organs found in an organism, most often humans. While their main purpose has usually been educational in nature, anatomical models have also been used as a means of communicating with patients by doctors as well as for entertaining the public. Throughout the history of their manufacture and use, they represent the changing relationship between society and the medical culture.
In the Western world, the creation of the first educational anatomical models occurred at the end of the 17th century. Initially models were mainly made out of wax due to its malleability and its resemblance to actual human flesh. But as time went on, wax models became less and less favoured due to such things as they’re high costs and tendency to be easily deformed.
As a result, in the 19th century, anatomical models began to be made out materials such as wood, plaster and papier-mâché. In particular papier-mâché was popular due to its low cost and ease of manufacturing. Now, models are commonly made out of plastic and can even be entirely digital. This has allowed people to explore the human body in a whole new way, such as through transparent models, interactive computer programs and 3D printing.
Many artifacts related to anatomical models can be found in Ingenium’s collection.
Artifact details
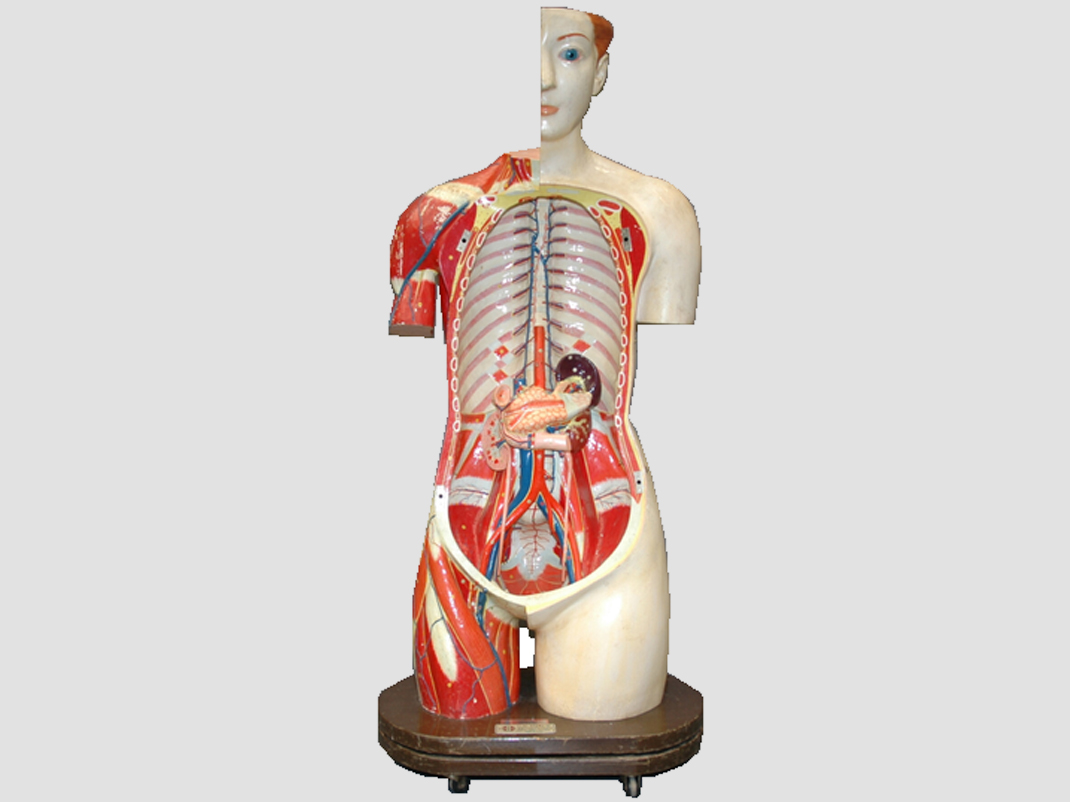
Anatomical model, circa 1930 – 1950
Manufacturer: Unknown
Artifact no. 2002.0539.001
The anatomical model seen here is of a female torso and head and was distributed by Clay Adams, Inc. It is mainly made out of papier-mâché on wood and had a height of 51 cm and a width of 30 cm. While the torso is relatively sturdy, the models of the organs are fragile. It was originally owned by a Dr. Yankoff of Toronto, who regularly used it to communicate with his patients.
Fun fact
Ingenium’s artifact collection contains a 1931 wax hand model made by Maria Wishart, the founder of the medical illustration program at the University of Toronto.
Files for downloading
3D printing files
Download and print your very own anatomical model! The .stl files can be reproduced as needed for your classroom, and can be assembled by following the instructions in the video above.
You may also be interested in

Butter-making artifacts
Make your own butter in your classroom with these 3D printable files and activities. Then, create a stamp to decorate and name your butter with a butter stamp like the kind used in the 18th and 20th centuries.
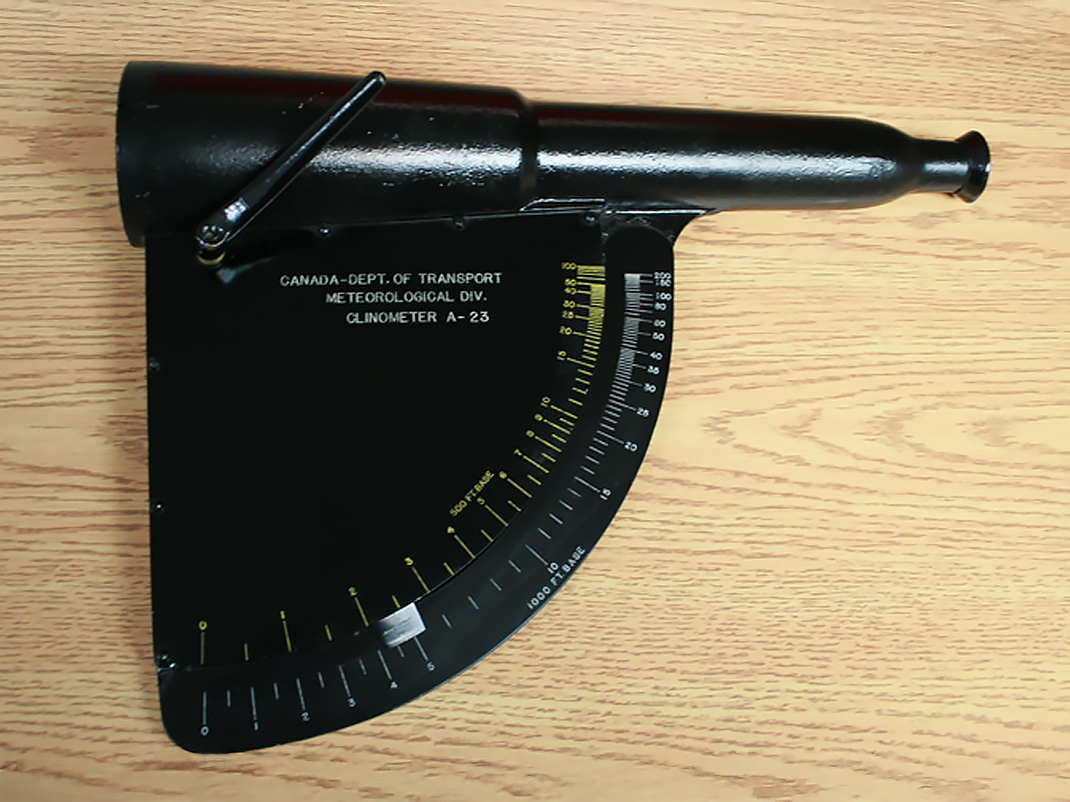
Clinometers
Find out how you can use a clinometer to determine how tall something is in your everyday life! Students can explore this 19th century tool through this educational resource from Ingenium, including downloadable 3D files and activity sheets.
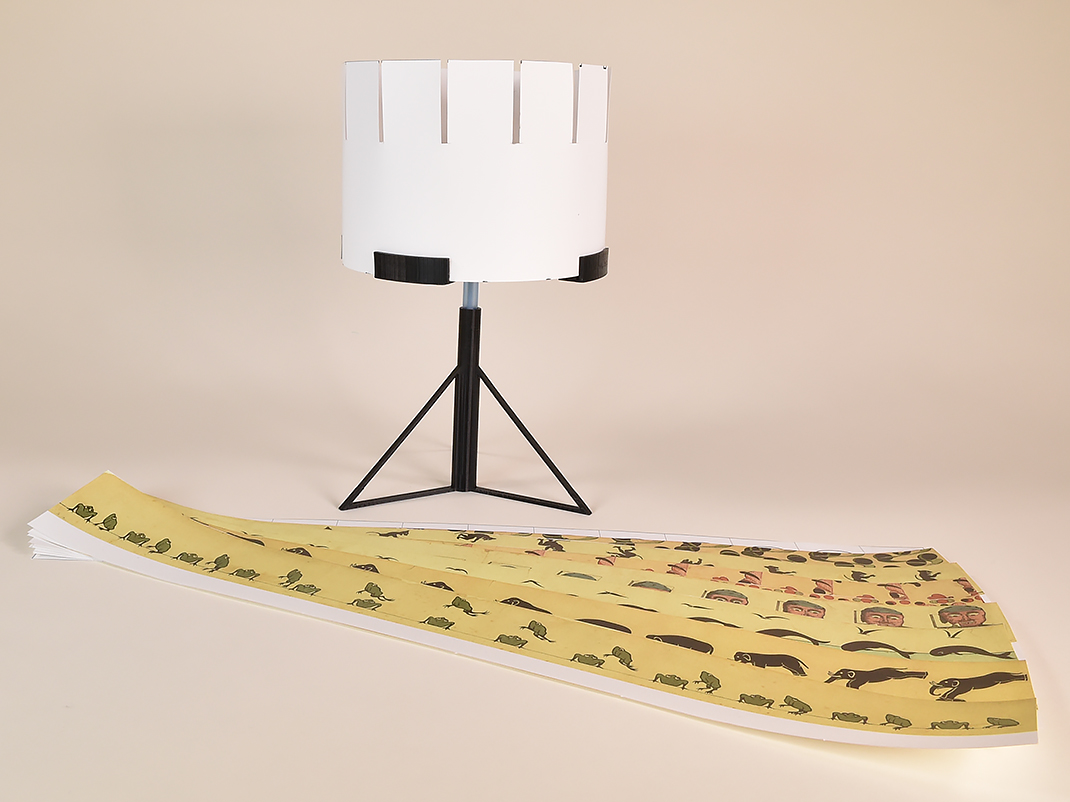
Zoetrope
Explore the zoetrope, an early animation device that uses an optical trick to make moving images. This lesson plan contains instructions on how to build your own 3D-printed zoetrope, assemble it and make it work. Students will be enthralled by the science behind this artifact from the Ingenium Collection.